Featured Blog Posts
June 2, 2021
13 min Read
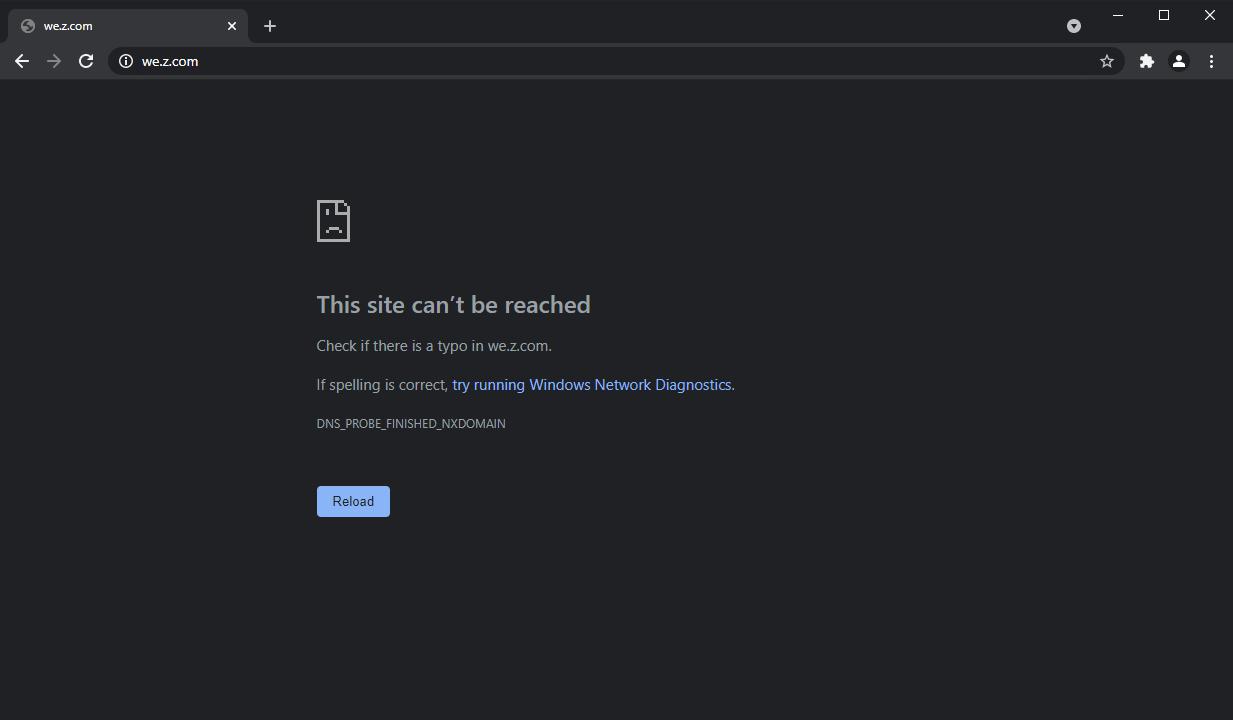
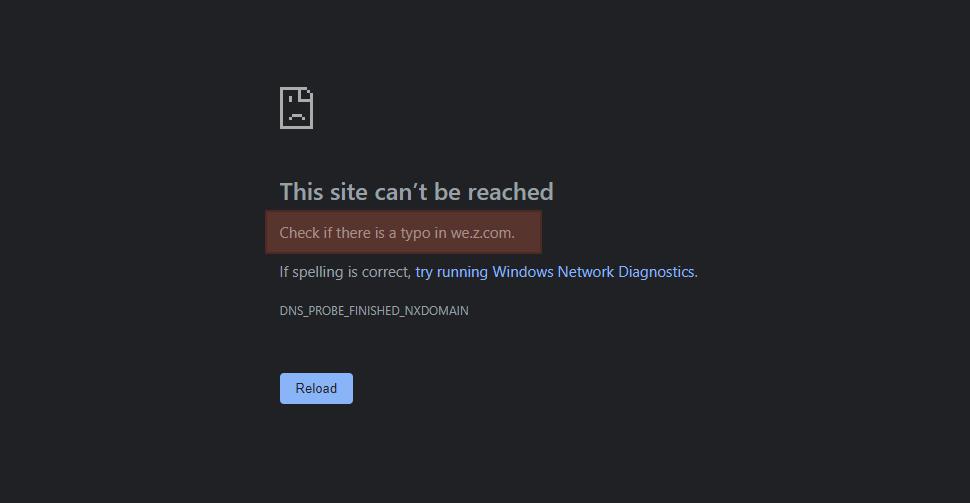
How to Fix the DNS_PROBE_FINISHED_NXDOMAIN Error in Chrome
The internet connection here in the Philippines maybe a little bit shaky at times, which would cause you to encounter various errors including DNS_PROBE_FINISHED_NXDOMAIN. However, you could still get this error even with a fine internet connection.
So what really causes this error to pop out? Is it only specific to Google Chrome? What can you do to fix it? Does fixing it requires technical skills?
In this article, we’ll dig a bit deeper into the DNS_PROBE_FINISHED_NXDOMAIN and see what causes it. Then, you will learn what you can do to fix it on your side, whether you’re using Windows or Mac OS.
Let’s get started!
 DNS, short for Domain Name System, is a system that handles the translation of a domain name into an IP address and vice versa. That’s why you could use a domain name like https://web.z.com/ph/ instead of typing in 163.44.130.61.
Think of it like this — whenever you enter a link in Chrome (or in any browser), the DNS would connect that link to the actual IP address of the actual server of the website. This process requires name resolution and querying nameservers to find the actual IP address.
Now, whenever the name resolution process fails, you might receive the DNS_PROBE_FINISHED_NXDOMAIN error.
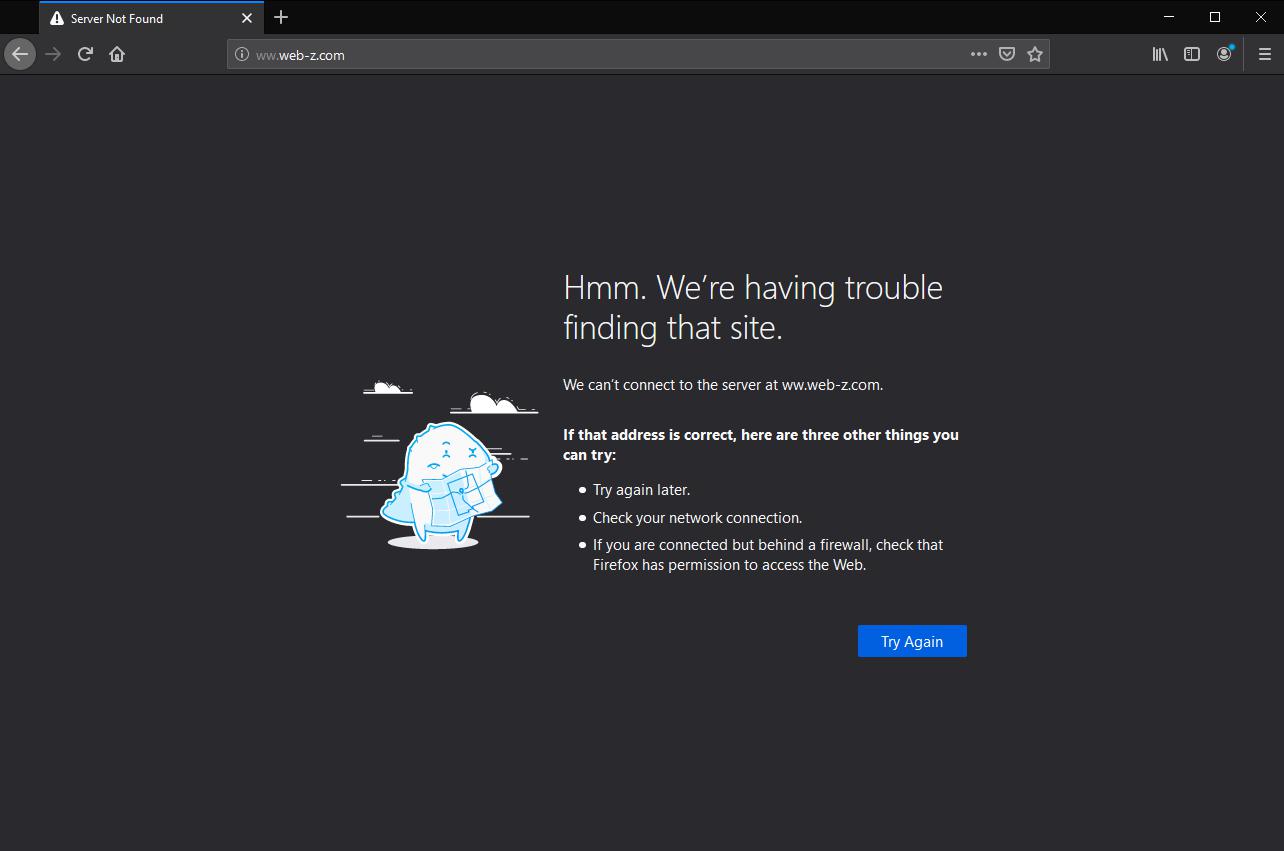
For example, when using Firefox, you would get this error:
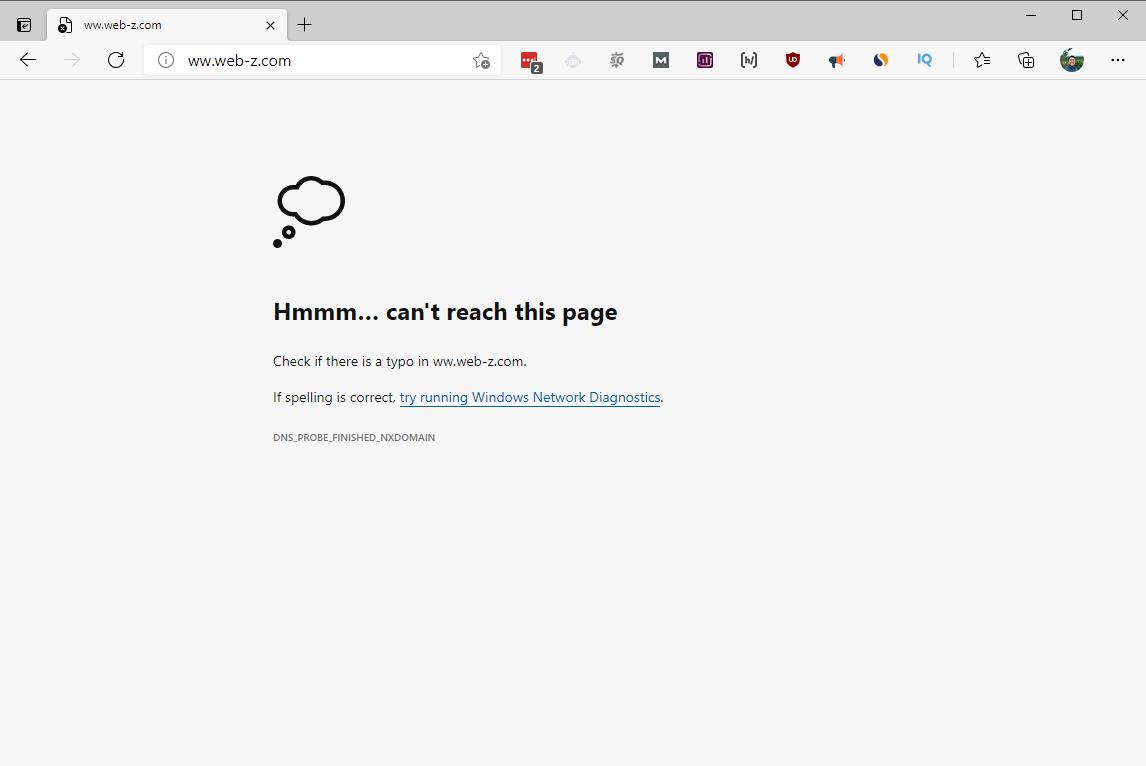
 Some chromium-based browsers like Microsoft Edge may display an error quite similar to Google Chrome as shown below:
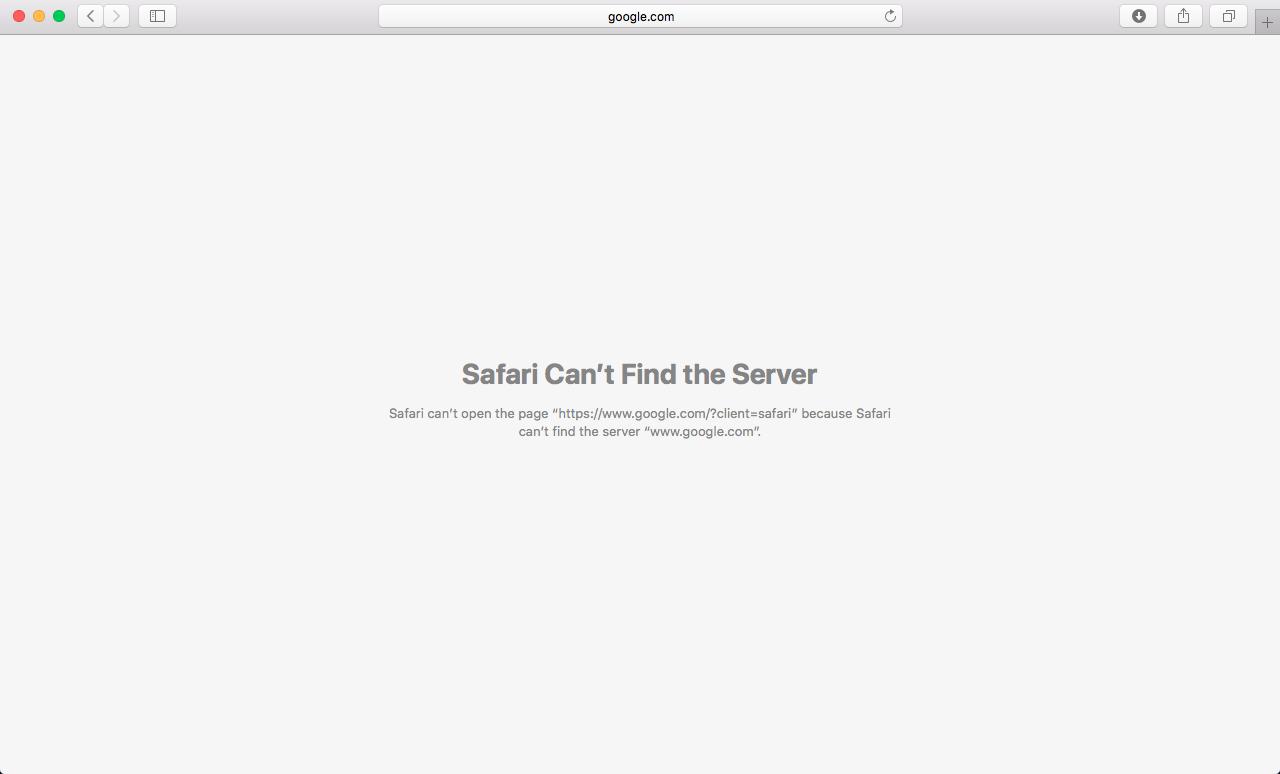
 DNS error could also happen while using Safari, though the error would look like this on screen:
 The bottom line is, the DNS error could happen while using any browser. But it’s only Chrome and other chromium-based browsers that actually display the DNS_PROBE_FINISHED_NXDOMAIN error to the user.
Here are ways to fix the DNS_PROBE_FINISHED_NXDOMAIN error:
This is why recent updates in Google Chrome include mentioning a line for checking if there is a typo in the URL that you entered.
 If you’re certain that there are no errors in the URL, another simple but effective fix is to restart your computer. It’s quite possible that a bug may have wreaked havoc on your system, including your browser and DNS settings.
If the error still persists, then you will have to use the more sophisticated fixes below.
Windows
To clear the cache on Windows, you must open your system’s command prompt in administrator mode.
Follow these steps:

 Windows will then let you know if the DNS flush was successful.
Mac
The process is a bit similar in Mac.
Here are the steps:

 However, unlike in Windows, the system will not provide you any feedback once the process is complete. But you can be assured that it did.
 Google Chrome
Google Chrome also stores a separate DNS cache from the operating system, which is why you must also flush it especially when Chrome is your main browser.
Follow these steps:
 Like with Mac, you wouldn’t see an indication of whether or not the command was successfully executed. However, you may notice that Google Chrome would sort of blink for a second after pressing the button.
Now, if flushing the DNS didn’t solve the issue, you may have to change the DNS servers on your system.
Plenty of people though prefer to use Google DNS (8.8.8.8 and 8.8.4.4) as it’s actually more reliable than other public DNS servers.
Note that if you’re already using a public DNS server, you could also switch back to your default DNS servers. Public servers aren’t always 100% and errors may still occur. Switching back may solve the problem on your end.
Windows
There are two ways to change the DNS servers on Windows. The steps below will outline to you the easiest method so far.
Here are the steps:


 After doing all the steps, restart your browser for the changes to take effect.
Mac
You could also change the DNS servers in Mac.
Follow these steps:


 Similarly, make sure to restart your browser for the changes to take effect.
There are three ways to do this:
Windows Command Prompt
To use the command prompt to restart the DNS client services, follow these steps:

 In the event that you encounter feedback from the system on how your request is invalid, try out other methods.
 This feedback informs you that you must run command prompt as a network service in order to restart the DNS client service.
Windows Services Manager
This method will require you to literally open Windows Services and restart the DNS client service from there.
Here are the steps:

 If you’re still unable to make changes, try out restarting the DNS client service through the System Configuration.
Windows System Configuration
In this method, you would be able to restart the DNS client service using the Windows System Configuration manager.
Follow these steps:

 After restarting the DNS client service, restart your computer for the changes to take effect.
Windows
In Windows, you will have to use the command prompt once again.
These are the steps:

 If this is the first time you’ve heard about Winsock, it’s simply the service that handles internet application requests on your computer. After doing the changes, restart your computer first before visiting the website.
Mac
Releasing and renewing your IP address is Mac is not as complicated. All you got to do is access the advanced settings of your network.
Follow these steps:


 After renewing your IP address, restart your computer.
To make it simple, every time you visit a website, your computer will check the hosts file first. If it couldn’t find any information, it will then search the DNS system to find the IP address and allow you to access the website.
It’s worth checking the local hosts file and see if the website you want to visit is recorded there. If it is, it might be the one causing the DNS_PROBE_FINISHED_NXDOMAIN error.
Windows
To check the local hosts file in Windows, you will have to use a notepad tool first and search the file from there.
Here are the steps:

 After opening the hosts file, check whether or not the domain name of the website you want to visit is present. If it is, remove it and save the changes.
Mac
In Mac, the approach is more direct.
Here are the steps:

 Once again, examine the entries within the hosts file. Remove the information of the website you’re trying to access and save your changes.
This is where the problem lies. One of those changes may be causing the DNS_PROBE_FINISHED_NXDOMAIN error.
To solve this, you could reset Google Chrome settings back to default. You can do this by entering chrome://flags in the URL bar.
Then, click on the Reset all box and relaunch the application.
 It’s important to note here that even if Google Chrome allows you to try out their experimental features, you need to be careful when using any one of them. If you suspect something is not right, reset your Chrome settings to default immediately.
For that reason, you should consider temporarily disabling your antivirus and VPN software to see whether or not they were the ones causing the problem.
Since each software is different, the method you may have to use would vary. For example, if you’re using Windows Security in Windows 10, you could go to the virus and threat protection settings and disable the security features from there.
 As for disabling VPN software, most of them also have a switch-off button somewhere on their interface. On the other hand, if you’re using Windows, there is a VPN settings page under network and internet settings and disable the software from there.
 If the DNS_PROBE_FINISHED_NXDOMAIN error disappeared while the antivirus and VPN software were disabled, then you can be certain that they have features that may be messing around and causing your DNS name resolution some problems.
Of course, since both software are important to your security, you shouldn’t keep them disabled forever. However, it’s always a good idea to backtrack and analyze which of their features was causing the problem.
As for the error problem itself, it’s actually quite common than you think. Fortunately, as you can see above, it’s also not that difficult to fix.
On the flip side, if you’re the owner of the website that’s giving others the DNS error, it’s important that you choose a hosting service that offers great packages and maintenance services.
For as little as 100 pesos a month, you could already start your own website complete with a free domain for a year, 10 GB SSD storage, 20 email accounts, unmetered bandwidth, and more. All plans include access to our support team available from Monday to Sunday.
So what really causes this error to pop out? Is it only specific to Google Chrome? What can you do to fix it? Does fixing it requires technical skills?
In this article, we’ll dig a bit deeper into the DNS_PROBE_FINISHED_NXDOMAIN and see what causes it. Then, you will learn what you can do to fix it on your side, whether you’re using Windows or Mac OS.
Let’s get started!
What causes the DNS_PROBE_FINISHED_NXDOMAIN error?
The DNS_PROBE_FINISHED_NXDOMAIN error is typically caused by a problem or misconfiguration with your DNS. DNS, short for Domain Name System, is a system that handles the translation of a domain name into an IP address and vice versa. That’s why you could use a domain name like https://web.z.com/ph/ instead of typing in 163.44.130.61. Think of it like this — whenever you enter a link in Chrome (or in any browser), the DNS would connect that link to the actual IP address of the actual server of the website. This process requires name resolution and querying nameservers to find the actual IP address.
Now, whenever the name resolution process fails, you might receive the DNS_PROBE_FINISHED_NXDOMAIN error.
Does this error only exist in Chrome?
To be precise, the DNS_PROBE_FINISHED_NXDOMAIN error is only specific to Chrome and other chromium-based browsers. However, this DNS error is present in all browsers, though there may be some variation on how they were presented to the user.For example, when using Firefox, you would get this error:
Some chromium-based browsers like Microsoft Edge may display an error quite similar to Google Chrome as shown below: DNS error could also happen while using Safari, though the error would look like this on screen: The bottom line is, the DNS error could happen while using any browser. But it’s only Chrome and other chromium-based browsers that actually display the DNS_PROBE_FINISHED_NXDOMAIN error to the user.How to fix the DNS_PROBE_FINISHED_NXDOMAIN error?
Typically, you can narrow down the issue to the browser or device settings. Sometimes, it’s caused by simply entering the wrong link into the browser. Other times, it could be affected by third-party software like antivirus or a virtual private network service.Here are ways to fix the DNS_PROBE_FINISHED_NXDOMAIN error:
Fix #1: Non-Technical Methods
Before heading off to more complex fixes, try double-checking first if you have entered the correct URL. Even a single character deviation could result in a DNS_PROBE_FINISHED_NXDOMAIN error.This is why recent updates in Google Chrome include mentioning a line for checking if there is a typo in the URL that you entered.
If you’re certain that there are no errors in the URL, another simple but effective fix is to restart your computer. It’s quite possible that a bug may have wreaked havoc on your system, including your browser and DNS settings. If the error still persists, then you will have to use the more sophisticated fixes below.
Fix #2: Flush Your Local DNS Cache
Another method to try is flushing the local DNS cache as it keeps the IP address of websites that you have visited. This clears the cache and deletes outdated IP addresses that might be causing the problem.Windows
To clear the cache on Windows, you must open your system’s command prompt in administrator mode.
Follow these steps:
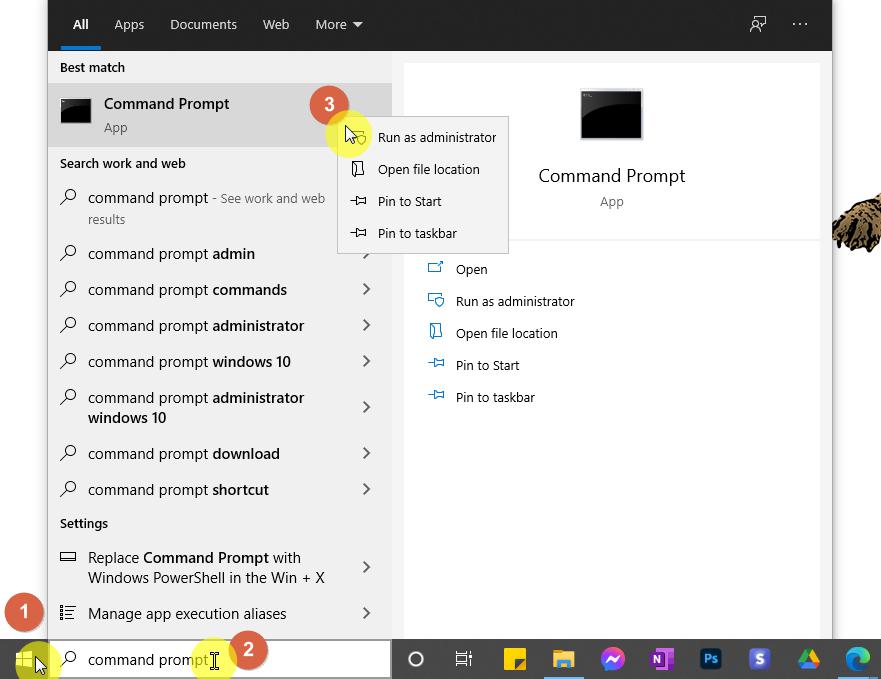
- Open the Start Windows menu by clicking on its button on the rightmost side of your taskbar (or use the search bar directly if it’s enabled).
- Search for the Command Prompt by typing it up.
- Right-click on its logo and select the Run as administrator option.
- Once the command prompt is open, type in ipconfig/flushdns and press Enter on your keyboard.
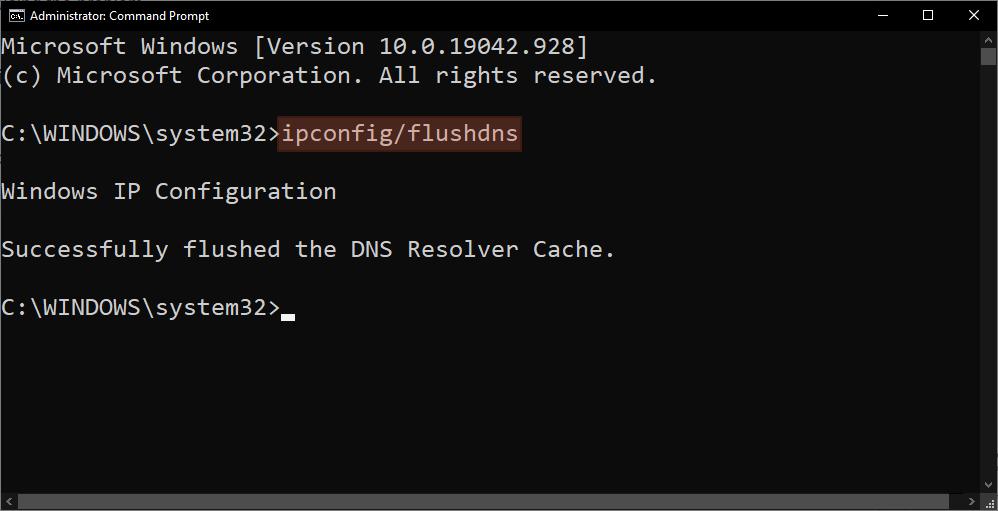 Windows will then let you know if the DNS flush was successful.
 Mac
The process is a bit similar in Mac.
Here are the steps:
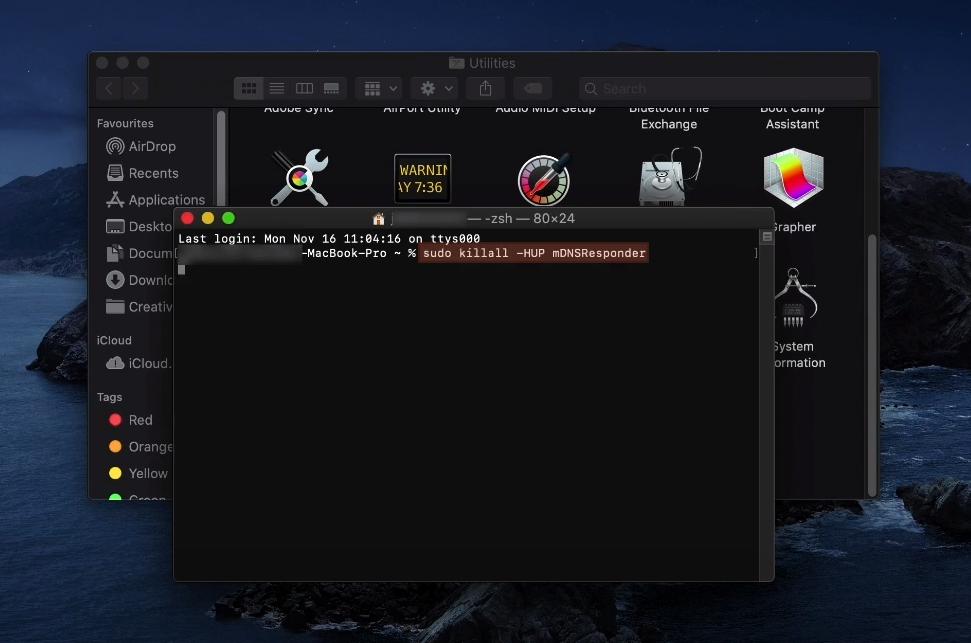
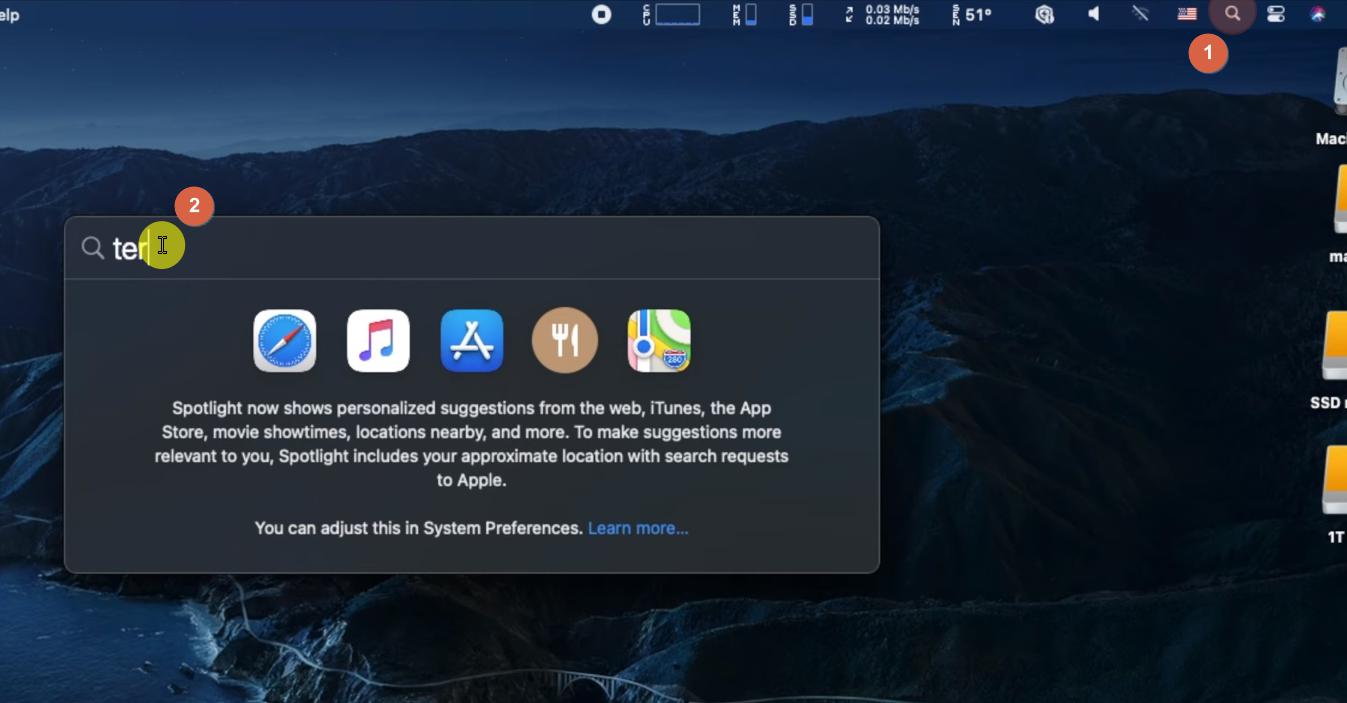
- Open the Launchpad’s search field by clicking on its icon on the upper-right corner of the screen.
- Search for the terminal in the Launchpad’s search field and open the command terminal window.
- On the terminal, enter sudo killall -HUP mDNSResponder and press Enter on your keyboard.
However, unlike in Windows, the system will not provide you any feedback once the process is complete. But you can be assured that it did. Google Chrome Google Chrome also stores a separate DNS cache from the operating system, which is why you must also flush it especially when Chrome is your main browser.
Follow these steps:
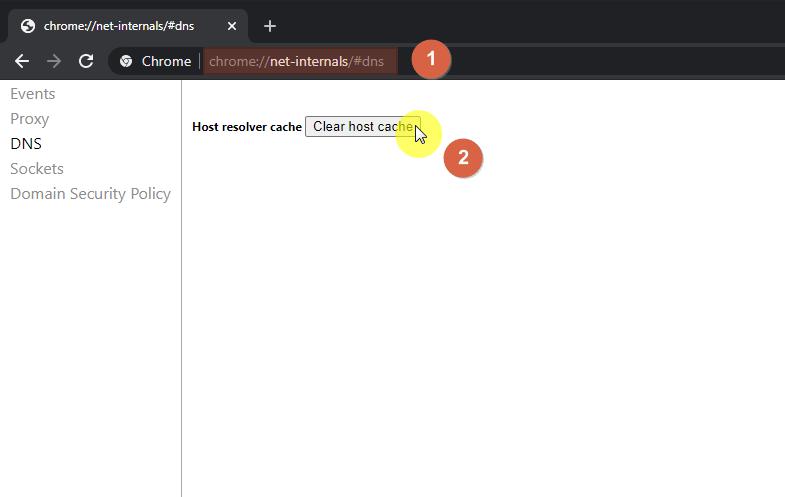
- On Google Chrome’s address bar, enter chrome://net-internals/#dns and press Enter on your keyboard.
- On the opened page, click on the Clear host cache button.
Like with Mac, you wouldn’t see an indication of whether or not the command was successfully executed. However, you may notice that Google Chrome would sort of blink for a second after pressing the button. Now, if flushing the DNS didn’t solve the issue, you may have to change the DNS servers on your system.
Fix #3: Change DNS Servers
By default, it’s your internet service provider that assigns you DNS servers. However, you could always change these settings and point them to a public DNS server like Google, Cloudfare, Open DNS.Plenty of people though prefer to use Google DNS (8.8.8.8 and 8.8.4.4) as it’s actually more reliable than other public DNS servers.
Note that if you’re already using a public DNS server, you could also switch back to your default DNS servers. Public servers aren’t always 100% and errors may still occur. Switching back may solve the problem on your end.
Windows
There are two ways to change the DNS servers on Windows. The steps below will outline to you the easiest method so far.
Here are the steps:
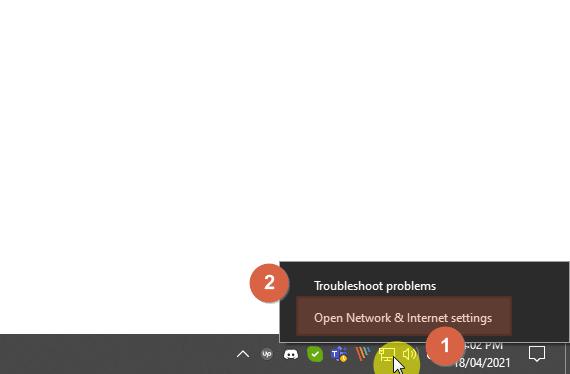
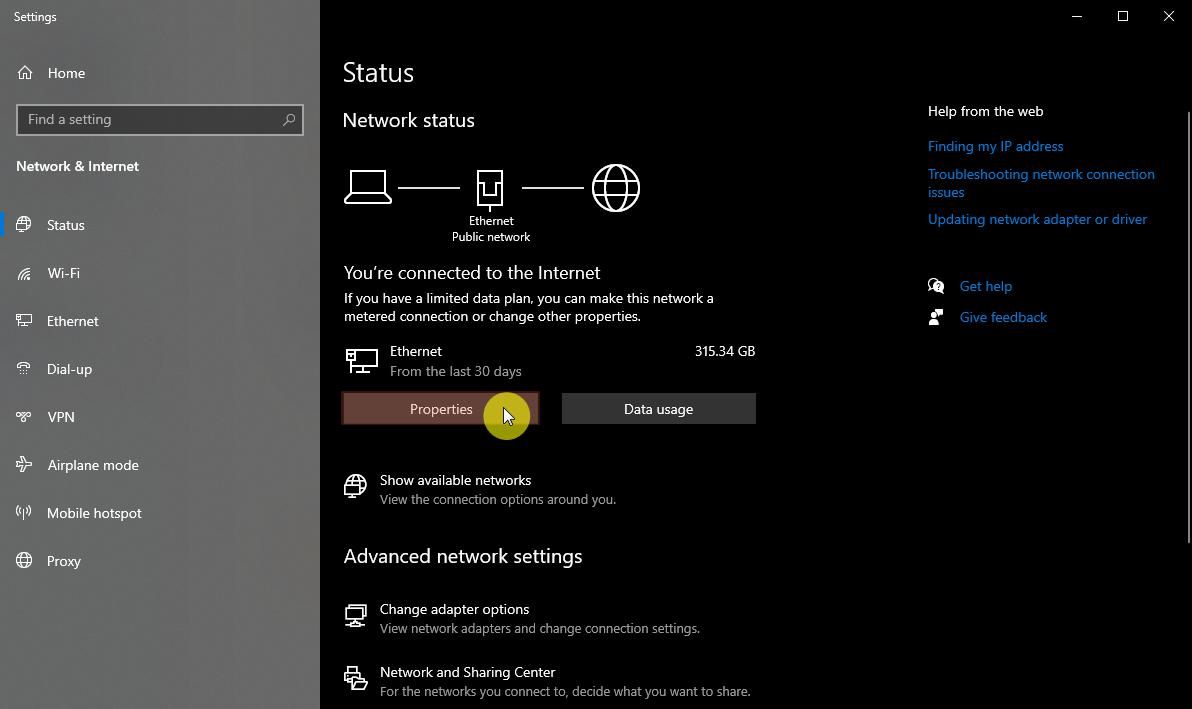
- On the taskbar, right-click on the internet access logo and select Open Network & Internet settings.
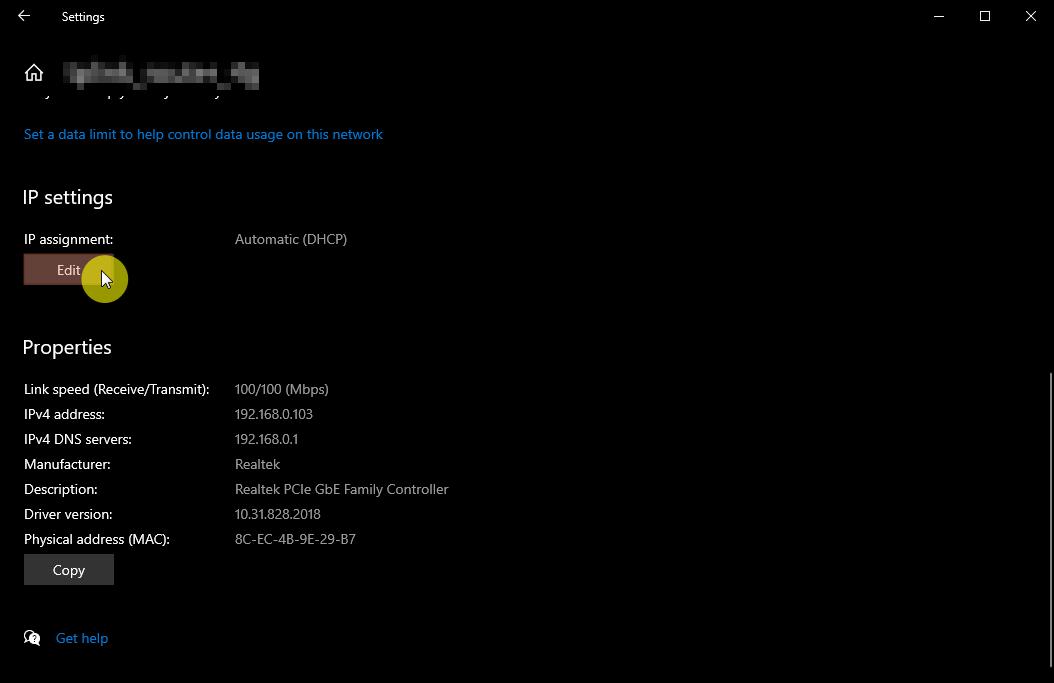
- On the opened window that details your current network status, click on the Properties box under your network type.
- On your network settings, scroll down until you get to the IP settings section and click on the Edit box.
- Then, change the IP settings to Manual, enable IPv4, provide the correct DNS on the appropriate boxes, and save the changes.
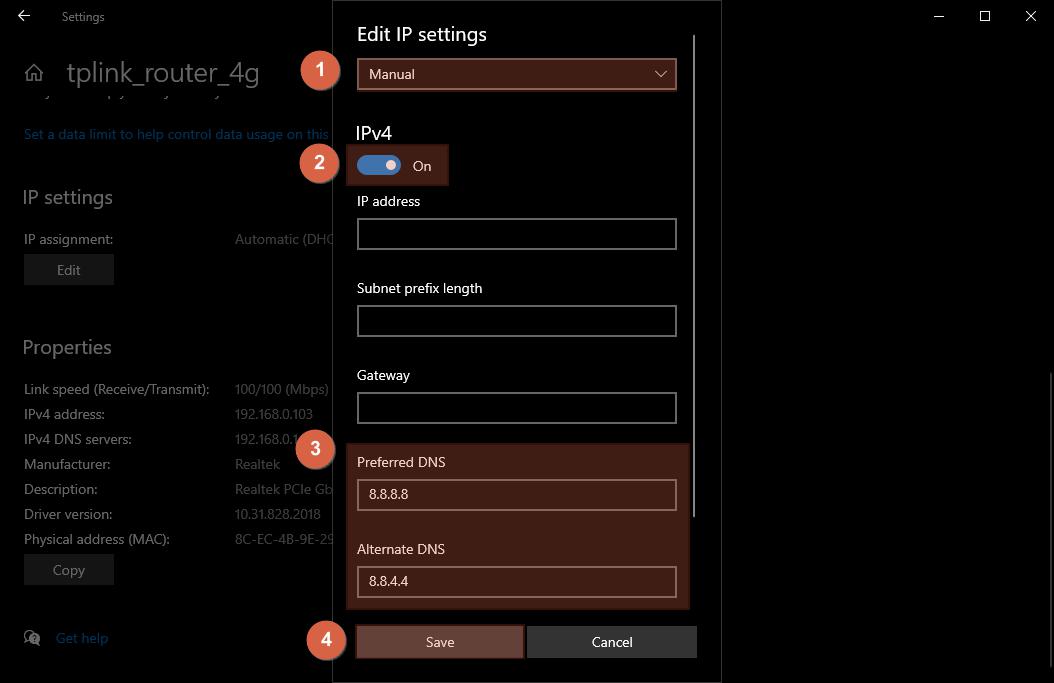 After doing all the steps, restart your browser for the changes to take effect.
 Mac
You could also change the DNS servers in Mac.
Follow these steps:
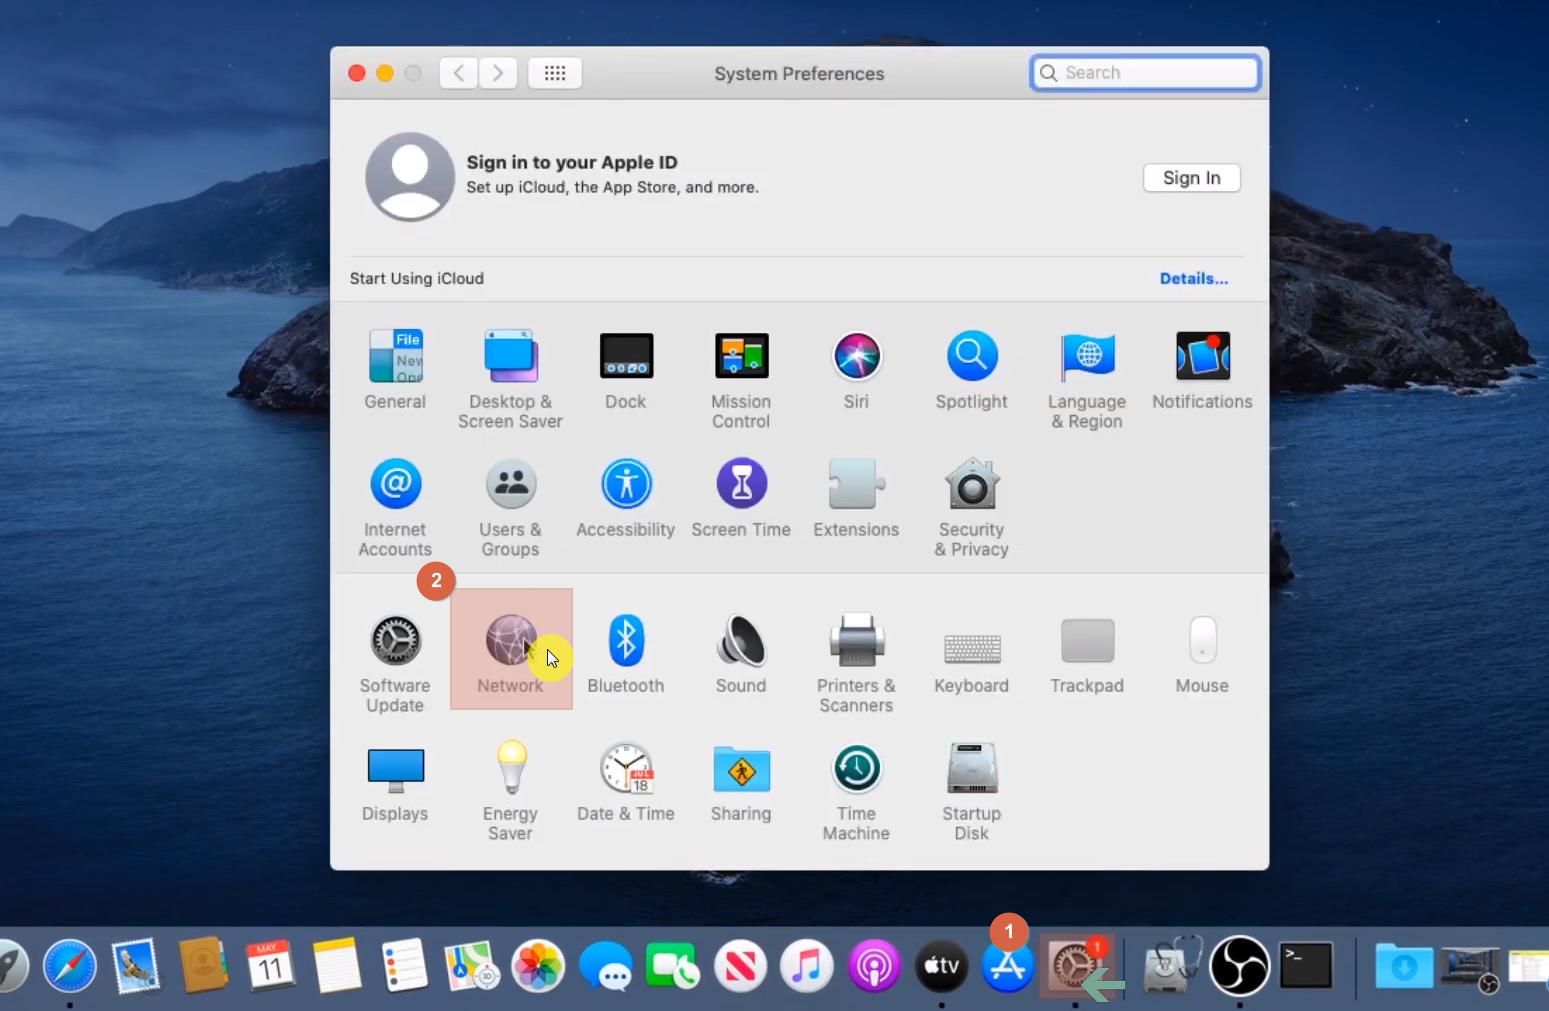
- Open System Preferences in your system.
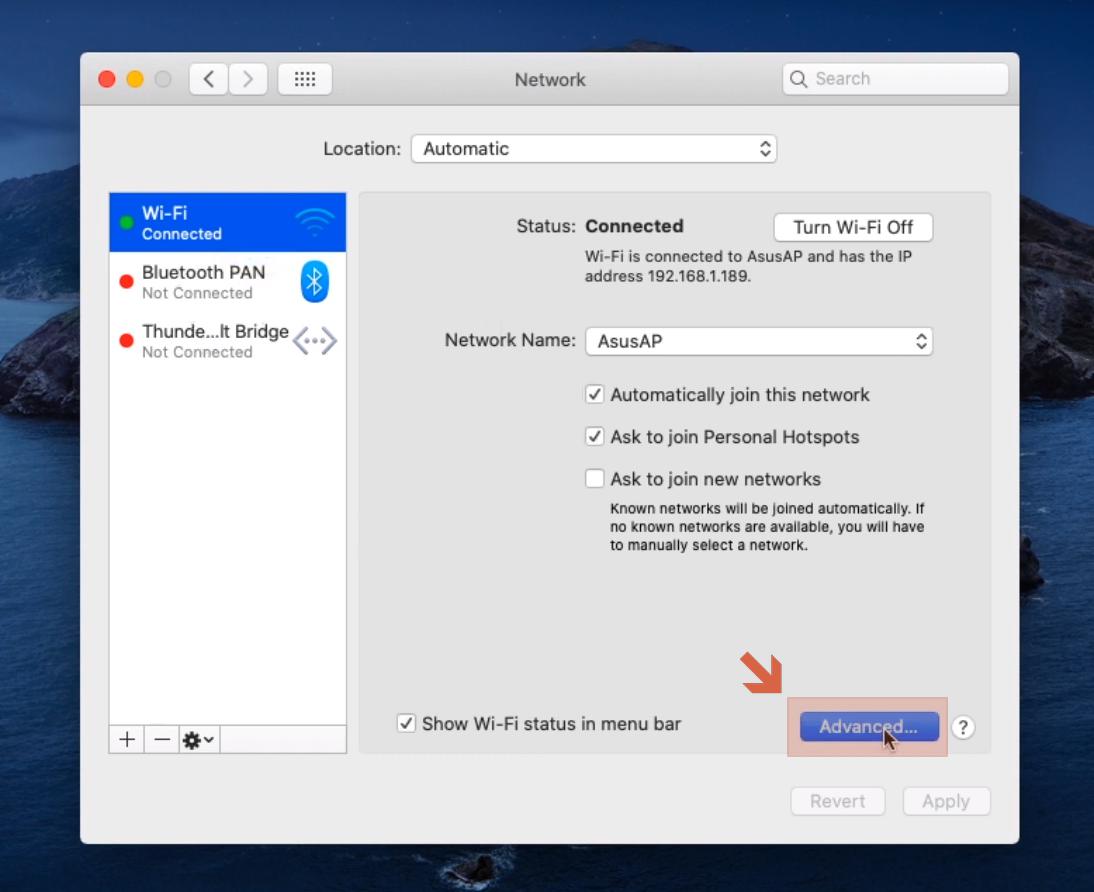
- Click on the Network logo.
- Inside your network settings, click the Advanced box.
- In the advanced settings, go to the DNS tab.
- To add new DNS servers, simply click on the + sign.
- Click OK once you’re done.
 Similarly, make sure to restart your browser for the changes to take effect.
Fix #4: Restart the DNS Client Service
If changing the DNS servers didn’t solve the problem, try restarting the DNS client service itself. Take note that this is only possible if you’re running Windows on your computer.There are three ways to do this:
Windows Command Prompt
To use the command prompt to restart the DNS client services, follow these steps:
- Open Command Prompt in Administrator mode.
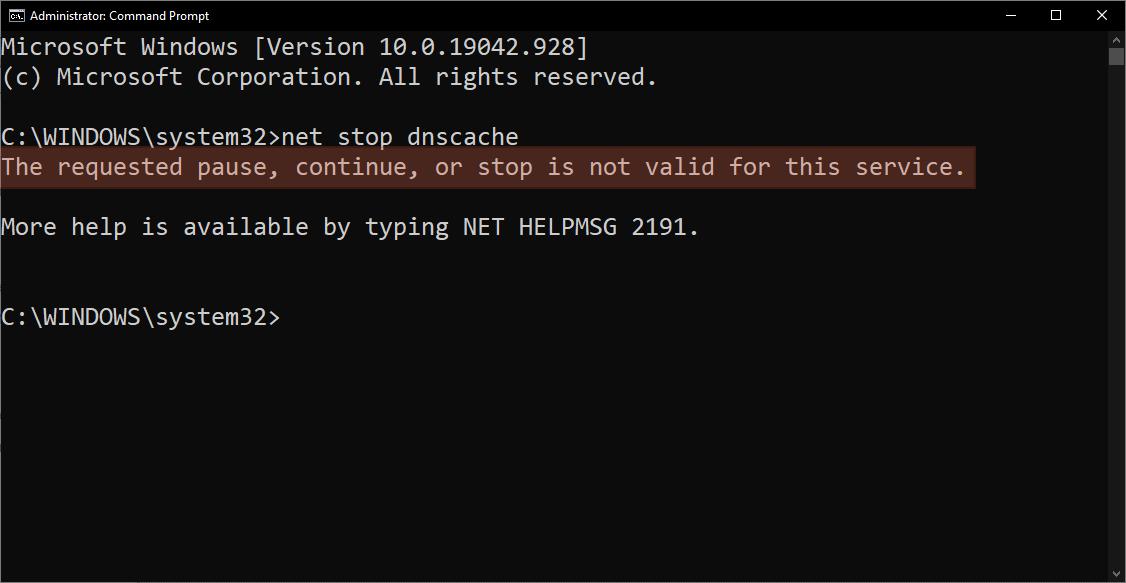
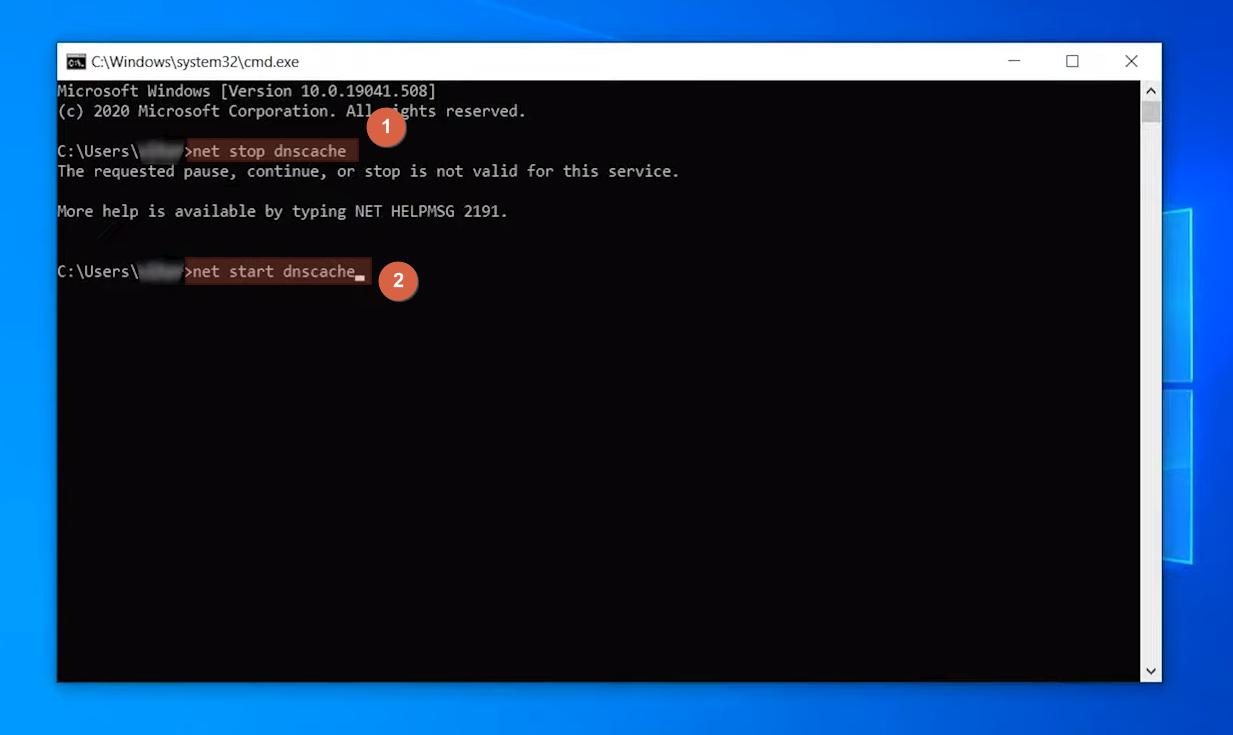
- First, you must stop the DNS server by entering the net stop dnscache command and wait for the system to inform you that the DNS client service has stopped successfully.
- To start the DNS service, enter the net start dnscache command and wait for the system to inform you that the DNS client service has started successfully.
 In the event that you encounter feedback from the system on how your request is invalid, try out other methods. This feedback informs you that you must run command prompt as a network service in order to restart the DNS client service.
 Windows Services Manager
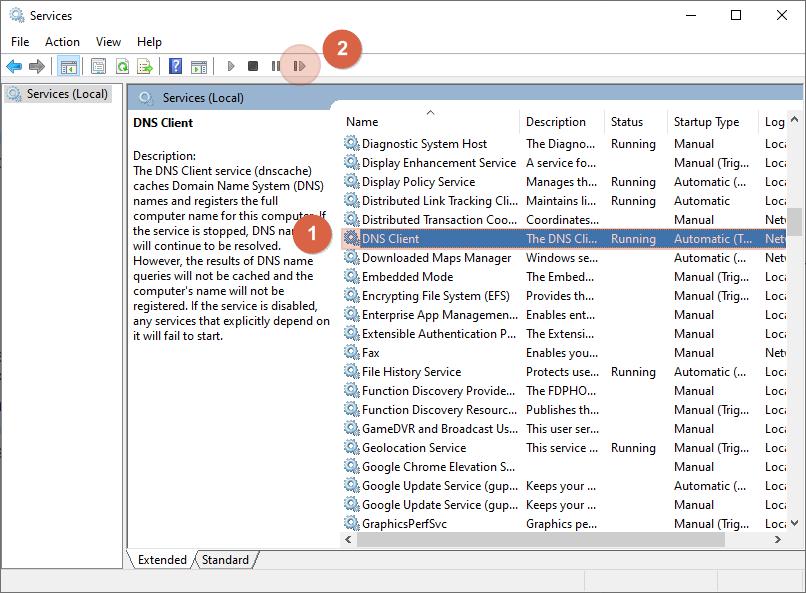
This method will require you to literally open Windows Services and restart the DNS client service from there.
Here are the steps:
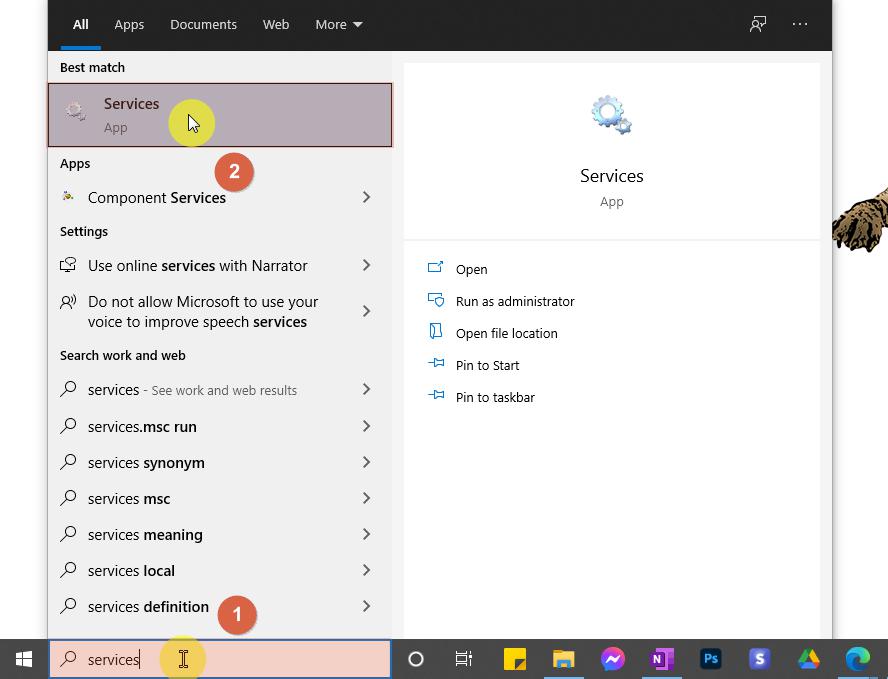
- On your Start Windows menu, search for Services and open it up.
- In the Services Manager, scroll down and find the DNS Client option.
- Once you find it, all you need to do is click on the restart service button at the top.
 If you’re still unable to make changes, try out restarting the DNS client service through the System Configuration.
 Windows System Configuration
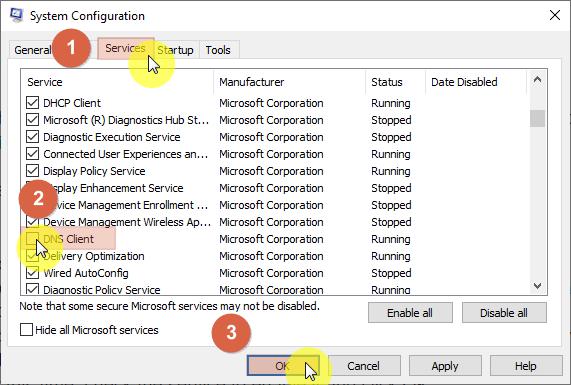
In this method, you would be able to restart the DNS client service using the Windows System Configuration manager.
Follow these steps:
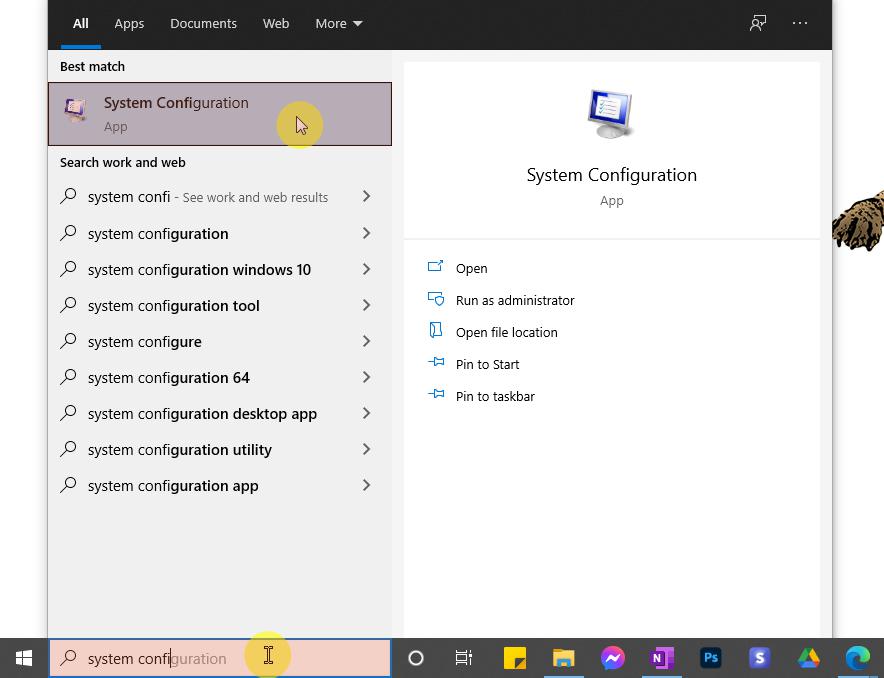
- On your Start Windows menu, search for System Configuration and open it up.
- Once the system configuration manager is open, go to the services tab.
- Find the DNS Client service and uncheck it to disable the service temporarily.
- Click OK to save the changes.
- Repeat steps one to three — open the system configuration, go to the services tab, and find the DNS Client service).
- But this time, check the service to enable it and click OK.
 After restarting the DNS client service, restart your computer for the changes to take effect.
Fix #5: Release and Renew IP Address
Another thing you can try is to release and renew your IP address. Since the DNS_PROBE_FINISHED_NXDOMAIN error is usually a client-side DNS issue, doing this fix could solve the issue right away.Windows
In Windows, you will have to use the command prompt once again.
These are the steps:
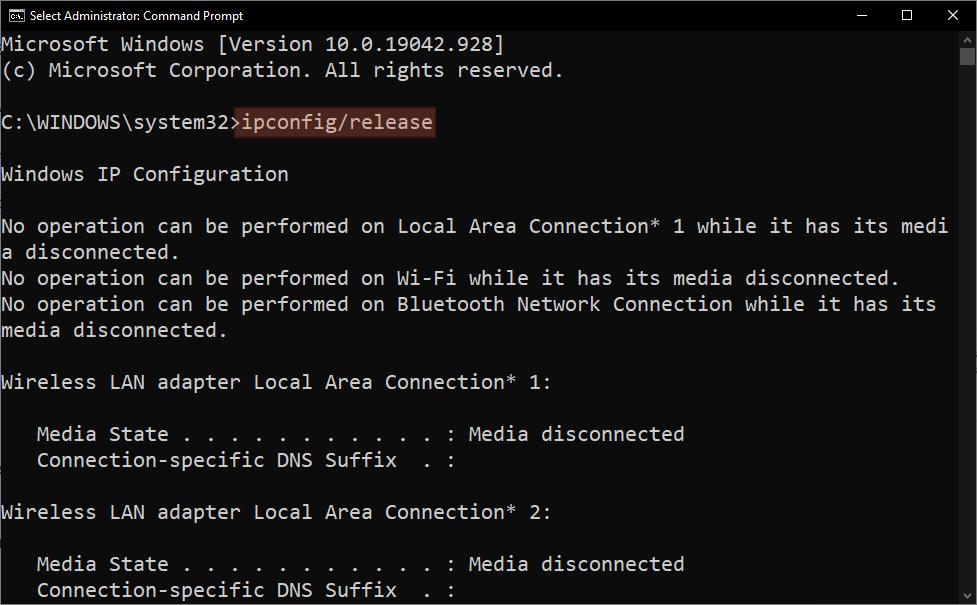
- Open Command Prompt in Administrator mode.
- To release your current IP address, enter the ipconfig/release command and hit Enter. This will then set off a number of responses from the system.
- To renew your current IP address, enter the ipconfig/renew command and hit Enter. Once again, you will see lots of responses from the system.
- You could also reset the IP settings of your previously stored IP and reinstate the Winsock Catalog by entering the commands netsh int ip set dns and netsh winsock reset.

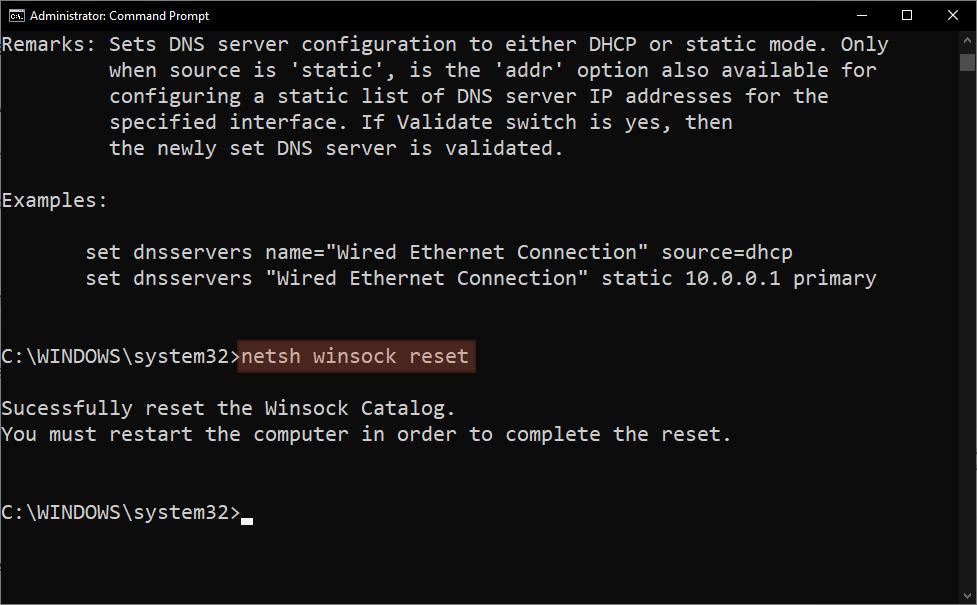 If this is the first time you’ve heard about Winsock, it’s simply the service that handles internet application requests on your computer. After doing the changes, restart your computer first before visiting the website.
 Mac
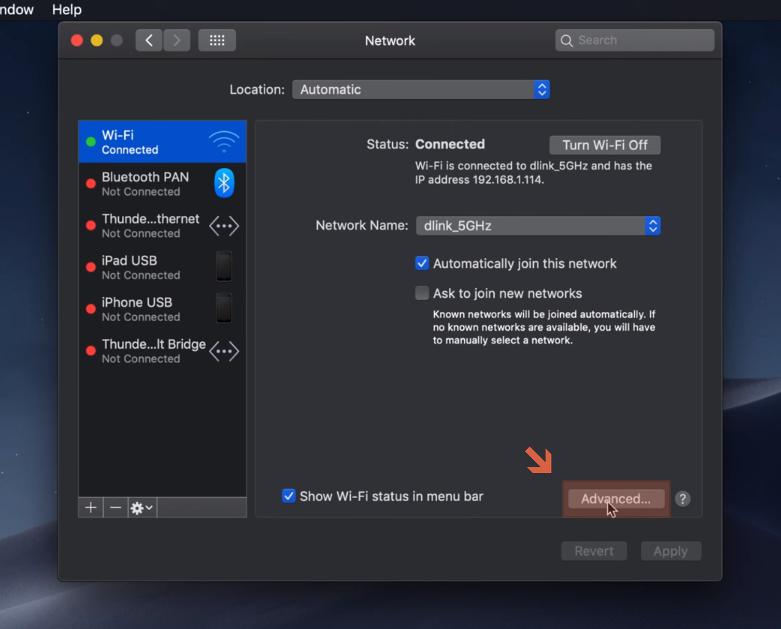
Releasing and renewing your IP address is Mac is not as complicated. All you got to do is access the advanced settings of your network.
Follow these steps:
- Click the internet connection icon on your launchpad and select Open Network Preferences.
- On your network settings, click on the Advanced box.
- Then, go to the TCP/IP tab, click on the Renew DHCP Lease, and hit OK to exit the network settings.
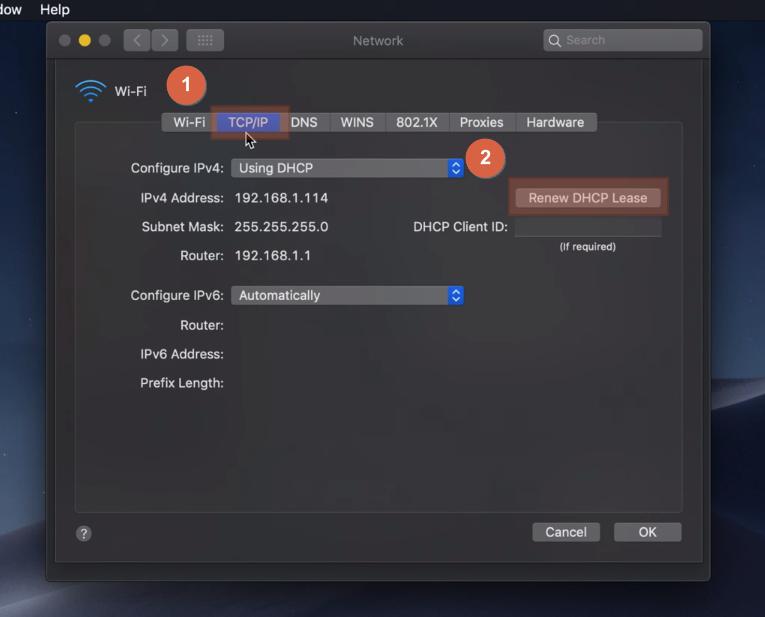 After renewing your IP address, restart your computer.
Fix #6: Check the Local “Hosts” File
If the above methods haven’t fixed the DNS issue yet, then you might want to check the local hosts file. All computer systems have one as it contains all DNS entries for specific IP addresses that you have accessed.To make it simple, every time you visit a website, your computer will check the hosts file first. If it couldn’t find any information, it will then search the DNS system to find the IP address and allow you to access the website.
It’s worth checking the local hosts file and see if the website you want to visit is recorded there. If it is, it might be the one causing the DNS_PROBE_FINISHED_NXDOMAIN error.
Windows
To check the local hosts file in Windows, you will have to use a notepad tool first and search the file from there.
Here are the steps:
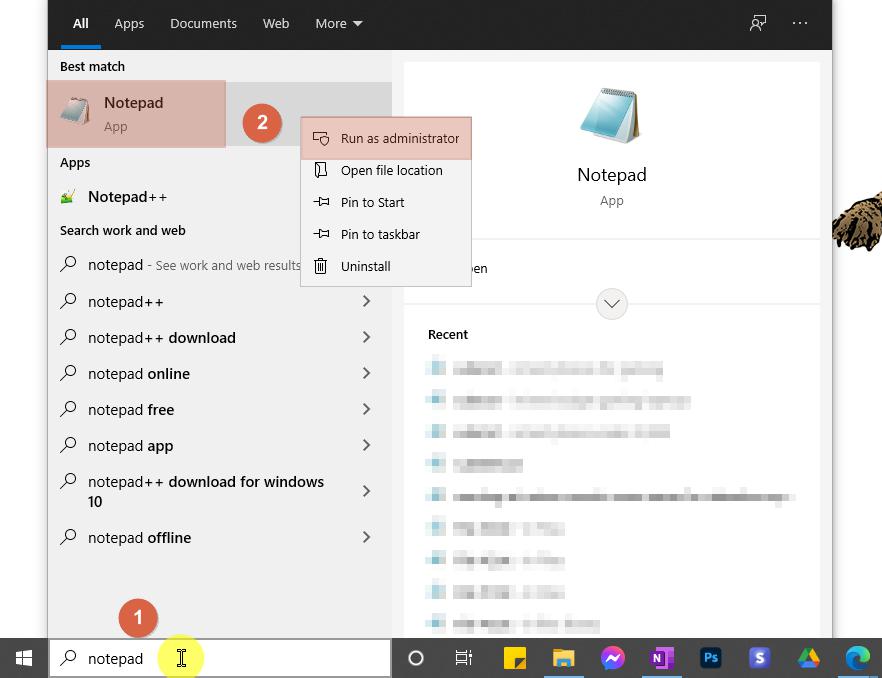
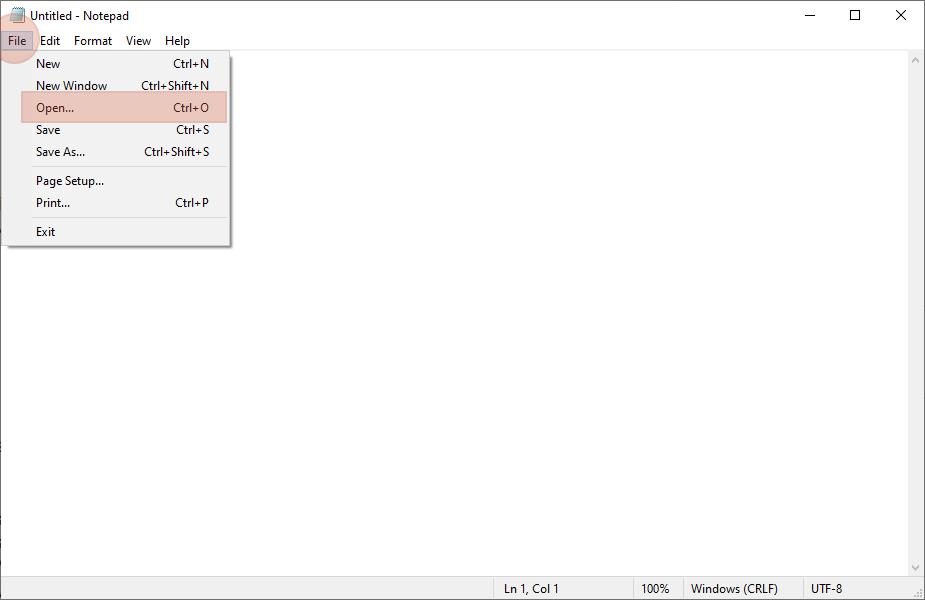
- Search for Notepad in the search bar and open it as an administrator by right-clicking on it and selecting Run as administrator.
- On the Notepad, navigate to File > Open.
- Copy the following address in the address bar on the open window: C:\Windows\System32\drivers\etc\.
- Change the file filter to All Files to see everything in the folder.
- Double click on the hosts file to access it.
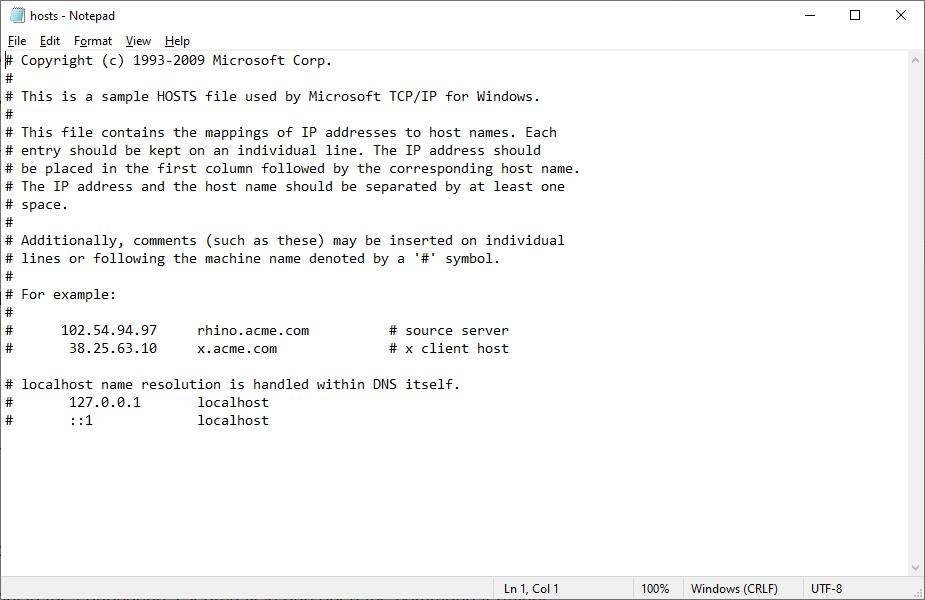 After opening the hosts file, check whether or not the domain name of the website you want to visit is present. If it is, remove it and save the changes.
 Mac
In Mac, the approach is more direct.
Here are the steps:
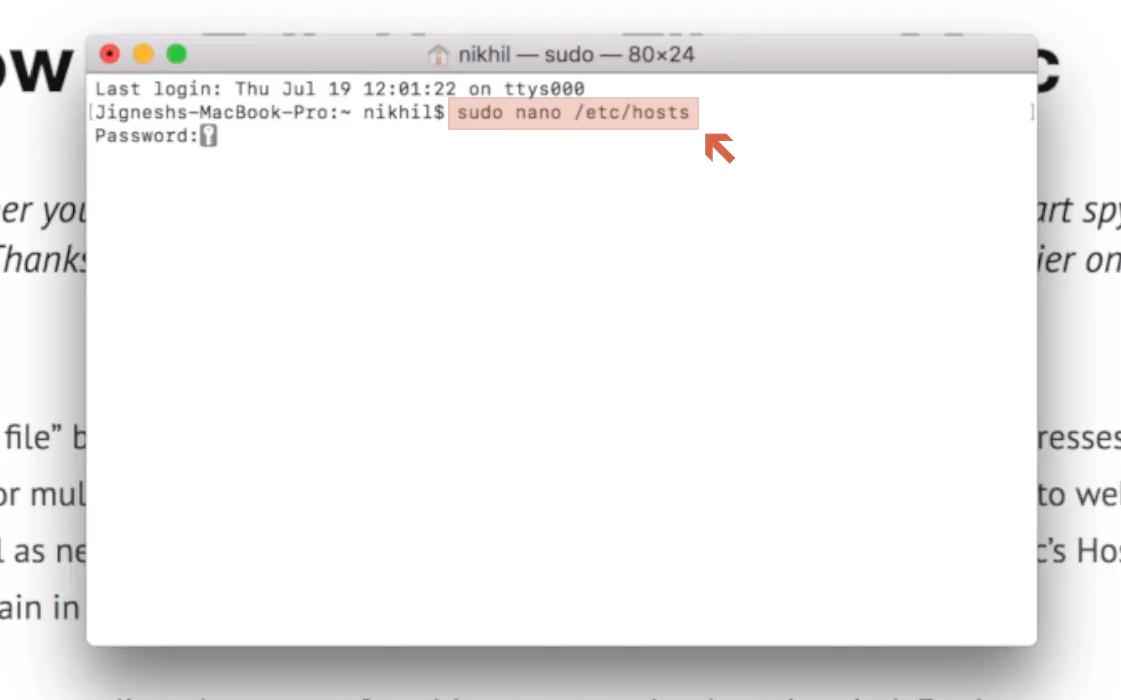
- Open the Launchpad’s search field by clicking on its icon on the upper-right corner of the screen.
- Search for the terminal in the Launchpad’s search field and open the command terminal window.
- Then, enter the sudo nano /private/etc/hosts command to run Mac’s Nano Editor as an administrator.
- Provide your password and you will be immediately directed to the hosts file.
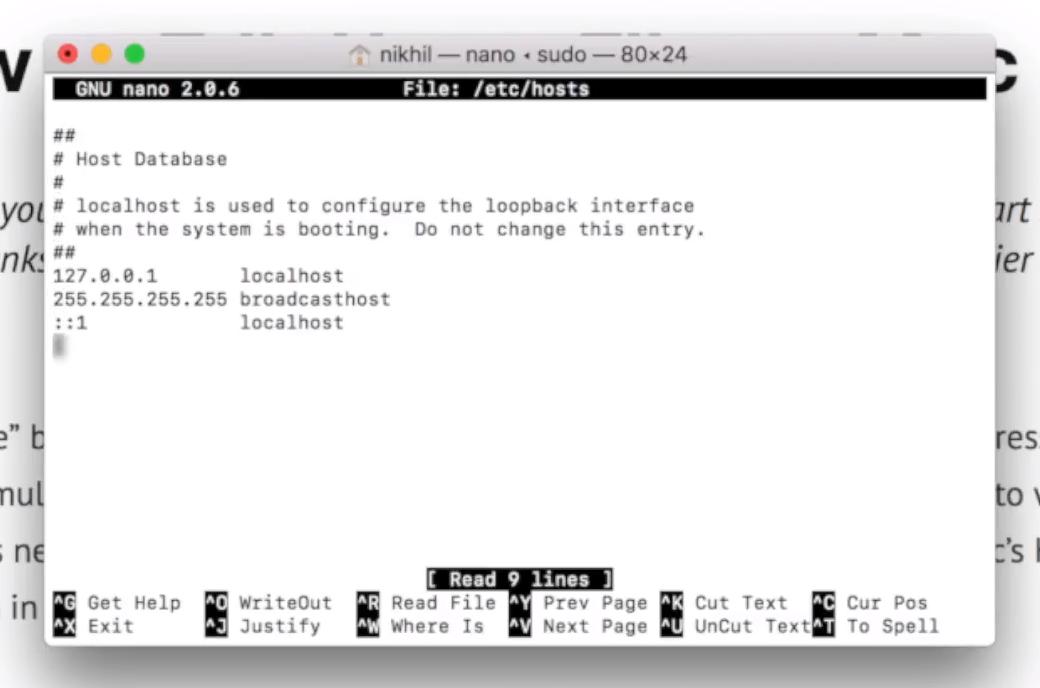 Once again, examine the entries within the hosts file. Remove the information of the website you’re trying to access and save your changes.
Fix #7: Reset the Chrome Flags
Sometimes, the problem may be lying with Chrome itself. As you may know, Google Chrome allows its users to try out various experimental features that are still under development.This is where the problem lies. One of those changes may be causing the DNS_PROBE_FINISHED_NXDOMAIN error.
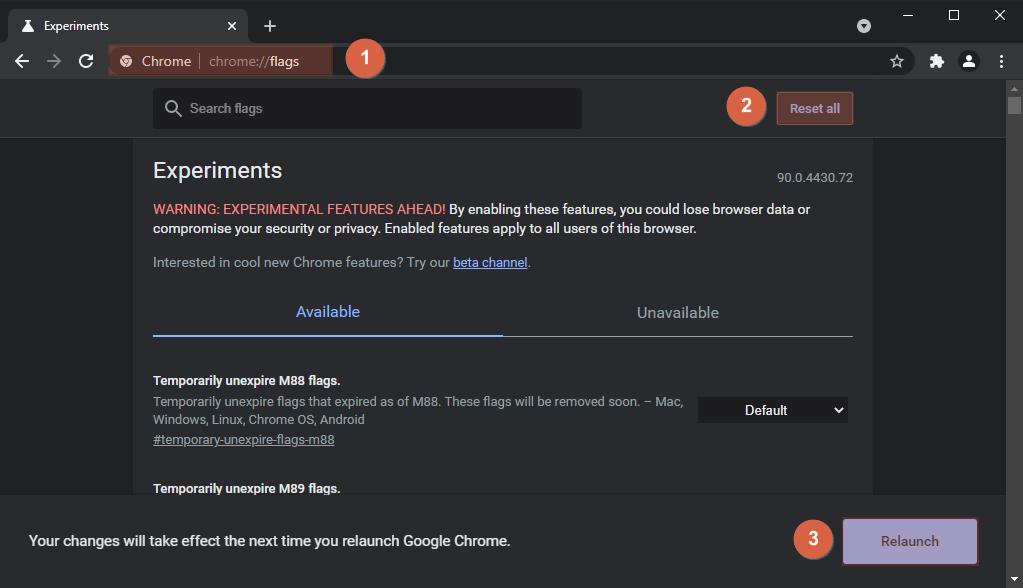
To solve this, you could reset Google Chrome settings back to default. You can do this by entering chrome://flags in the URL bar.
Then, click on the Reset all box and relaunch the application.
It’s important to note here that even if Google Chrome allows you to try out their experimental features, you need to be careful when using any one of them. If you suspect something is not right, reset your Chrome settings to default immediately.Fix #8: Temporarily Disable Your Antivirus and VPN Software
Both antivirus and VPN software could provide you with an added layer of protection especially when you’re always online. On the downside, these applications could also cause issues that may inhibit you from visiting some websites.For that reason, you should consider temporarily disabling your antivirus and VPN software to see whether or not they were the ones causing the problem.
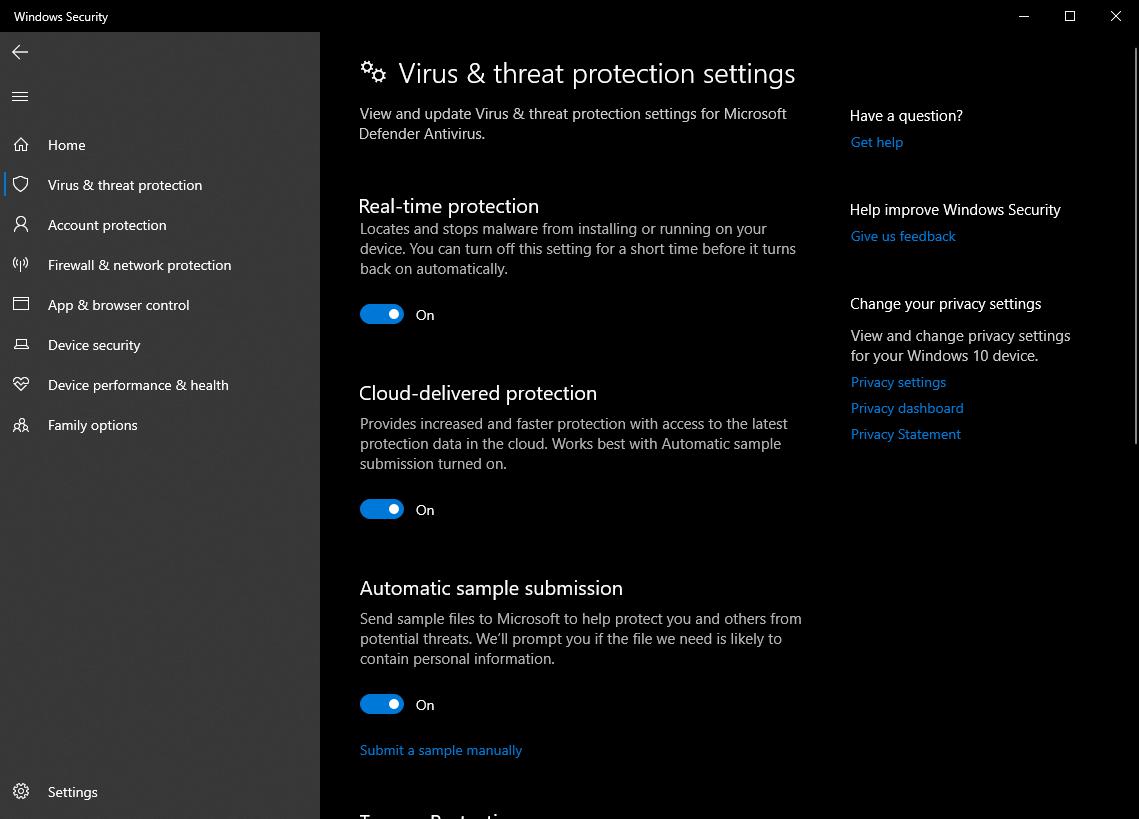
Since each software is different, the method you may have to use would vary. For example, if you’re using Windows Security in Windows 10, you could go to the virus and threat protection settings and disable the security features from there.
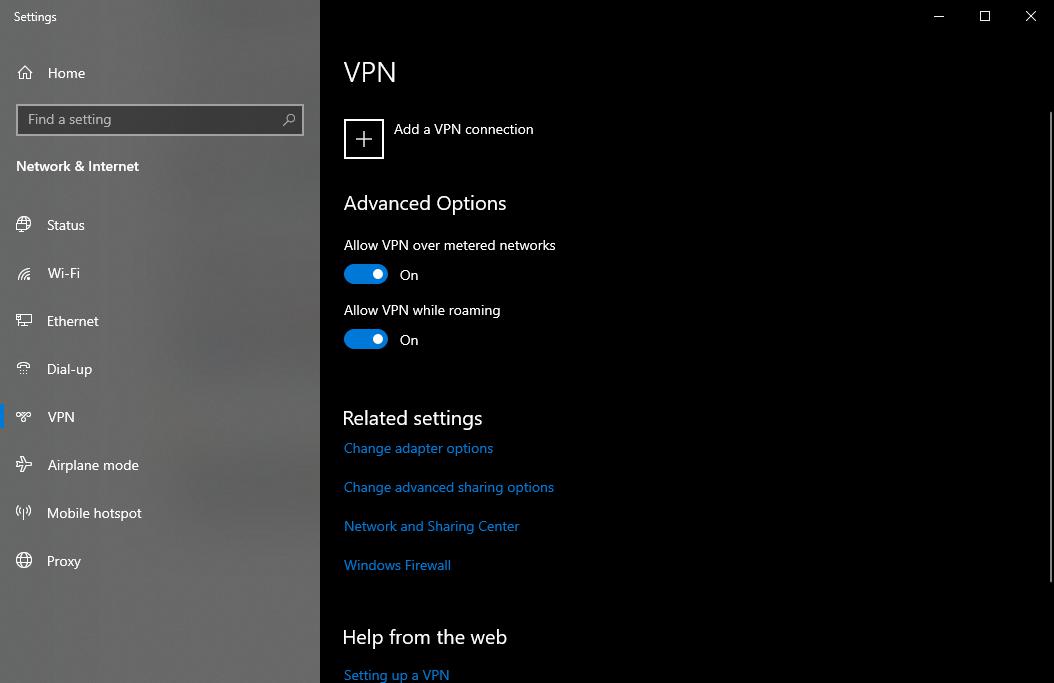
As for disabling VPN software, most of them also have a switch-off button somewhere on their interface. On the other hand, if you’re using Windows, there is a VPN settings page under network and internet settings and disable the software from there. If the DNS_PROBE_FINISHED_NXDOMAIN error disappeared while the antivirus and VPN software were disabled, then you can be certain that they have features that may be messing around and causing your DNS name resolution some problems. Of course, since both software are important to your security, you shouldn’t keep them disabled forever. However, it’s always a good idea to backtrack and analyze which of their features was causing the problem.
Contact Your Internet Provider When Nothing Works
If you have tried every single fix that we mentioned in this article and the DNS_PROBE_FINISHED_NXDOMAIN error is still around, then you should contact your internet service provider as the issue may be on their side.As for the error problem itself, it’s actually quite common than you think. Fortunately, as you can see above, it’s also not that difficult to fix.
On the flip side, if you’re the owner of the website that’s giving others the DNS error, it’s important that you choose a hosting service that offers great packages and maintenance services.
For as little as 100 pesos a month, you could already start your own website complete with a free domain for a year, 10 GB SSD storage, 20 email accounts, unmetered bandwidth, and more. All plans include access to our support team available from Monday to Sunday.

PROMO
FREE Web Hosting
for Your Website
Learn More