Wordpress
June 4, 2021
9 min Read
How to Connect EasyParcel to Your WordPress Ecommerce Store
Though there are a lot of courier services here in Malaysia, only a few of them could be easily integrated with your ecommerce store. In fact, many of them require either extensive coding knowledge or hiring one who does.
But what if you don’t know any coding? What if you don’t want to hire a coder? Could you still do it?
Fortunately, you don’t have to worry about that with EasyParcel. By following our instructions on this article, you could have EasyParcel running on your ecommerce website within minutes and have your buyers use the courier services they prefer.
Let’s get started.
Before we start, you can rest assured that you don’t need to have any technical skills to make it work. However, there are a lot of small steps involved, which may confuse you if you don’t follow everything step by step.
If you found yourself confused at any point, please refer to the images.
The first step is to register and create an EasyParcel account. You may skip this step if you have already created an account previously.
If not, head over to EasyParcel’s homepage and click on the signup box found on the upper right corner of the website.

To create an account, enter your preferred email address and provide a strong password. You could also use your Facebook or Google account to sign up.
Before clicking on the signup button, don’t forget to tick the box that shows that you agree to all their terms, conditions, and privacy policy.
 The next step is verification through your mobile number. All you have to do is provide your first and last name as well as your phone number.
Once you have entered your number, click on the send code button to proceed. Note that you can also skip this step and verify later after you have created your account.
 After verifying (or skipping ahead), you will then arrive at the main internal page (dashboard) of EasyParcel.
Unlike other delivery booking services, adding a new ecommerce store on EasyParcel is simple. If this is your first time using EasyParcel, don’t mind the dashboard for now and go straight into how you could add your own store.
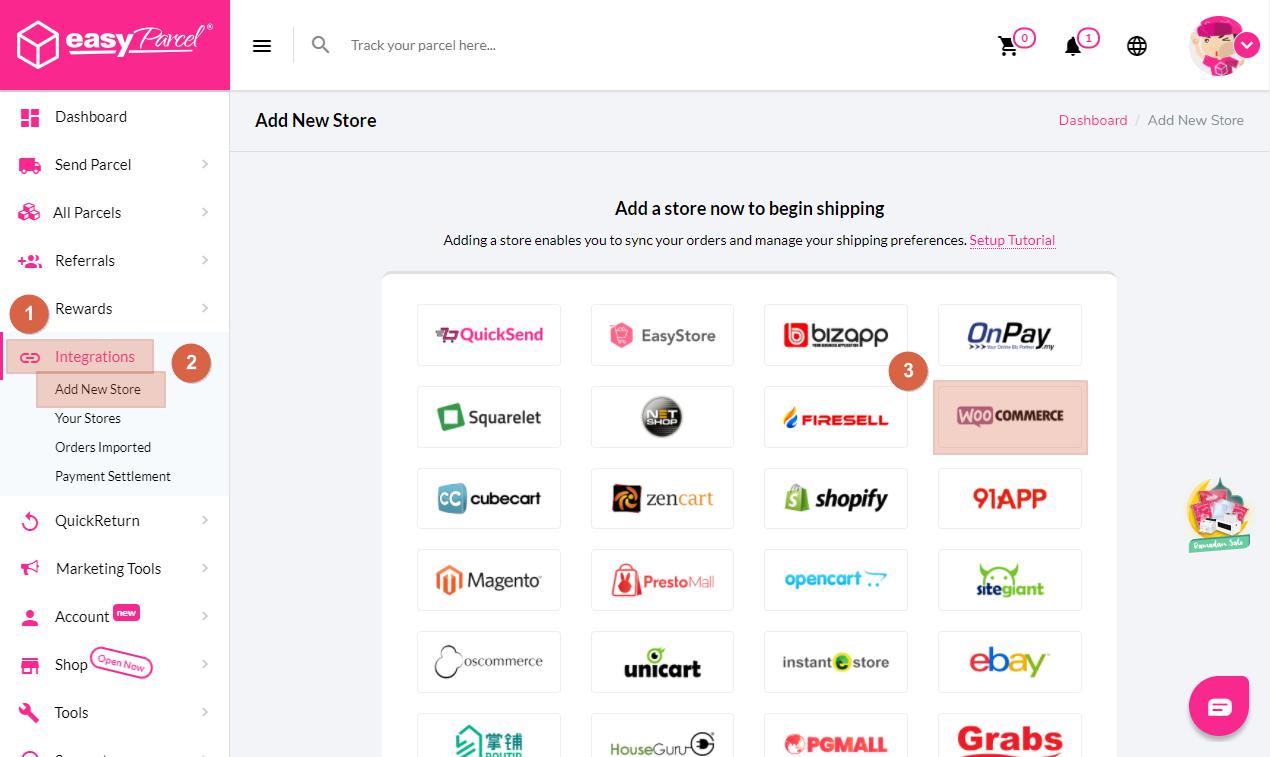
To do so, click Integrations > Add New Store on the left-hand sidebar. You should then see various ecommerce platforms that you can integrate with EasyParcel.
Find WooCommerce in the list and click on it.
 In the case that you haven’t actually created your ecommerce site yet and you’re only here to learn in advance how to integrate EasyParcel into your upcoming ecommerce store, know that you need WooCommerce to give ecommerce functionalities to your website.
For installation, refer to the guide below on how to install the WooCommerce plugin.
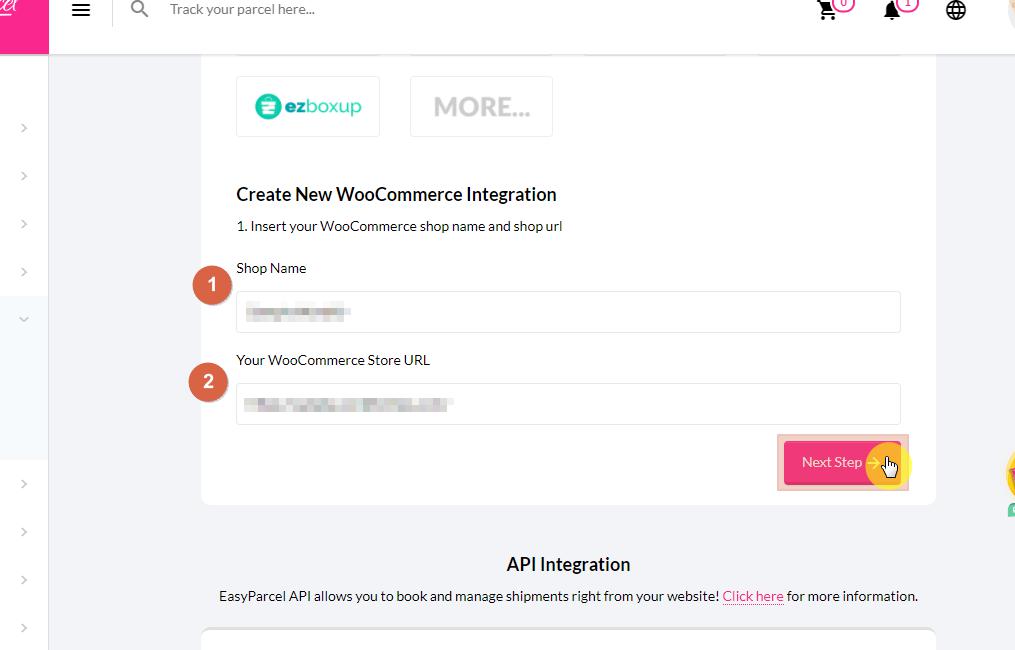
Now, right after clicking the WooCommerce button, you will have to provide the name of your shop and its link. Once you’ve done that, click on the pink button to continue.
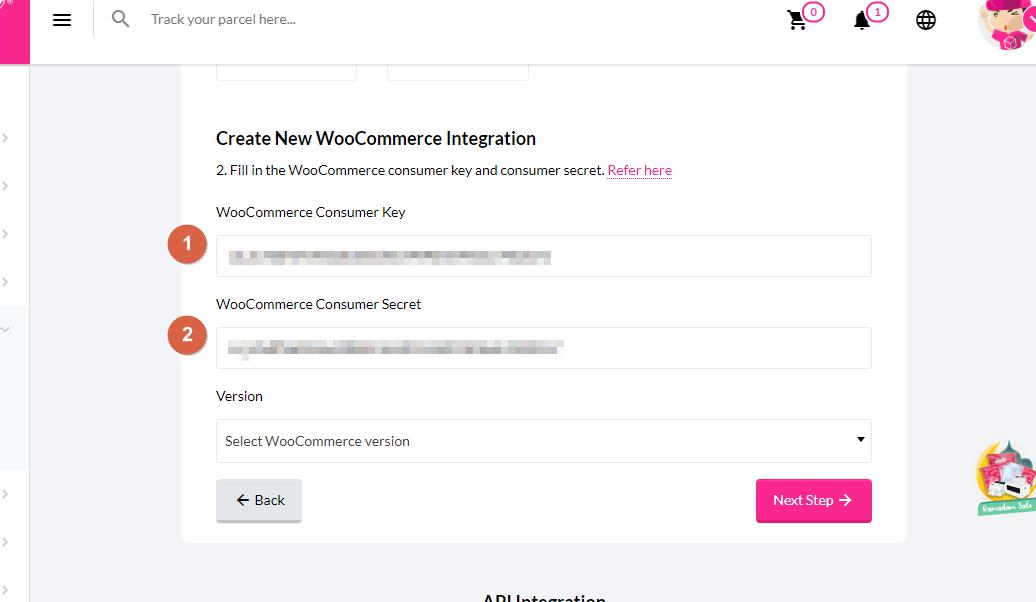
The next step may confuse you a little bit as you will need to provide the consumer key and consumer secret. You can get these codes from the advanced settings of the WooCommcerce plugin.
To get them, refer to the guide below on how to generate REST API for WooCommerce.
Once you have the consumer key and consumer secret, all you need to do now is copy and paste them on the forms provided.
 After that, you will have to select the integration version to use. There are two choices here:
Basically, the simple version will automatically import your orders straight to EasyParcel once you change the order status of the orders to Processing/Processed. However, the automatic importing of orders only comes every four hours.
On the other hand, the plugin version is more robust as it will display courier companies and delivery rates on your checkout page. Buyers then will be able to choose which courier they prefer.
If you select the simple version, you don’t have to download the integration kit. But if you want to give your buyers more control over how their products get delivered and by what courier, then the plugin version is the right choice.
Once you choose the plugin version, you will have to download the integration kit (plugin). Choose the latest version and click on the download button to begin.
After downloading the plugin, click on the pink button to proceed.
 To learn how to install the plugin you just downloaded, refer to the guide below on how to install the EasyParcel plugin.
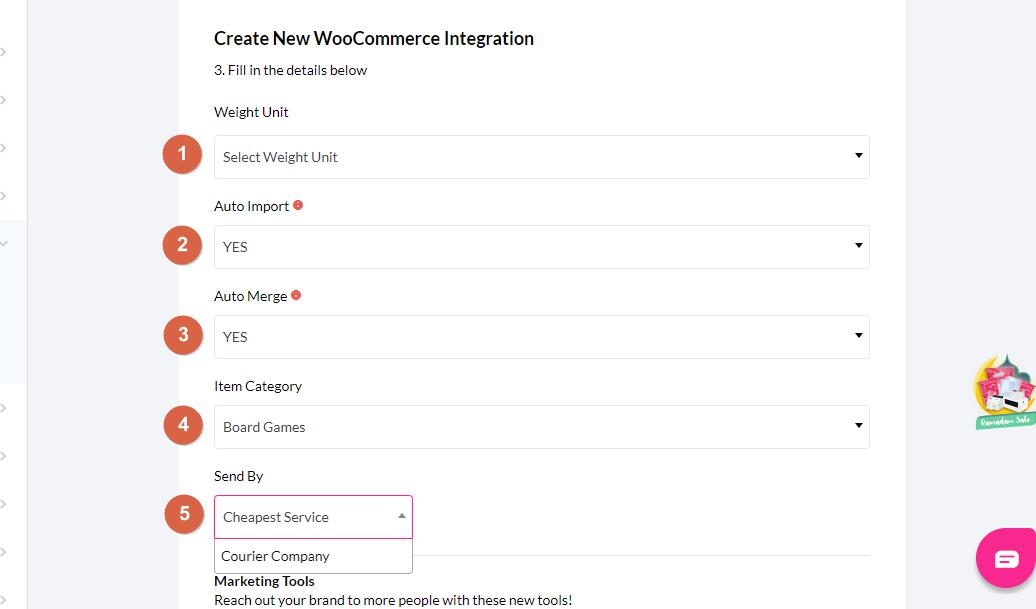
The next step is to specify the details of the integration. Compared to previous integration options, there are more things you need to set up now. The guide below is updated according to the current integration options.
Currently, there are five specific details you need to provide:
 You could also make use of certain marketing tools that would make your ecommerce store more memorable.
The tools that you can use as of now include:
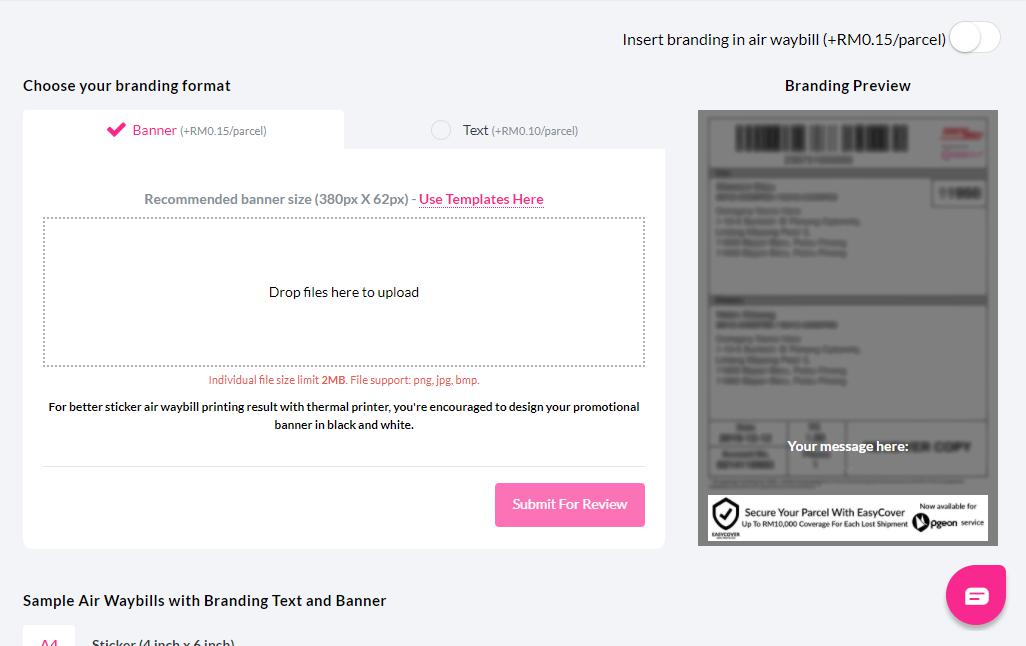
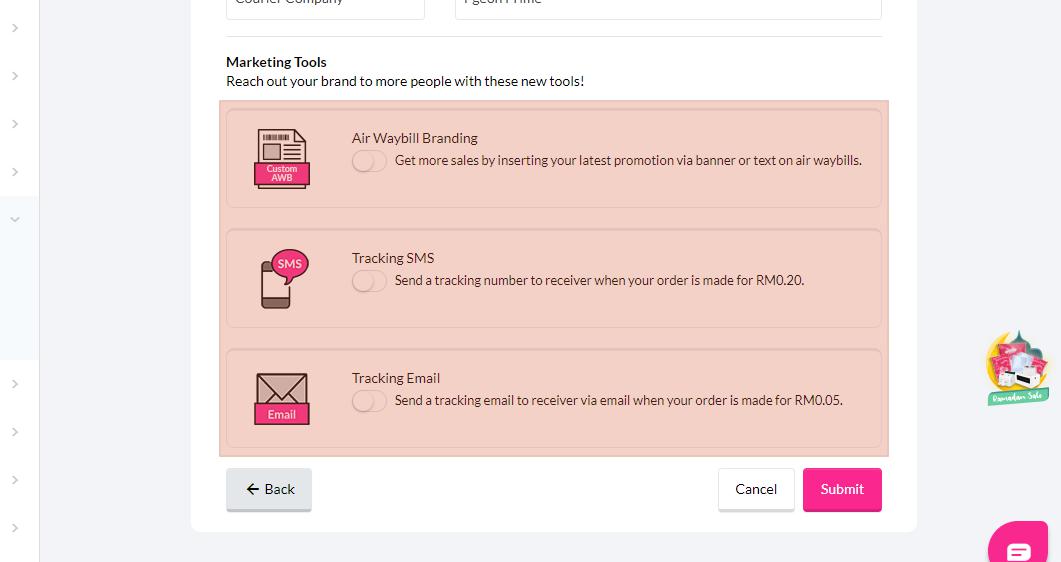 Choosing any of these tools will require you to specify additional settings. For example, if you want to provide an air waybill branding, then you must input your banner or text as shown in the image below.
 After setting up the integration options the way you want them, click on the submit button to finish the setup.
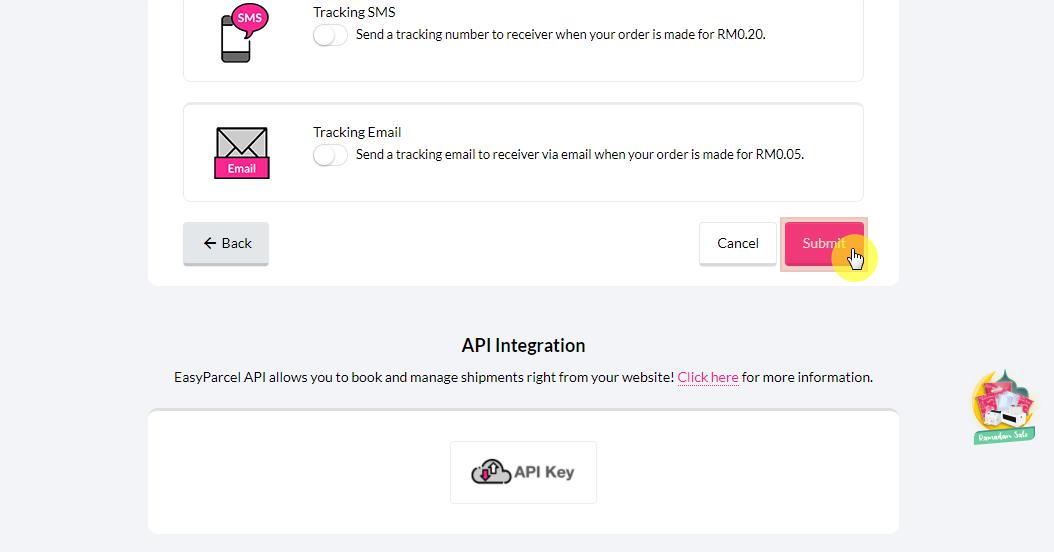 Before you leave the page, check first that your store is enabled. You will know it if the slide button is set to green.
You could also do certain actions like edit, import, or even remove the integration by clicking on the action button.
 That’s it! The integration on the EasyParcel is now complete. What’s left now is to install the plugin that you downloaded earlier.
Earlier, you had to choose the type of integration to go with…
With the simple version, you don’t need to worry about anything as all the orders will be pushed out to EasyParcel automatically. However, if you chose the plugin version, then you had to download a plugin from EasyParcel.
To install the plugin to your website, please follow the steps outlined below:
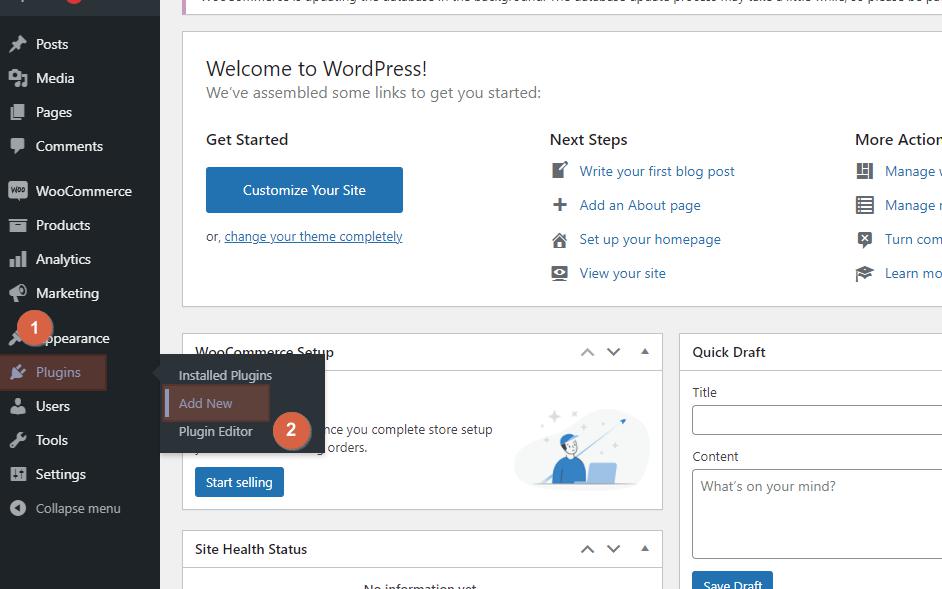
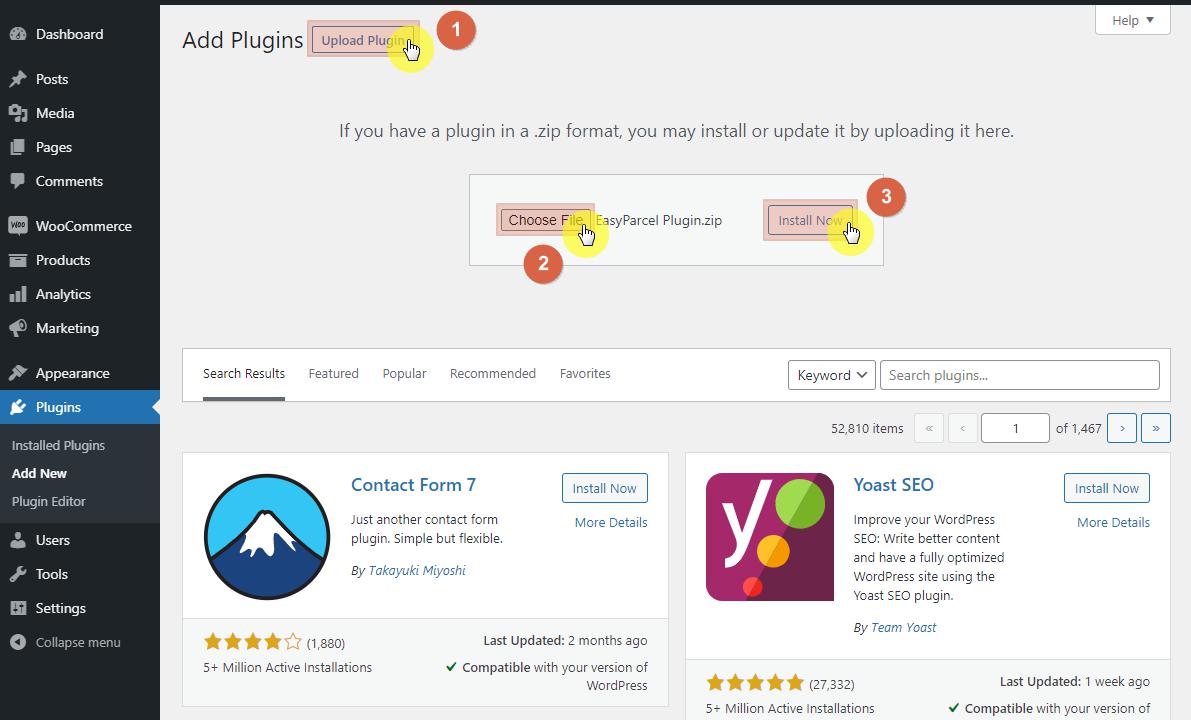
The first step is to navigate to the add plugin page of WordPress.
On your ecommerce website dashboard, hover your mouse over the plugins tab on the left-hand sidebar and click on the add new option.
 Because the plugin can only be downloaded from EasyParcel and can’t be searched on the plugins database, you would need to upload the plugin.
The second step is to upload the plugin to your website.
To do so, click on the upload plugin button at the top of the page, choose the file, and find the plugin that you have downloaded earlier from EasyParcel.
Click on the install now button to proceed with the installation.
 The last step is to activate the plugin.
After the plugin gets uploaded and installed, you would still need to activate it. When the installation is successful, you see the page below and all you have to do is click on the activate plugin button.
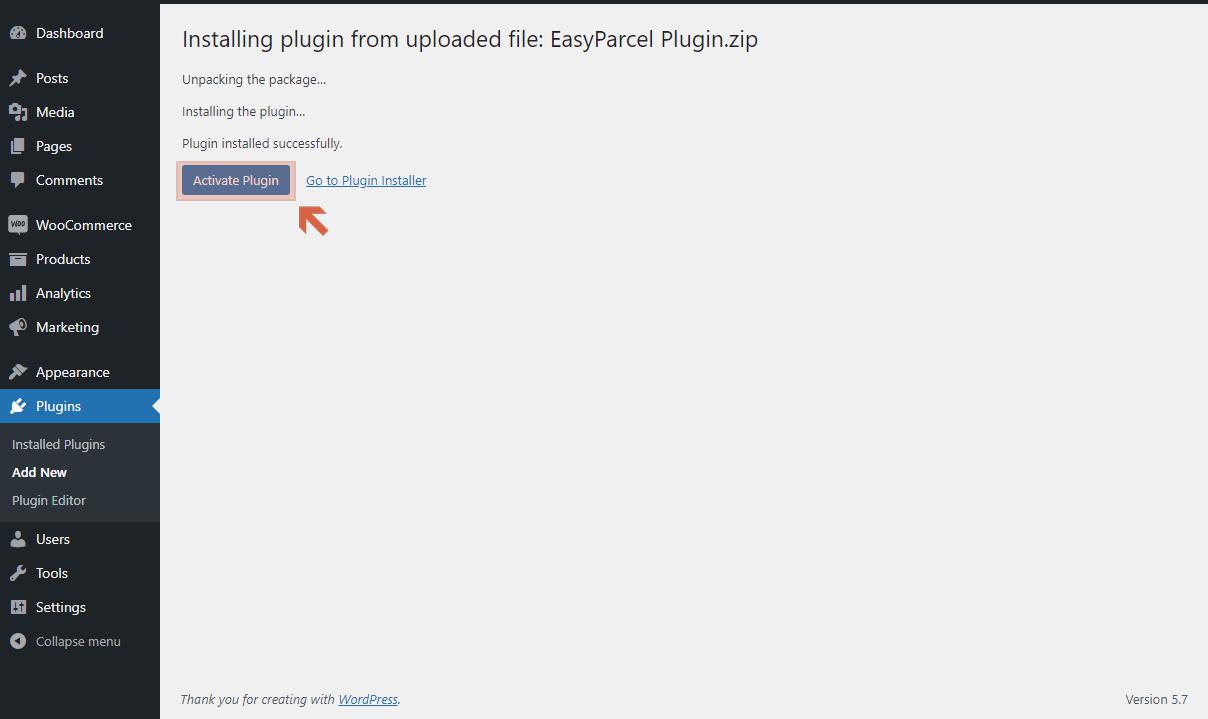 That’s it! You have now successfully installed the EasyParcel plugin into your website.
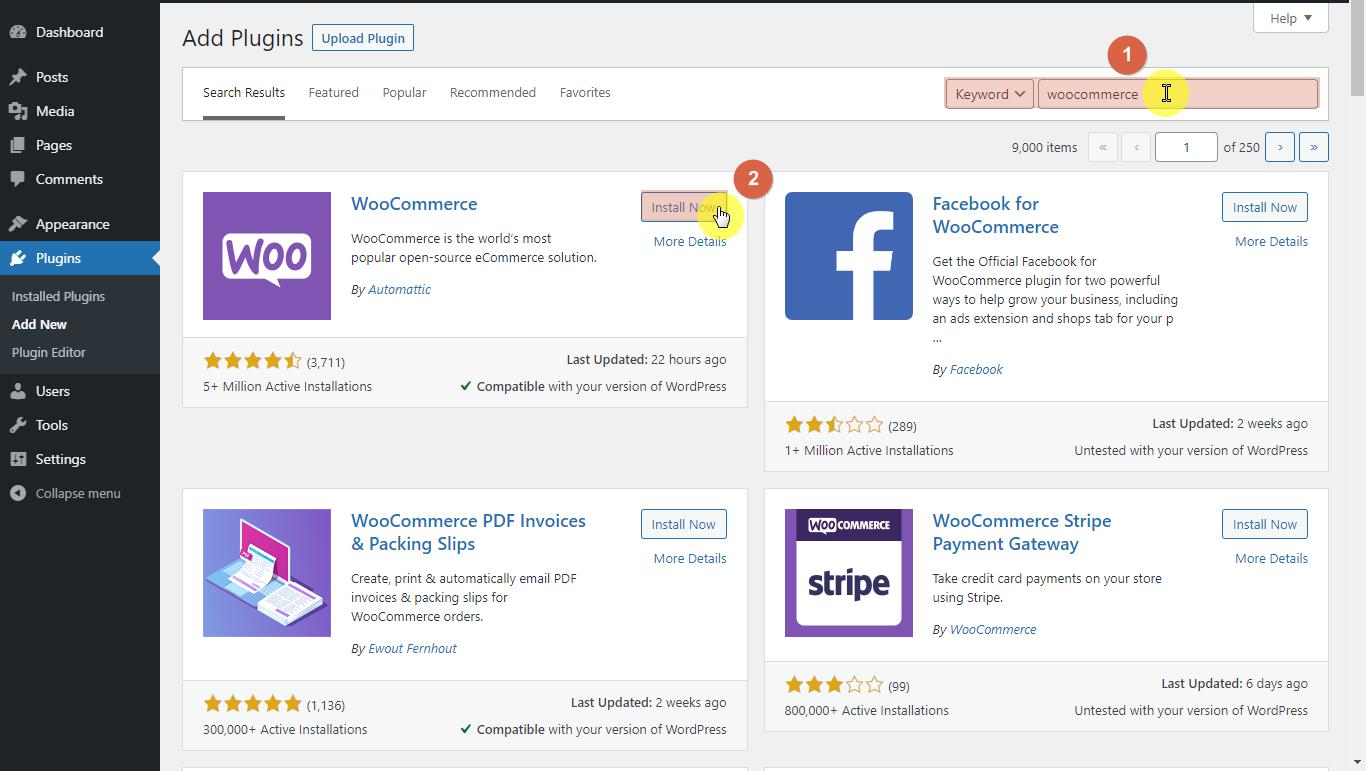
The steps into installing the WooCommerce plugin are quite similar to installing the EasyParcel. The only difference here is that you don’t need to download the plugin from WooCommerce’s website.
All you need to do is use the search feature within the add plugins page. Simply enter “woocommerce” into the search bar and wait for the results.
You will then see WooCommerce listed as number one on that list. Click on the install now button to start the installation. After the installation, click again on the button to activate the WooCommerce plugin.
 Once the plugin is installed and activated, you will now be able to access the WooCommerce settings and generate the consumer key and consumer secret, which you need for integrating EasyParcel with your website.
To properly integrate EasyParcel with WooCommerce, you would need to generate a consumer key and consumer secret which would connect your website with EasyParcel’s server. To do this, you must access the advanced settings of WooCommerce.
Here are the steps:
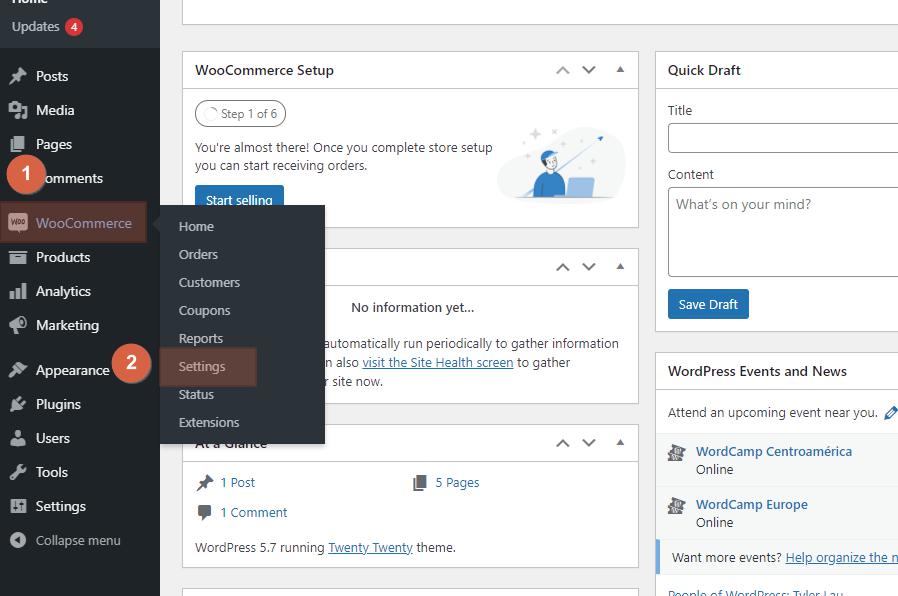
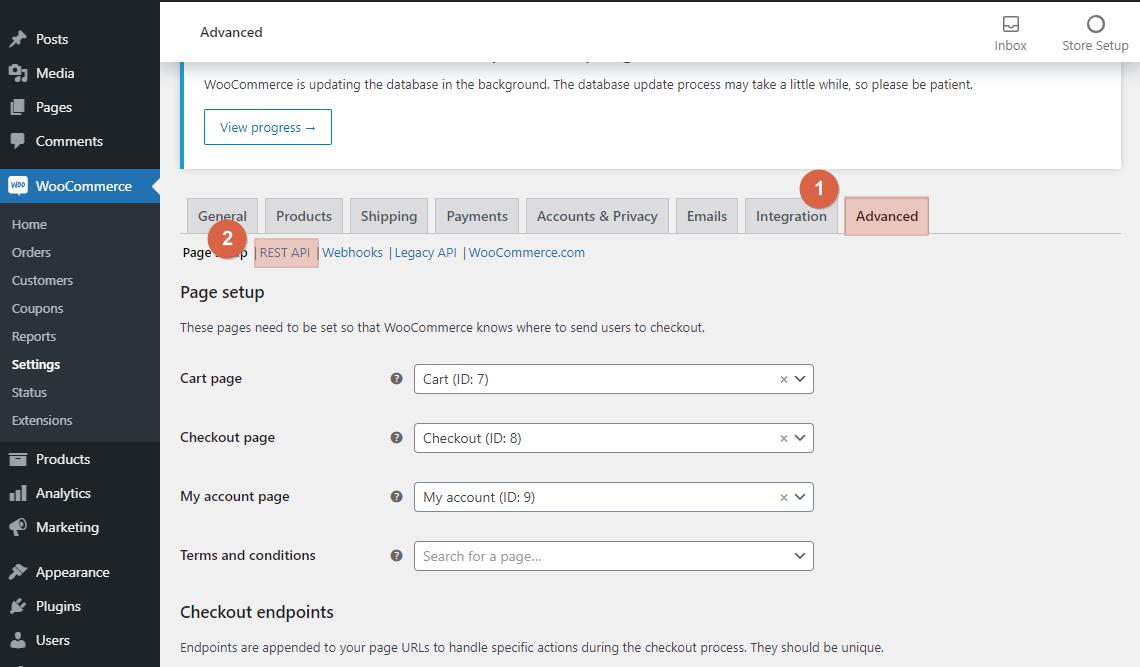
The first step is to navigate to the advanced settings page of WooCommerce.
On the WordPress dashboard, hover your mouse over the WooCommerce tab on the left-hand sidebar and click on settings.
 Navigate to the advanced tab and click on the REST API to see all the settings related to it.
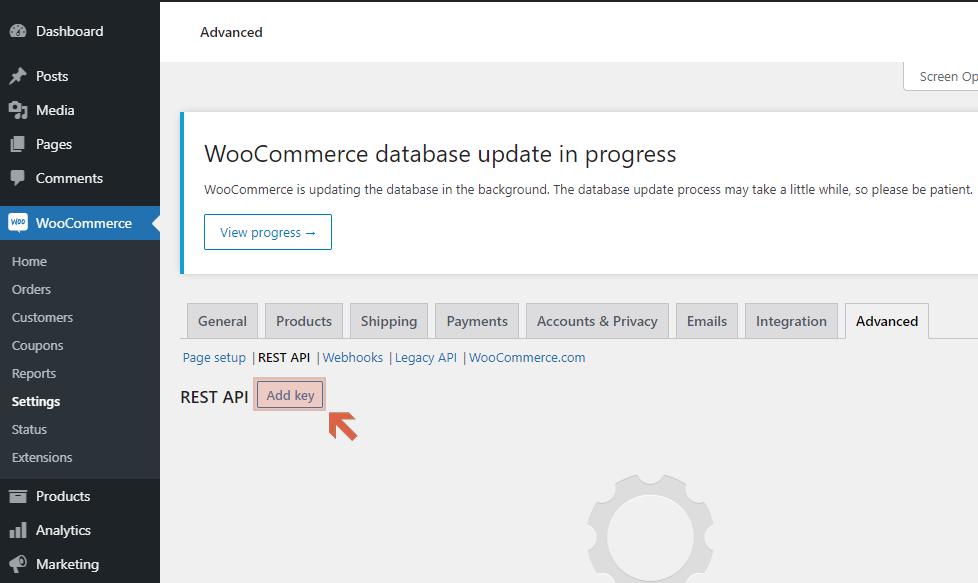
 The next step is to create an API key.
The key that you would generate would allow EasyParcel to view and manage your store data. To proceed, click on the add key button
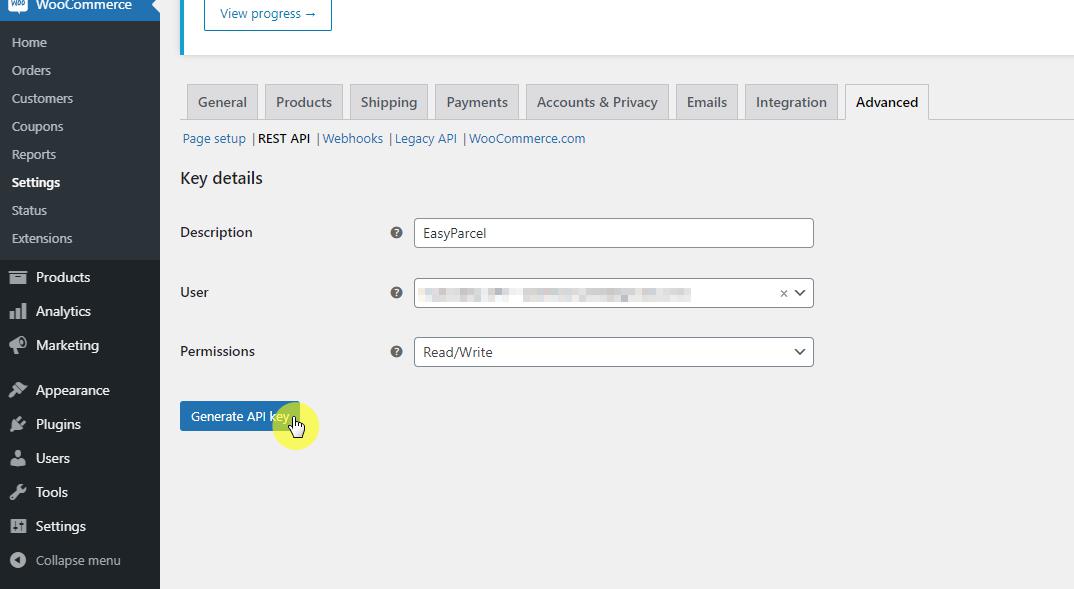
 Right after that, you need to provide the details for the API key:
For the description, simply enter EasyParcel here so you would know right away what the key is all about when you view the key list in the future. If there are multiple users of the site, you could select which ones the key generated is for. As for the permission, make sure to set it to “Read/Write”.
Once you’re done, click on the generate API key button to continue.
 After that, you will then be able to view the consumer key and consumer secret.
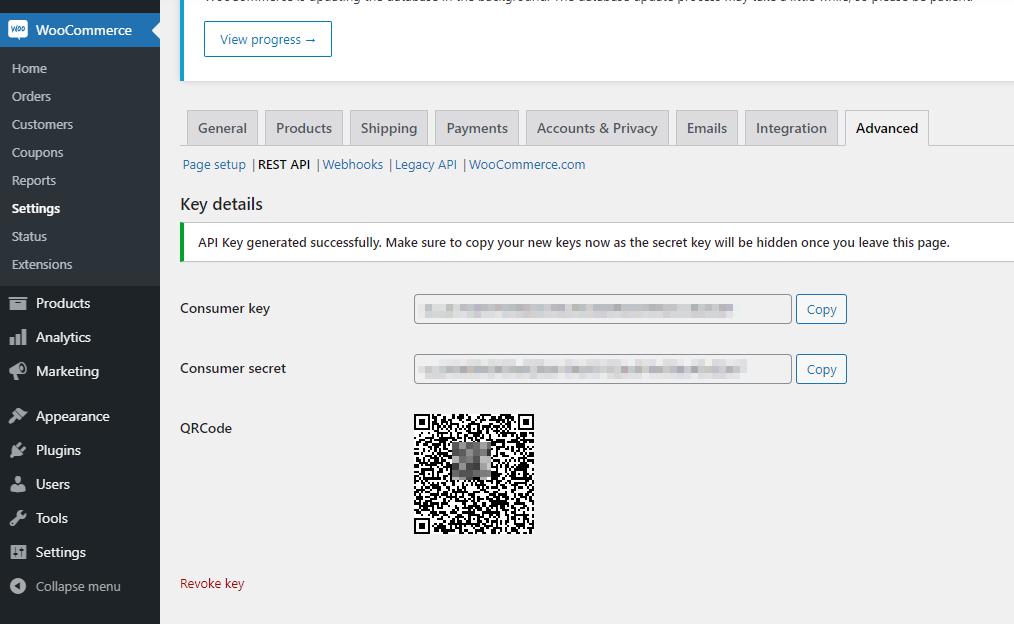 That’s it! You can now copy the codes back to EasyParcel to continue the integration process.
As you can see, integrating EasyParcel with your ecommerce store isn’t really that difficult, even without coding knowledge or hiring someone who does. In fact, you could be done with all of this in under five minutes.
In case you still haven’t started yet, you can actually start now for as low as RM 8.40 per month. This already includes a free .com domain of your choice, 10 GB SSD storage, a free SSL certificate, and a lot more.
To get your website ready, all you have to do is design it really well and install the WooCommerce plugin to gain lots of online store functionalities. You must also market your online store as much as you can to gain initial traction.
But what if you don’t know any coding? What if you don’t want to hire a coder? Could you still do it?
Fortunately, you don’t have to worry about that with EasyParcel. By following our instructions on this article, you could have EasyParcel running on your ecommerce website within minutes and have your buyers use the courier services they prefer.
Let’s get started.
How to Integrate EasyParcel With WordPress Ecommerce Websites
Before we start, you can rest assured that you don’t need to have any technical skills to make it work. However, there are a lot of small steps involved, which may confuse you if you don’t follow everything step by step.
If you found yourself confused at any point, please refer to the images.
Step 1: Create an EasyParcel Account
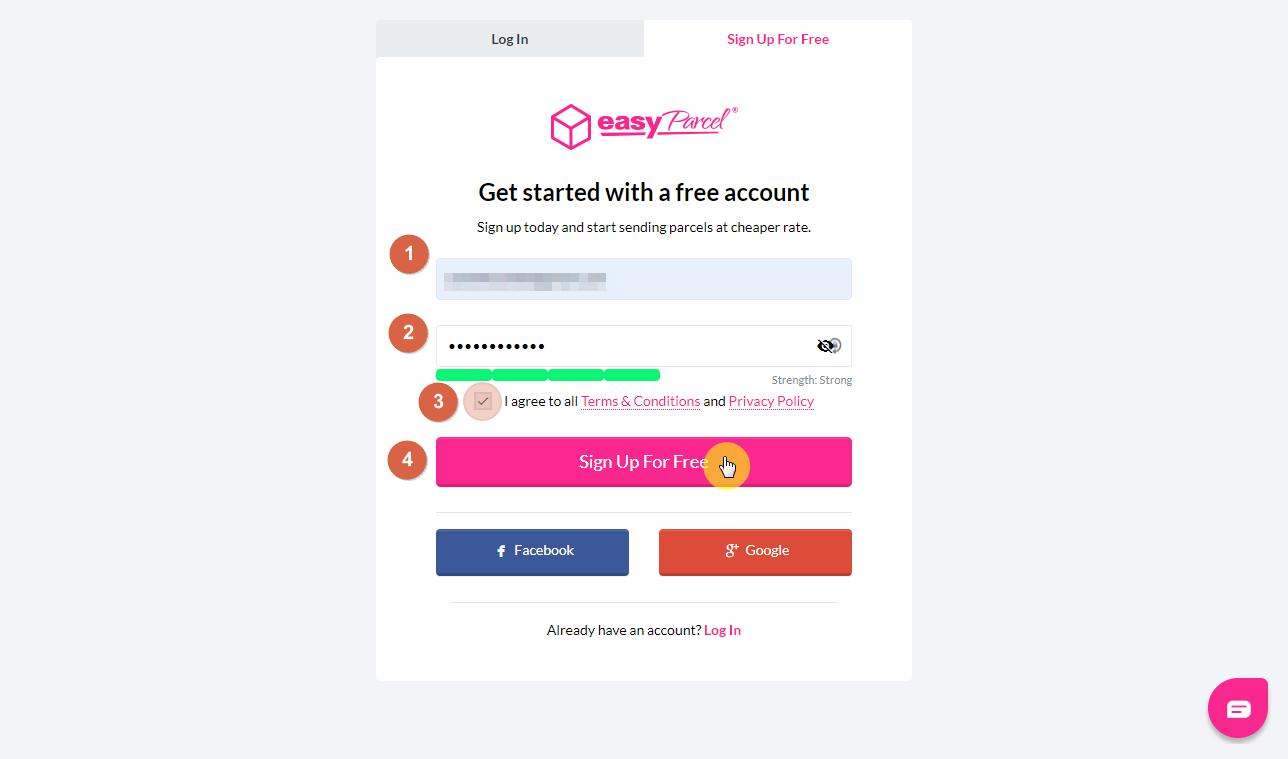
The first step is to register and create an EasyParcel account. You may skip this step if you have already created an account previously.
If not, head over to EasyParcel’s homepage and click on the signup box found on the upper right corner of the website.
To create an account, enter your preferred email address and provide a strong password. You could also use your Facebook or Google account to sign up.
Before clicking on the signup button, don’t forget to tick the box that shows that you agree to all their terms, conditions, and privacy policy.
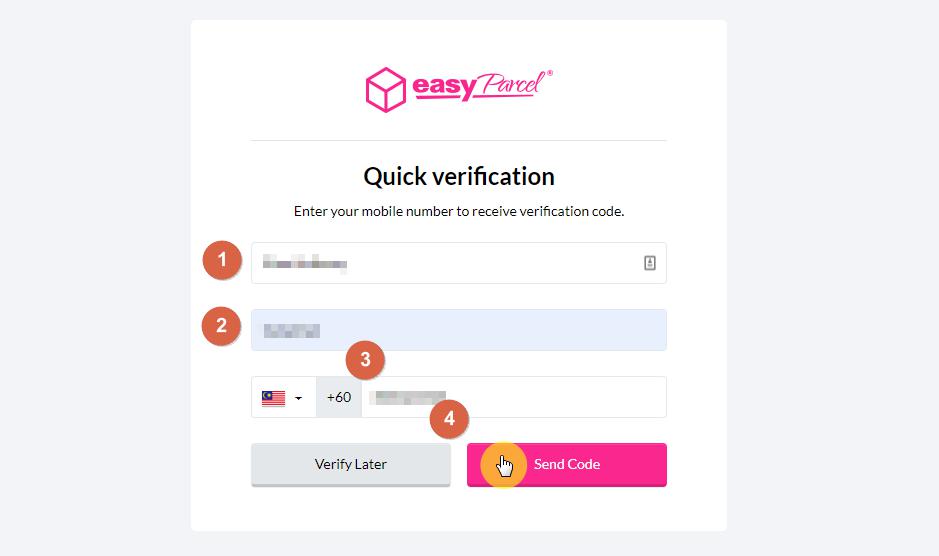
The next step is verification through your mobile number. All you have to do is provide your first and last name as well as your phone number.
Once you have entered your number, click on the send code button to proceed. Note that you can also skip this step and verify later after you have created your account.
After verifying (or skipping ahead), you will then arrive at the main internal page (dashboard) of EasyParcel.
Step 2: Add New Store
Unlike other delivery booking services, adding a new ecommerce store on EasyParcel is simple. If this is your first time using EasyParcel, don’t mind the dashboard for now and go straight into how you could add your own store.
To do so, click Integrations > Add New Store on the left-hand sidebar. You should then see various ecommerce platforms that you can integrate with EasyParcel.
Find WooCommerce in the list and click on it.
In the case that you haven’t actually created your ecommerce site yet and you’re only here to learn in advance how to integrate EasyParcel into your upcoming ecommerce store, know that you need WooCommerce to give ecommerce functionalities to your website.
For installation, refer to the guide below on how to install the WooCommerce plugin.
Now, right after clicking the WooCommerce button, you will have to provide the name of your shop and its link. Once you’ve done that, click on the pink button to continue.
Step 3: Downloading the Integration Kit
The next step may confuse you a little bit as you will need to provide the consumer key and consumer secret. You can get these codes from the advanced settings of the WooCommcerce plugin.
To get them, refer to the guide below on how to generate REST API for WooCommerce.
Once you have the consumer key and consumer secret, all you need to do now is copy and paste them on the forms provided.
After that, you will have to select the integration version to use. There are two choices here:
- Plugin Version
- Simple Version
Basically, the simple version will automatically import your orders straight to EasyParcel once you change the order status of the orders to Processing/Processed. However, the automatic importing of orders only comes every four hours.
On the other hand, the plugin version is more robust as it will display courier companies and delivery rates on your checkout page. Buyers then will be able to choose which courier they prefer.
If you select the simple version, you don’t have to download the integration kit. But if you want to give your buyers more control over how their products get delivered and by what courier, then the plugin version is the right choice.
Once you choose the plugin version, you will have to download the integration kit (plugin). Choose the latest version and click on the download button to begin.
After downloading the plugin, click on the pink button to proceed.
To learn how to install the plugin you just downloaded, refer to the guide below on how to install the EasyParcel plugin.
Step 4: Create New WooCommerce Integration
The next step is to specify the details of the integration. Compared to previous integration options, there are more things you need to set up now. The guide below is updated according to the current integration options.
Currently, there are five specific details you need to provide:
- Weight Unit - Choose the specific unit on how the weight of the items is displayed (in kilogram, gram, or pound).
- Auto Import - When set to YES, all orders with “Processing” status will be imported automatically every four hours. If NO, then you will have to manually import the orders to EasyParcel.
- Auto Merge - When set to YES, all imported orders with the same order number will automatically be merged. If NO, then you will have to manually merge the orders after importing them.
- Item Category - Choose the item category of your store. If you have more than one category, choose the major category that your products belong to.
- Send By - Choose whether the products will be sent by the cheapest company or by a specific courier company. Note that using the plugin version will provide your buyers the ability to choose the courier they prefer.
You could also make use of certain marketing tools that would make your ecommerce store more memorable.
The tools that you can use as of now include:
- Air Waybill Branding
- Tracking SMS
- Tracking Email
Choosing any of these tools will require you to specify additional settings. For example, if you want to provide an air waybill branding, then you must input your banner or text as shown in the image below.
After setting up the integration options the way you want them, click on the submit button to finish the setup.
Before you leave the page, check first that your store is enabled. You will know it if the slide button is set to green.
You could also do certain actions like edit, import, or even remove the integration by clicking on the action button.
That’s it! The integration on the EasyParcel is now complete. What’s left now is to install the plugin that you downloaded earlier.
How to Install the Plugin From EasyParcel
Earlier, you had to choose the type of integration to go with…
With the simple version, you don’t need to worry about anything as all the orders will be pushed out to EasyParcel automatically. However, if you chose the plugin version, then you had to download a plugin from EasyParcel.
To install the plugin to your website, please follow the steps outlined below:
The first step is to navigate to the add plugin page of WordPress.
On your ecommerce website dashboard, hover your mouse over the plugins tab on the left-hand sidebar and click on the add new option.
Because the plugin can only be downloaded from EasyParcel and can’t be searched on the plugins database, you would need to upload the plugin.
The second step is to upload the plugin to your website.
To do so, click on the upload plugin button at the top of the page, choose the file, and find the plugin that you have downloaded earlier from EasyParcel.
Click on the install now button to proceed with the installation.
The last step is to activate the plugin.
After the plugin gets uploaded and installed, you would still need to activate it. When the installation is successful, you see the page below and all you have to do is click on the activate plugin button.
That’s it! You have now successfully installed the EasyParcel plugin into your website.
How to Install the WooCommerce Plugin
The steps into installing the WooCommerce plugin are quite similar to installing the EasyParcel. The only difference here is that you don’t need to download the plugin from WooCommerce’s website.
All you need to do is use the search feature within the add plugins page. Simply enter “woocommerce” into the search bar and wait for the results.
You will then see WooCommerce listed as number one on that list. Click on the install now button to start the installation. After the installation, click again on the button to activate the WooCommerce plugin.
Once the plugin is installed and activated, you will now be able to access the WooCommerce settings and generate the consumer key and consumer secret, which you need for integrating EasyParcel with your website.
How to Generate REST API for WooCommerce
To properly integrate EasyParcel with WooCommerce, you would need to generate a consumer key and consumer secret which would connect your website with EasyParcel’s server. To do this, you must access the advanced settings of WooCommerce.
Here are the steps:
The first step is to navigate to the advanced settings page of WooCommerce.
On the WordPress dashboard, hover your mouse over the WooCommerce tab on the left-hand sidebar and click on settings.
Navigate to the advanced tab and click on the REST API to see all the settings related to it.
The next step is to create an API key.
The key that you would generate would allow EasyParcel to view and manage your store data. To proceed, click on the add key button
Right after that, you need to provide the details for the API key:
For the description, simply enter EasyParcel here so you would know right away what the key is all about when you view the key list in the future. If there are multiple users of the site, you could select which ones the key generated is for. As for the permission, make sure to set it to “Read/Write”.
Once you’re done, click on the generate API key button to continue.
After that, you will then be able to view the consumer key and consumer secret.
That’s it! You can now copy the codes back to EasyParcel to continue the integration process.
EasyParcel Integration With WooCommerce
As you can see, integrating EasyParcel with your ecommerce store isn’t really that difficult, even without coding knowledge or hiring someone who does. In fact, you could be done with all of this in under five minutes.
In case you still haven’t started yet, you can actually start now for as low as RM 8.40 per month. This already includes a free .com domain of your choice, 10 GB SSD storage, a free SSL certificate, and a lot more.
To get your website ready, all you have to do is design it really well and install the WooCommerce plugin to gain lots of online store functionalities. You must also market your online store as much as you can to gain initial traction.