General
December 4, 2021
16 min Read
How to Get NBI Clearance Online in the Philippines: An Ultimate Step-By-Step Guide
An NBI clearance is one of the valid IDs you can get here in the Philippines, which you need for important matters like starting an online business or getting a job. The NBI is a government authority responsible for keeping a check on the criminal as well as legal matters of the citizens.
The process of getting the clearance wasn’t an easy one in the past. But recently, an online system has made it much more convenient to get one. The requirements aren’t too complicated either as you will find out in this post.
Read on to learn about the step-by-step process, and how modern technology has made getting NBI clearance so accessible.
What is an NBI clearance and why do companies and government agencies require the citizens to get one?
An NBI clearance is a document that certifies the person has no prior criminal record, illegal cases, or shady background. It assures future organizations and employers that you're a good samaritan and responsible citizen.
Obtaining this document can seem like an intimidating task, especially considering the hassle that comes with it. The hours spent in queues, the extensive documentation required, and tedious checklists are mentally and physically exhausting.
However, with the recent advances in technology, your NBI clearance could be obtained with much less effort than before. The process has gone digital, and now all you need is internet access and a computer to get the NBI clearance done.
You could be from any city or even be abroad while applying for your clearance and still get the job done. Furthermore, the online clearance is a verified process and is eligible for use in all sorts of processes, be it foreign or local job applications, visas, or other verifications.
What are the requirements needed when applying for an NBI clearance online?
You need to prepare the following when applying for an NBI clearance online:
The ID cards accepted for online registration are the following:
The Barangay Certificate requirement is exclusive to citizens who are applying for a job for the first time.
It’s issued following the First Time Jobseekers Assistance Act. The document verifies that you have been in your residence for at least six months. It also proves that you're a first-time job applicant.
In addition to the Barangay certification, a first-time applicant may also need an Oath of Undertaking. This oath requires the presence of the Barangay captain or an authorized officer at the time of conduction.
Things to remember regarding the requirements for online application:
The online process is faster and convenient than the primitive one. Hence, it will take around half an hour to an hour max to get your clearance done. Let's get to the steps to help you through it.
First, you must visit the official NBI clearance website.
Here you will find a pop-up by the name "Data Privacy Content”. You must read the statement and click on the "I Agree" option.

This will open another pop-up by the name "Advisory," which must also be read. Once you're done, click on the "Close" button to proceed.

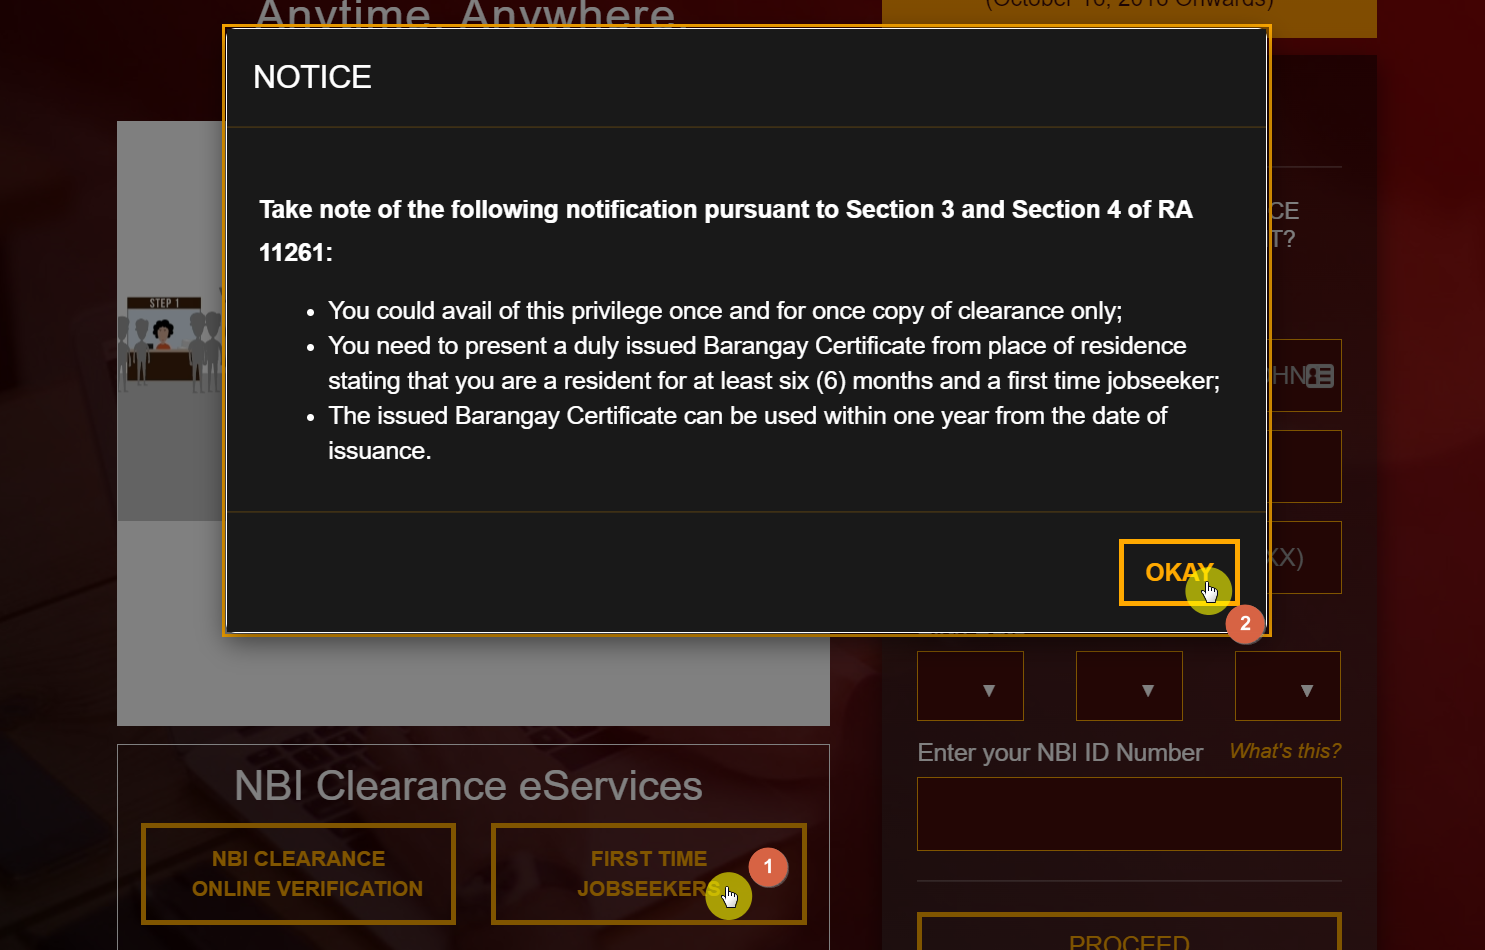
If you’re a first-time job applicant, you will find a box at the bottom that says "First-time Jobseekers". Click on this box if it relates to your needs.
Once you do, a “Notice” window will pop up. Simply read through it and click on the “Okay” button.

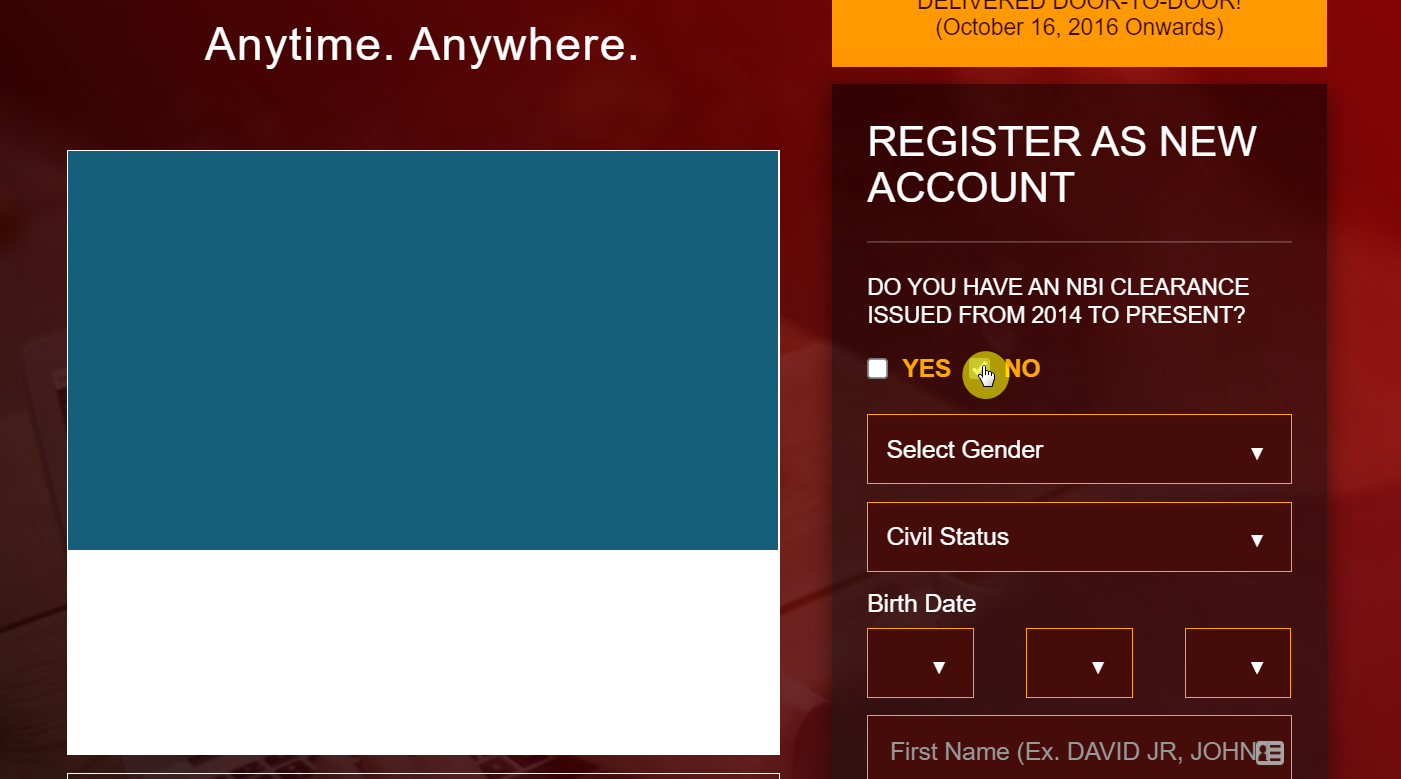
Otherwise, you can make use of the form on the right side of the page. Note that you have to indicate whether or not you have an NBI clearance issued from 2014 to the present.
If yes, you will see a shorter form since the process is more or less a renewal. If not, you will see a longer form where you have to provide additional personal information and registration credentials.

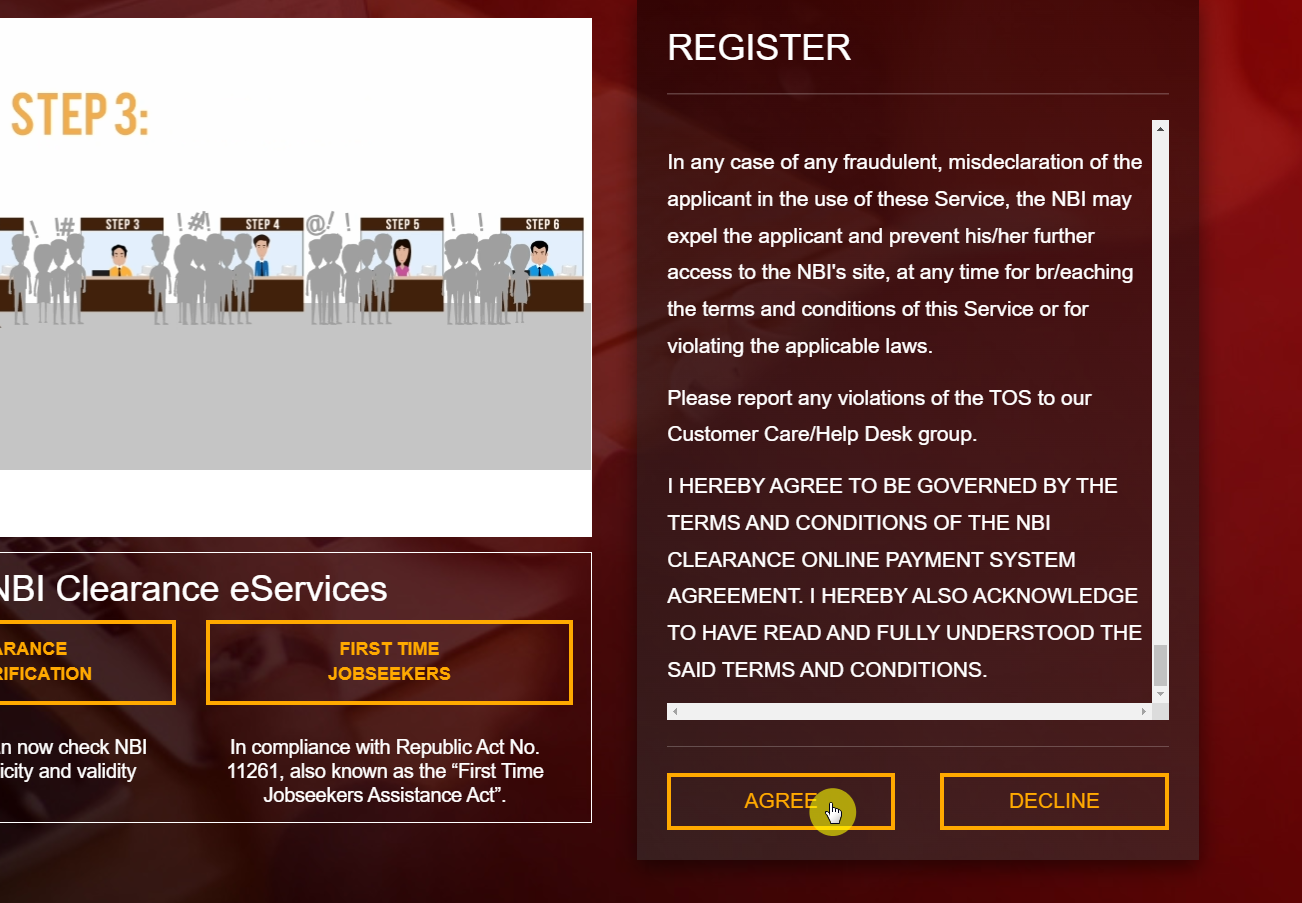
Go through the form and provide the details asked. Once you’re done, click on the box certifying that you have read the terms of services.
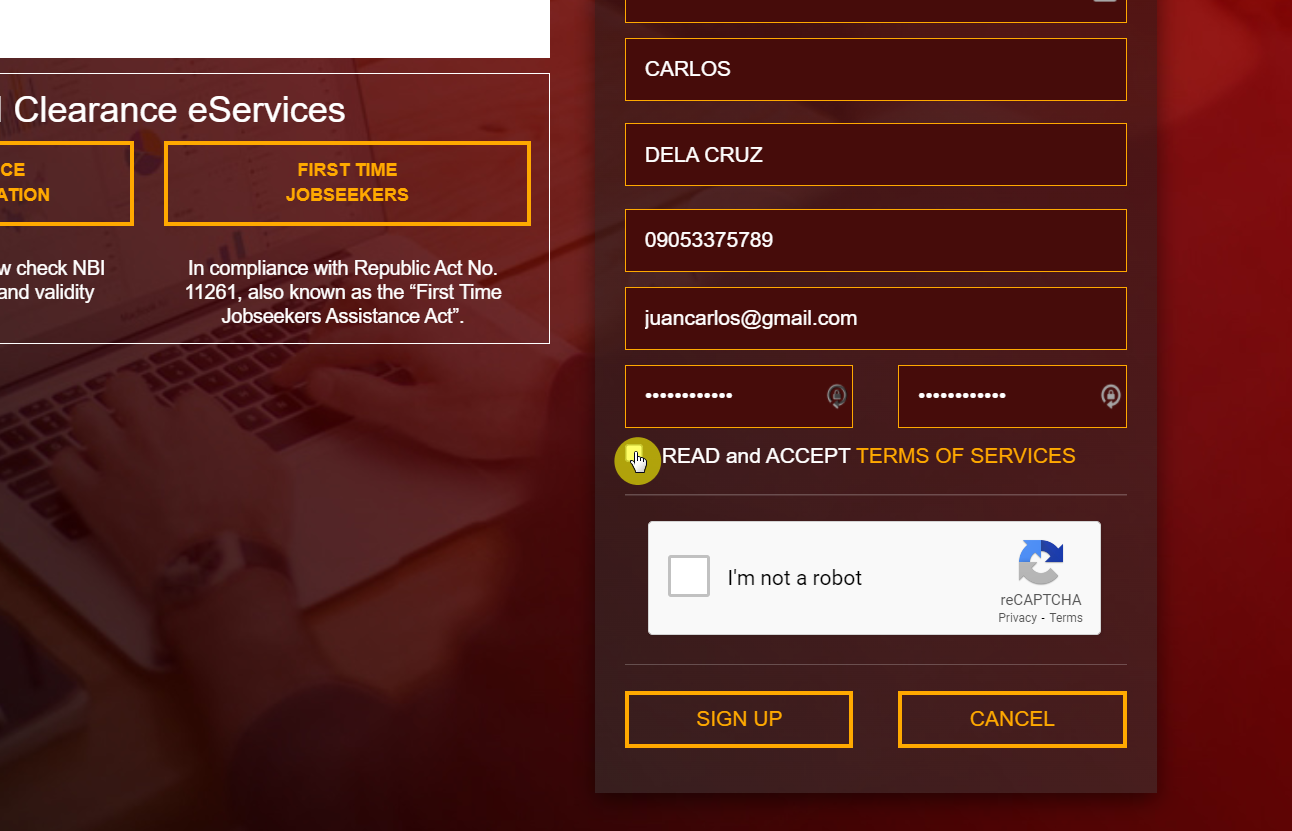

The system will then show you the terms of services. Read through them and when you’re done, click on the “Agree” button at the bottom.

Then, click on the captcha box and on the “Sign up” button.

Note:
Make sure all the information you entered is valid and correct to avoid any issues later on in the process. Furthermore, the online system does not acknowledge special characters such as hyphens. Hence, if your name has one, don't enter it.
You can get the hyphen or other characters added to your name right before the clearance gets printed. Then, all you need to do is inform your attendant, and they will add it.
Once you complete the initial process, you will be asked to enter a "One-time password" or OTP. This is part of a dual verification system that helps secure your information. The password will be sent to your number or your provided email address.
This is why it is important to add valid and correct information at the time of registration. Once you receive the OTP, enter it on the website and click on the "Submit" button.

Note:
If you didn’t receive the OTP, there's no need to panic. Instead, you can click on the "RE-SEND ONE-TIME PASSWORD (OTP)" button so a new one can be generated.
After you complete your registration, you can easily log in to your account. With this step, you can proceed with the rest of your clearance. Just enter your email and password on the form above the website, and you're good to go.


Once you are signed in to your account, you can begin filing your form. This will be in the form of "Applicant Information." Here you will provide some further information, including personal details, for example, your address and birthplace, etc.
It is obligatory to fill certain form columns for your clearance to be processed further. These columns will be marked with a red asterisk so you don't miss them. After you've completed your form, you can select the "Save Information" option at the end of the form.

This will enable another pop-up box that will show you the draft of your filled form. Once you're satisfied with the accuracy of the provided information, press "Submit."

Note:
Make sure you don't miss out on any important information and use the correct format. As the system is only familiar with spaces and letters, don't use any special characters. The system will not accept any commas and signs.
After doing the steps above, you will be brought back to your profile page.
Since you have filled out your personal information, you will now be allowed to access the application option. Click on the "Apply for Clearance" button at the top of your screen. (You can also edit your information if you need to before you proceed.)

Another pop-up window will appear on your screen. This is where you add your ID card information, including the ID type you're using as well as the ID number. Make sure you take the same ID to your appointment as you've entered in this box.
Once you're done, click on the "I Agree" option.

You will then be greeted with another reminder. Simply click on the “Close” button to continue.

Now you'll be directed to a page for the choice of an NBI clearance center. It could be the main branch located in UN Avenue or another one you can conveniently reach. Thanks to the various NBI branches, you can now get your clearance appointment from almost anywhere.

Note:
If you want to change your branch after paying the fee for any reason, there's a proper way to do that. First, you will have to get in contact with your previously mentioned branch and generate a request.
The branch will then transfer the documents to your new branch, and the process will go on. If you don't inform the concerned authorities, you won't be entertained by the new branch for your clearance.
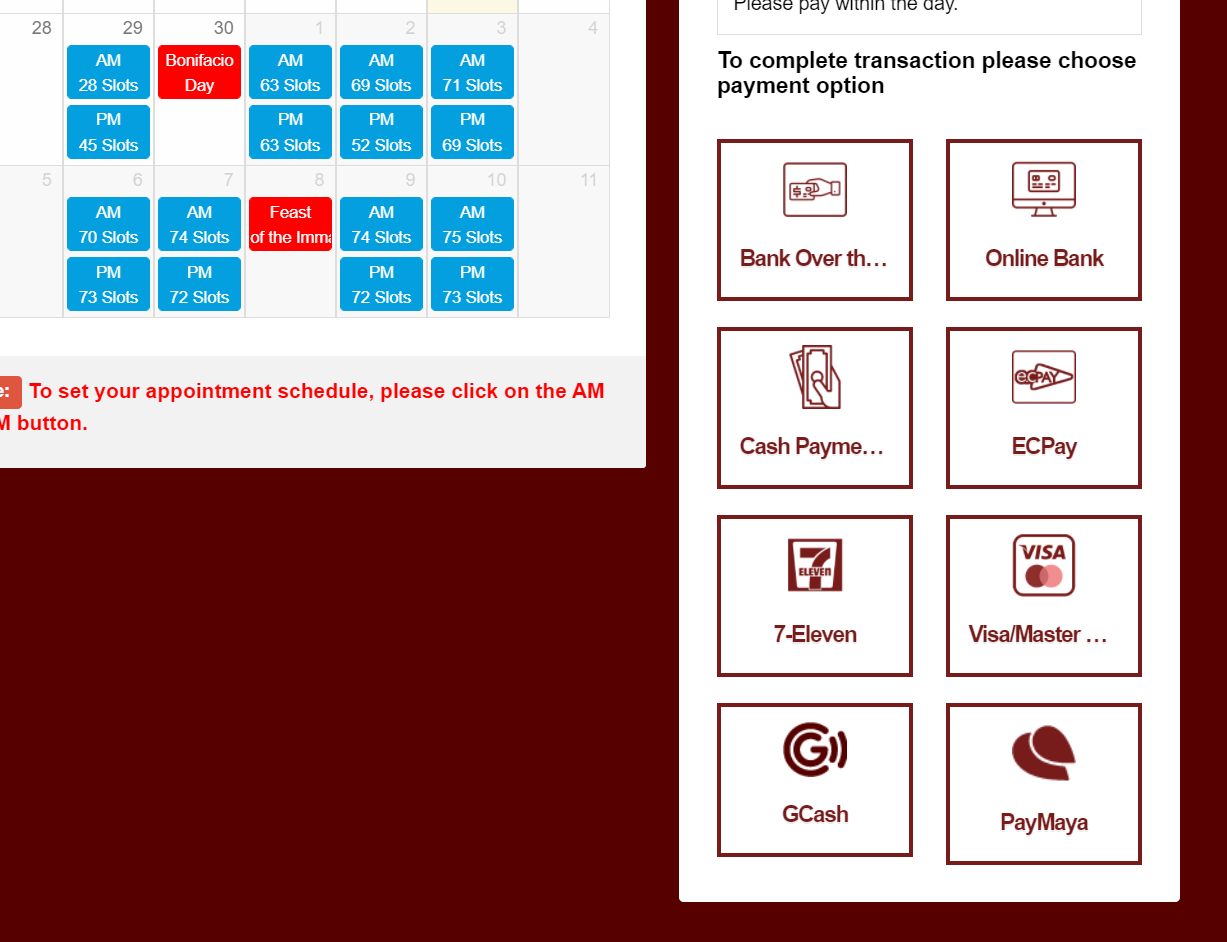
Once the location has been decided, you must set the time and date for your appointment. You will notice blue boxes in the list. These indicate vacant spots that can be availed. Click on a schedule that suits you.


Note:
You can’t change the time and date after making the payment. However, if you miss your appointment, you will get fifteen additional days to complete the application at the NBI clearance center.
Here is a list of the payment methods accepted by the system:

Once you have chosen the preferred payment option, another pop-up will come up. This will provide you with the details to proceed with the payment. You will get different details here depending on the method you chose.
For example, the image below shows what happens if you select the GCash option. But regardless of what option you go with, click on the "Proceed" button to go on to the next step.

After you pay your fee, your transaction will be shown to you. This will cost you around ₱130 for the clearance and an additional ₱25 as the transaction fee.
To continue, click on the "Proceed to Payment" option, which will either open another pop-up with your reference number or take you to the online bank portal. In the former case, you must note the reference number as it is very significant.


The system will then show you the reference number along with the total fee you need to pay:

The reference number will allow you to enter the NBI clearance center in the future and will also be used to pay your clearance fee. You will receive a confirmation email after your payment has been made.
To check the application status, you can click the "Transactions" option and see if the fee has been paid or is still pending.

On your appointment day, you will need the reference number or application form along with your ID cards to complete your clearance successfully.
The next step is to head over to the NBI branch you chose earlier at the time and day you indicated. Your biometrics and photograph will be taken there. Remember, you must keep your documents with you to enter the center and initiate this procedure.
If your records are clear, you will receive your clearance immediately. There are instances when people experience a hit in their application process. This indicates the detection of criminal records.
They may not necessarily be yours. It could be someone with the same name as you, who may be the proprietor of these records. For these hits, the clearance may take a few days to process.
However, there is no such thing as priority numbers, and it's all just a scam to attain money from you. In such cases, remember to never entertain their offer and report them to respective authorities.
What they are doing is a punishable act under the Republic Act No. 9485 or the Anti-Red Tape Act of 2007.
Here are answers to some questions you might be asking:
Thanks to the online system, the NBI clearance doesn't take very long anymore. The maximum time it will take is between 30 to 45 minutes. First, they will check your requirements, and after verification, you will proceed to the next step.
In the next step, your biometrics will be done. You will do your digital signature and your photo will be taken. In most cases, your clearance will be given immediately.
However, if your namesake has shady records, there might be a delay, and the situation will be considered a “hit”. In this case, the process can take anywhere from 5 to 15 days, so you will have to be a little patient.
Your NBI clearance will cost you ₱130. In addition, depending on your method of payment, you might be charged an extra transaction fee. For example, for e-payment services, you will be charged an extra ₱25, which puts the total cost to ₱155.
The NBI clearance validity is up to 12 months from the date it's issued. The short duration of validity is to keep your records updated. If you get involved in illegal activities during this duration, it can get noted easily once you get a renewal.
For a quick and hassle-free renewal of your NBI clearance, you should opt for "Quick renewal." The process is online, and you will receive your clearance in the span of a few days.
The best part about this method is that you don't have to go to any NBI clearance center to obtain your renewed clearance.
In another case, you can also make an online appointment. Then, you will have to visit the mentioned NBI clearance center, where your biometrics will be done. Later, your digital signatures and photos will also be taken.
This option suits people who may have dealt with technical issues with the "quick renewal" method. It is also appropriate if you want to edit, change, remove, or add certain personal information.
You only need the Barangay certificate if you are a first-time job applicant attempting to get your clearance for free. This is under the "First Time Jobseekers Assistance Act”.
The document verifies you have been in your residence for at least six months. It also proves you're a first-time job applicant.
In addition to the Barangay certification, an applicant also has to get an Oath of Undertaking. This oath requires the presence of the Barangay captain or an authorized officer at the time it is conducted.
If your case is still pending, you are eligible for an NBI clearance. If a case is under scrutiny by the fiscal's office and has yet to reach the courts, an NBI clearance can be achieved easily.
According to the NBI policy, a case is only considered once it has entered the court's records. So, if the status of your case is not present in the clearance, it is probably still being looked at by the fiscal's office. Furthermore, the decision of its dismissal lies in their hands.
Sadly, it isn't possible to change the date and time of your appointment once you have paid the fee. However, if the payment hasn't been made yet, it is possible to schedule another appointment.
All you need to do is apply with the date and time of your choice and ignore the entry and reference number issued before this.
The basic purpose of both types of clearances is the same. They verify a person's criminal records. However, the NBI clearance is much more vast and informative than a police clearance.
The police clearance is limited and covers only a city, whereas an NBI clearance covers all the person's records from any city in the Philippines.
This means if you have been charged with robbery in Cebu, the police clearance in Manila won't record it. However, the NBI clearance will have these records and will track your activity more successfully.
The police clearance is also unable to take note of civil cases, which the NBI easily does.
This concludes all the steps involved in obtaining your online NBI clearance, which is important if you plan on starting an online business.
Make sure you apply in the right category and are punctual with your deadlines as well as appointments. In addition, take all your valid and required documents with you on your appointment to avoid any hassle in the process.
If you haven’t started your online business yet, you might want to make sure of z.com’s web hosting plans starting at ₱69 per month only. This plan already includes a free .com domain and 50 email accounts, which you can use to apply for an NBI clearance online.
The process of getting the clearance wasn’t an easy one in the past. But recently, an online system has made it much more convenient to get one. The requirements aren’t too complicated either as you will find out in this post.
Read on to learn about the step-by-step process, and how modern technology has made getting NBI clearance so accessible.
What is an NBI clearance and why do companies and government agencies require the citizens to get one?
An NBI clearance is a document that certifies the person has no prior criminal record, illegal cases, or shady background. It assures future organizations and employers that you're a good samaritan and responsible citizen.
Obtaining this document can seem like an intimidating task, especially considering the hassle that comes with it. The hours spent in queues, the extensive documentation required, and tedious checklists are mentally and physically exhausting.
However, with the recent advances in technology, your NBI clearance could be obtained with much less effort than before. The process has gone digital, and now all you need is internet access and a computer to get the NBI clearance done.
You could be from any city or even be abroad while applying for your clearance and still get the job done. Furthermore, the online clearance is a verified process and is eligible for use in all sorts of processes, be it foreign or local job applications, visas, or other verifications.
What are the requirements needed when applying for an NBI clearance online?
You need to prepare the following when applying for an NBI clearance online:
- Two valid ID cards
- Barangay certificate (if you’re a first-time job applicant)
- Working email address
- ₱130 (application fee)
The ID cards accepted for online registration are the following:
- Passport
- Voter's ID
- PRC and Driver's License
- Pag-IBIG ID
- UMID (SSS plus GSIS)
- Postal ID
- Local Civil Registrar issued certificate
- MARINA ID
- School ID card
- Seaman's book
- Solo parent ID
- Company ID( (only government servants)
- Malacanang certificate for indigenous groups
- Police clearance
The Barangay Certificate requirement is exclusive to citizens who are applying for a job for the first time.
It’s issued following the First Time Jobseekers Assistance Act. The document verifies that you have been in your residence for at least six months. It also proves that you're a first-time job applicant.
In addition to the Barangay certification, a first-time applicant may also need an Oath of Undertaking. This oath requires the presence of the Barangay captain or an authorized officer at the time of conduction.
Things to remember regarding the requirements for online application:
- When applying, you will be required to mention the IDs you will be using at your appointment.
- Non-government-issued identification and certification are not valid for clearance.
- The documents and identification you bring should be legible, government-issued, and original (photocopies are not acceptable).
- Applicants who need to renew their clearance (2014 and beyond) can bring only one legitimate identification. In addition, a copy of their prior clearance should also accompany them.
How to get NBI clearance online
The online process is faster and convenient than the primitive one. Hence, it will take around half an hour to an hour max to get your clearance done. Let's get to the steps to help you through it.
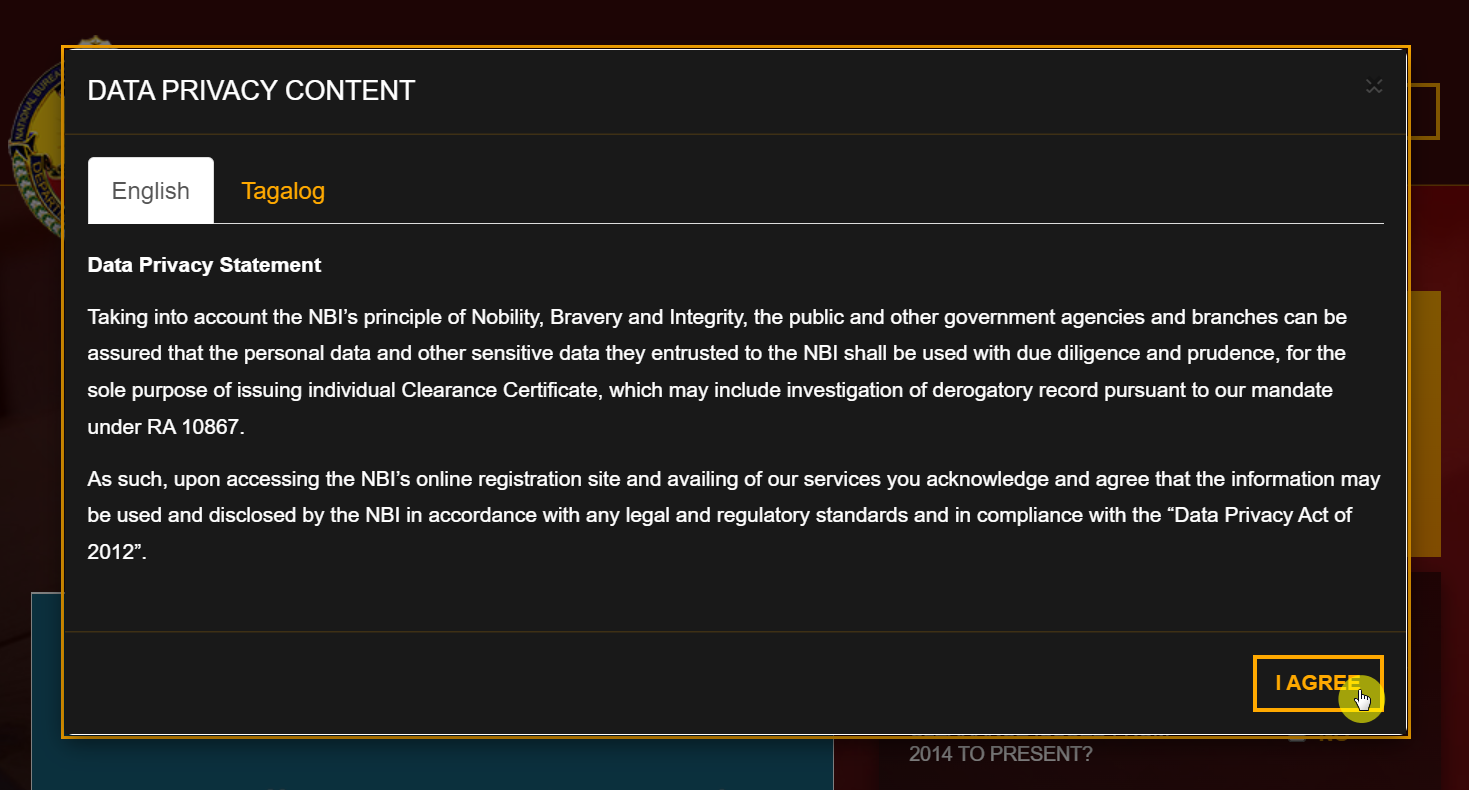
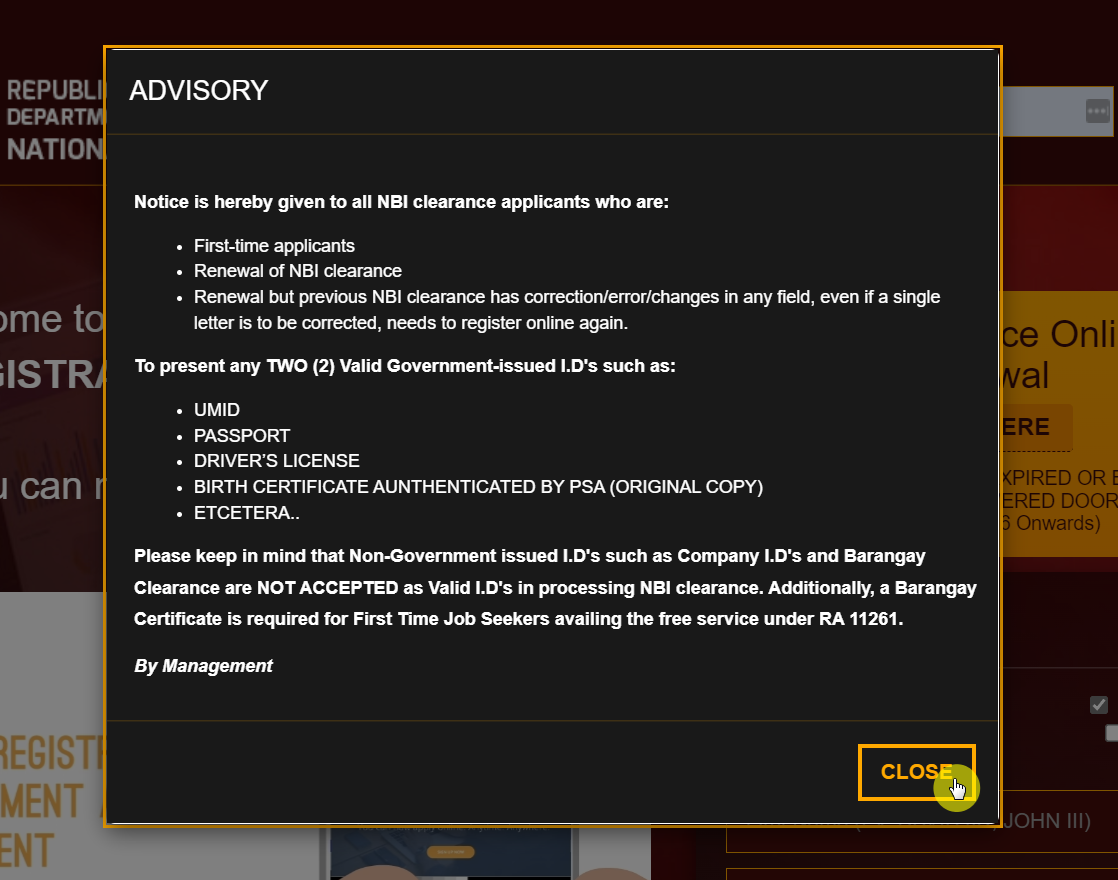
1. Go to the NBI clearance website
First, you must visit the official NBI clearance website.
Here you will find a pop-up by the name "Data Privacy Content”. You must read the statement and click on the "I Agree" option.
This will open another pop-up by the name "Advisory," which must also be read. Once you're done, click on the "Close" button to proceed.
2. Complete your registration
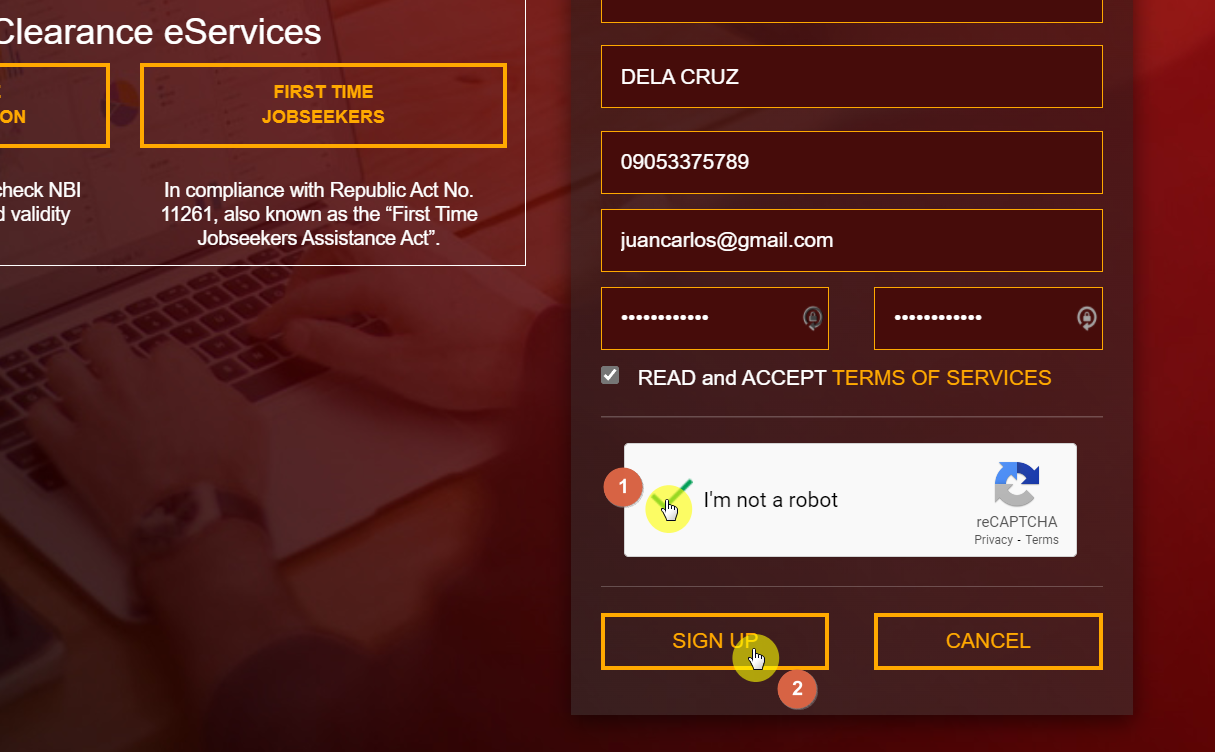
If you’re a first-time job applicant, you will find a box at the bottom that says "First-time Jobseekers". Click on this box if it relates to your needs.
Once you do, a “Notice” window will pop up. Simply read through it and click on the “Okay” button.
Otherwise, you can make use of the form on the right side of the page. Note that you have to indicate whether or not you have an NBI clearance issued from 2014 to the present.
If yes, you will see a shorter form since the process is more or less a renewal. If not, you will see a longer form where you have to provide additional personal information and registration credentials.
Go through the form and provide the details asked. Once you’re done, click on the box certifying that you have read the terms of services.
The system will then show you the terms of services. Read through them and when you’re done, click on the “Agree” button at the bottom.
Then, click on the captcha box and on the “Sign up” button.
Note:
Make sure all the information you entered is valid and correct to avoid any issues later on in the process. Furthermore, the online system does not acknowledge special characters such as hyphens. Hence, if your name has one, don't enter it.
You can get the hyphen or other characters added to your name right before the clearance gets printed. Then, all you need to do is inform your attendant, and they will add it.
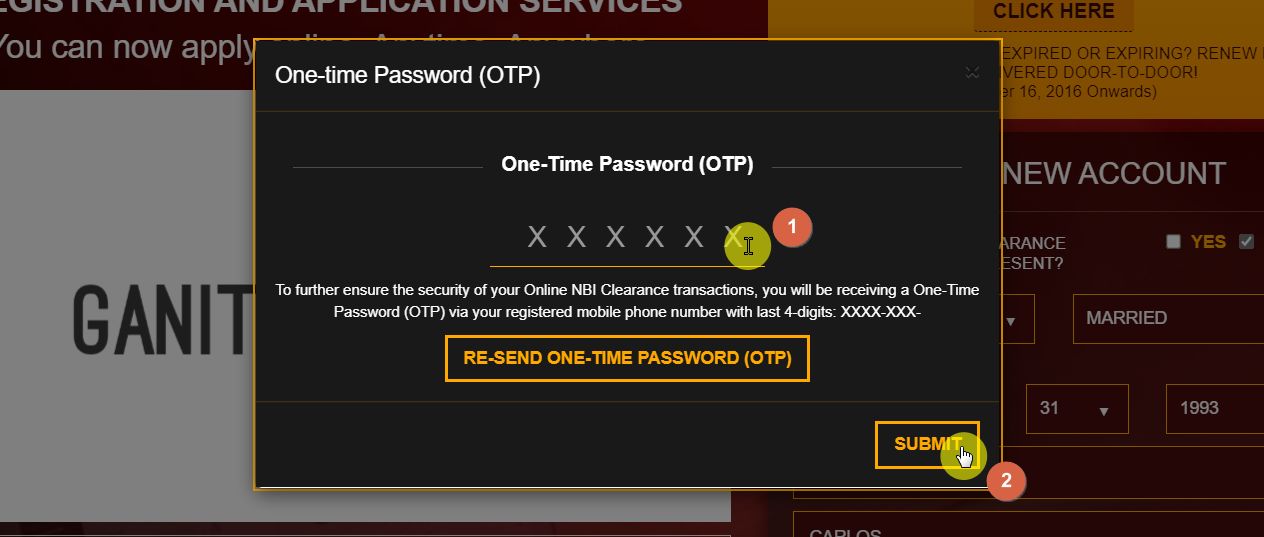
3. Enter the one-time password
Once you complete the initial process, you will be asked to enter a "One-time password" or OTP. This is part of a dual verification system that helps secure your information. The password will be sent to your number or your provided email address.
This is why it is important to add valid and correct information at the time of registration. Once you receive the OTP, enter it on the website and click on the "Submit" button.
Note:
If you didn’t receive the OTP, there's no need to panic. Instead, you can click on the "RE-SEND ONE-TIME PASSWORD (OTP)" button so a new one can be generated.
4. Log in for further processing
After you complete your registration, you can easily log in to your account. With this step, you can proceed with the rest of your clearance. Just enter your email and password on the form above the website, and you're good to go.
5. Fill the required form
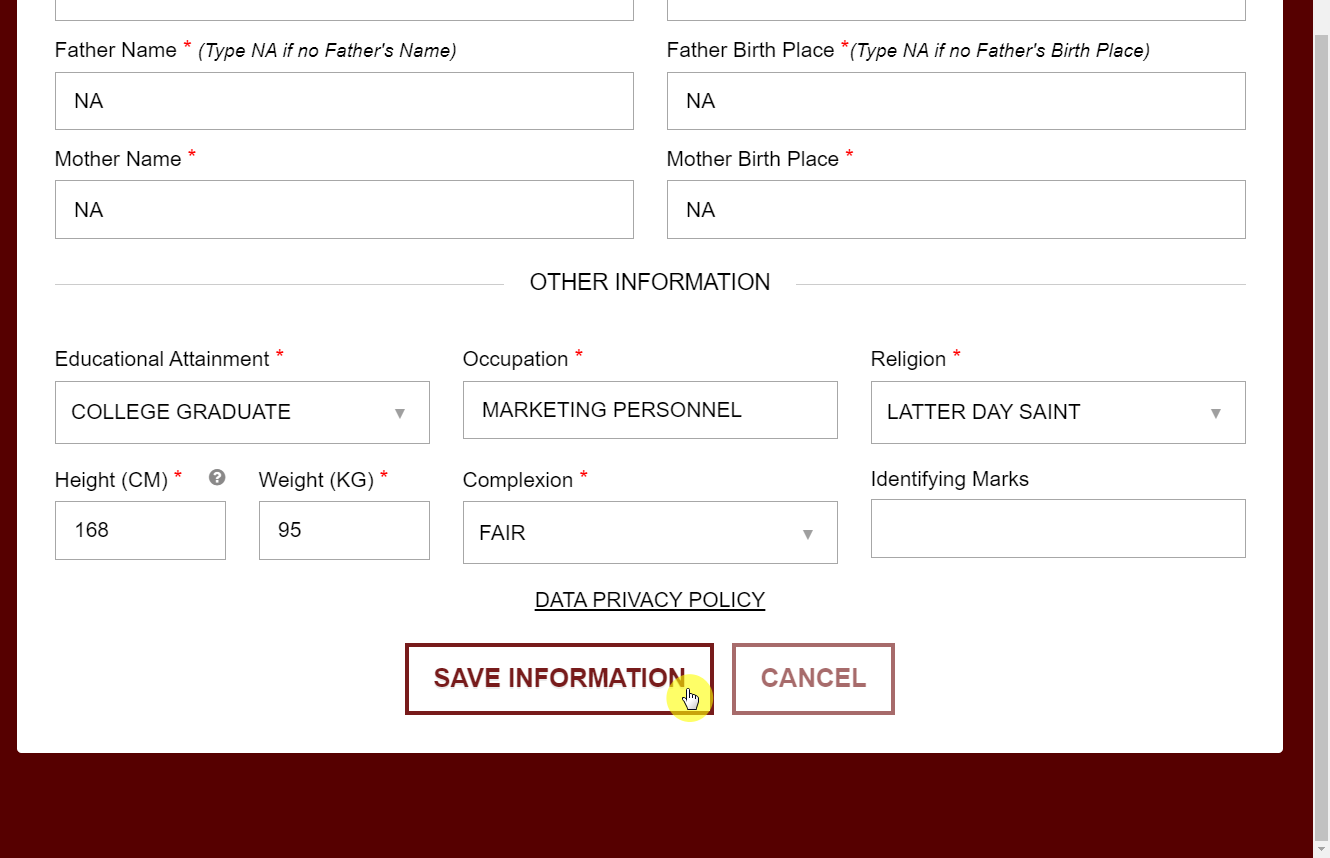
Once you are signed in to your account, you can begin filing your form. This will be in the form of "Applicant Information." Here you will provide some further information, including personal details, for example, your address and birthplace, etc.
It is obligatory to fill certain form columns for your clearance to be processed further. These columns will be marked with a red asterisk so you don't miss them. After you've completed your form, you can select the "Save Information" option at the end of the form.
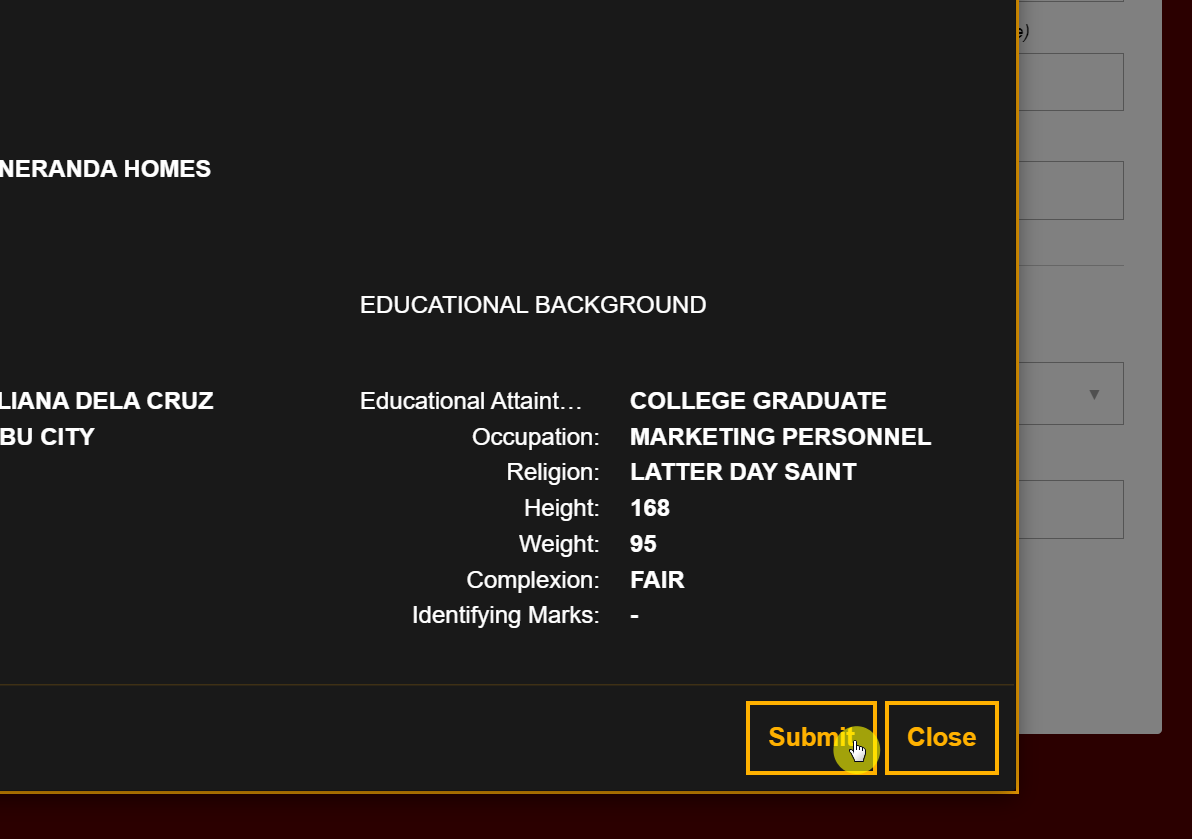
This will enable another pop-up box that will show you the draft of your filled form. Once you're satisfied with the accuracy of the provided information, press "Submit."
Note:
Make sure you don't miss out on any important information and use the correct format. As the system is only familiar with spaces and letters, don't use any special characters. The system will not accept any commas and signs.
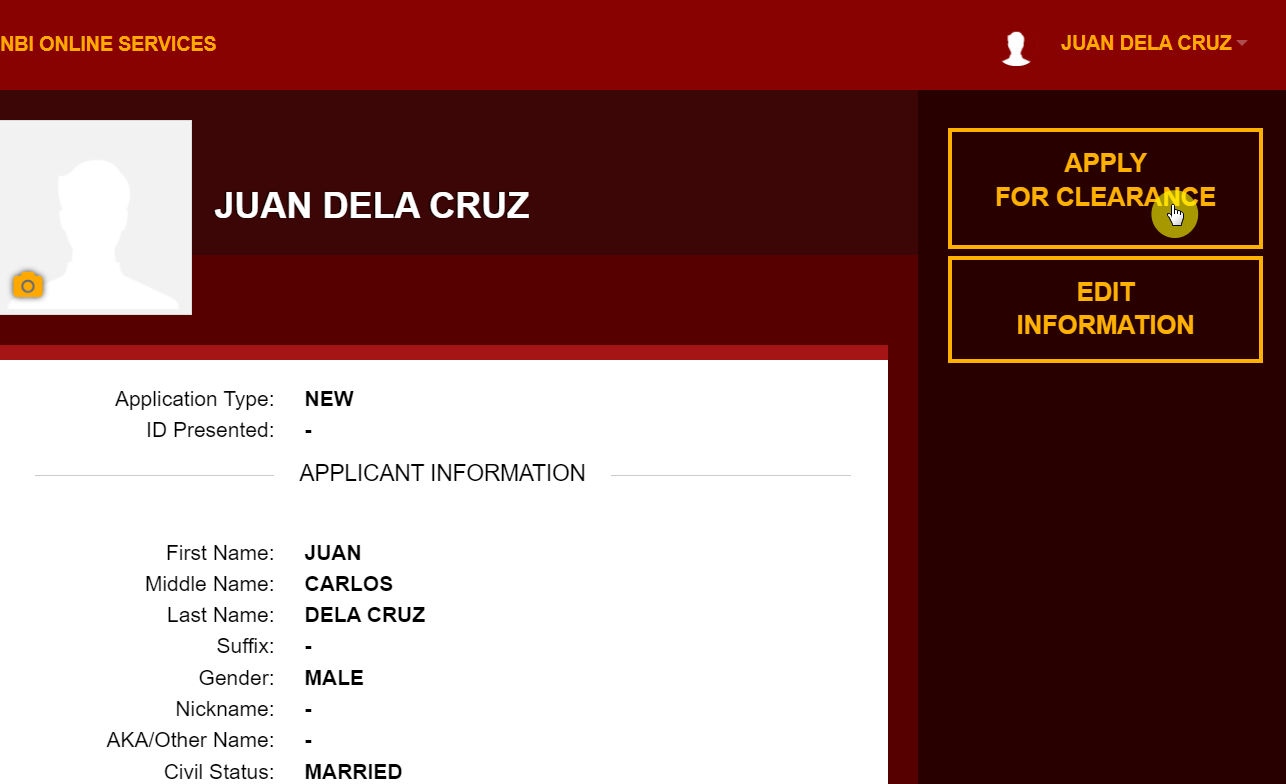
6. Choose the “Apply for clearance” option
After doing the steps above, you will be brought back to your profile page.
Since you have filled out your personal information, you will now be allowed to access the application option. Click on the "Apply for Clearance" button at the top of your screen. (You can also edit your information if you need to before you proceed.)
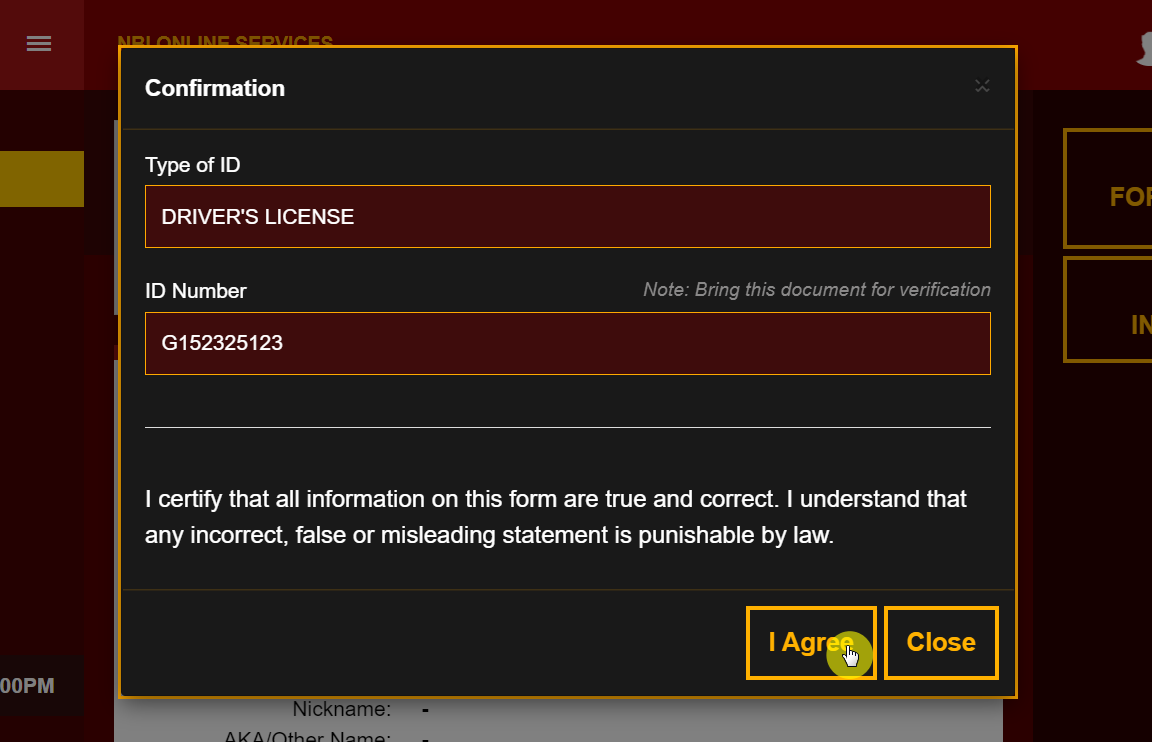
7. Provide your identification information
Another pop-up window will appear on your screen. This is where you add your ID card information, including the ID type you're using as well as the ID number. Make sure you take the same ID to your appointment as you've entered in this box.
Once you're done, click on the "I Agree" option.
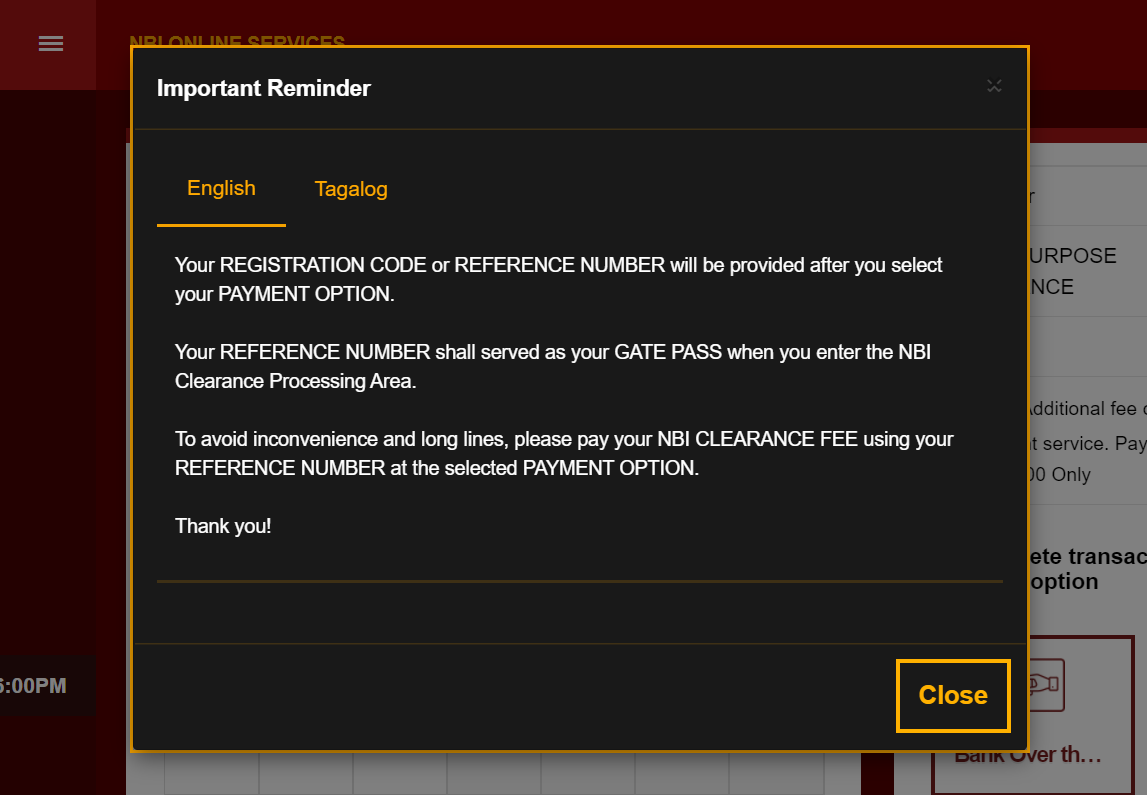
You will then be greeted with another reminder. Simply click on the “Close” button to continue.
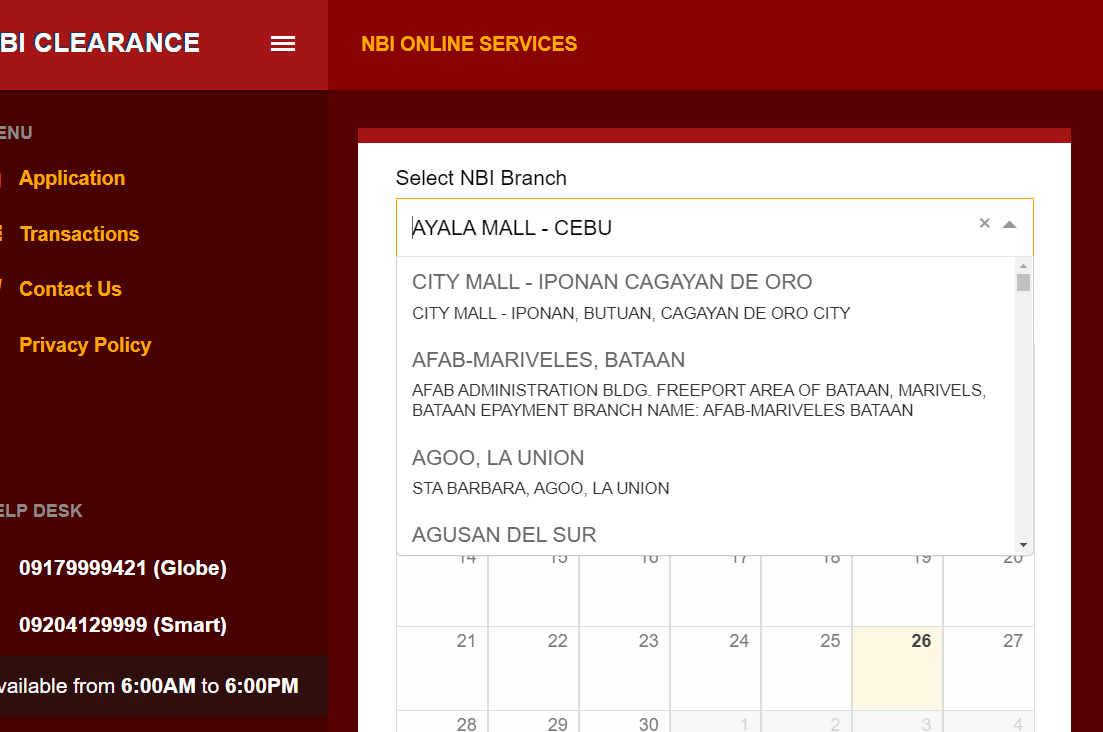
8. Choose your preferred or closest NBI clearance center
Now you'll be directed to a page for the choice of an NBI clearance center. It could be the main branch located in UN Avenue or another one you can conveniently reach. Thanks to the various NBI branches, you can now get your clearance appointment from almost anywhere.
Note:
If you want to change your branch after paying the fee for any reason, there's a proper way to do that. First, you will have to get in contact with your previously mentioned branch and generate a request.
The branch will then transfer the documents to your new branch, and the process will go on. If you don't inform the concerned authorities, you won't be entertained by the new branch for your clearance.
9. Choose a suitable schedule for your appointment
Once the location has been decided, you must set the time and date for your appointment. You will notice blue boxes in the list. These indicate vacant spots that can be availed. Click on a schedule that suits you.
Note:
You can’t change the time and date after making the payment. However, if you miss your appointment, you will get fifteen additional days to complete the application at the NBI clearance center.
10. Select your preferred payment method
Here is a list of the payment methods accepted by the system:
- Over-the-counter payment: This is a cash payment in any bank. For example, Chinabank, RCBC, PNB, MetroBank and BDO etc.
- Online transaction: An online payment can be made through BPI and Unionbank EON easily
- Bayad Centre or Partner outlets: Partner outlets to Bayad like Villarica Pawnshop, SM Savemore, Lhullier will accept payments
- Bayad Centre Mobile: The Bayad Centre app is available on Playstore to make your payment convenient
- ECPay: All ECPay partners like Petron Corporation can be used
- 7-Eleven: All 7-eleven branches are entertaining the payment of the NBI clearance fee
- Mastercard or VISA card: You can use your debit card to pay your fee as well
- GCash: An innovative payment method that works through a mobile app. It's like carrying a wallet in your phone and is compatible with payment of the NBI clearance fee
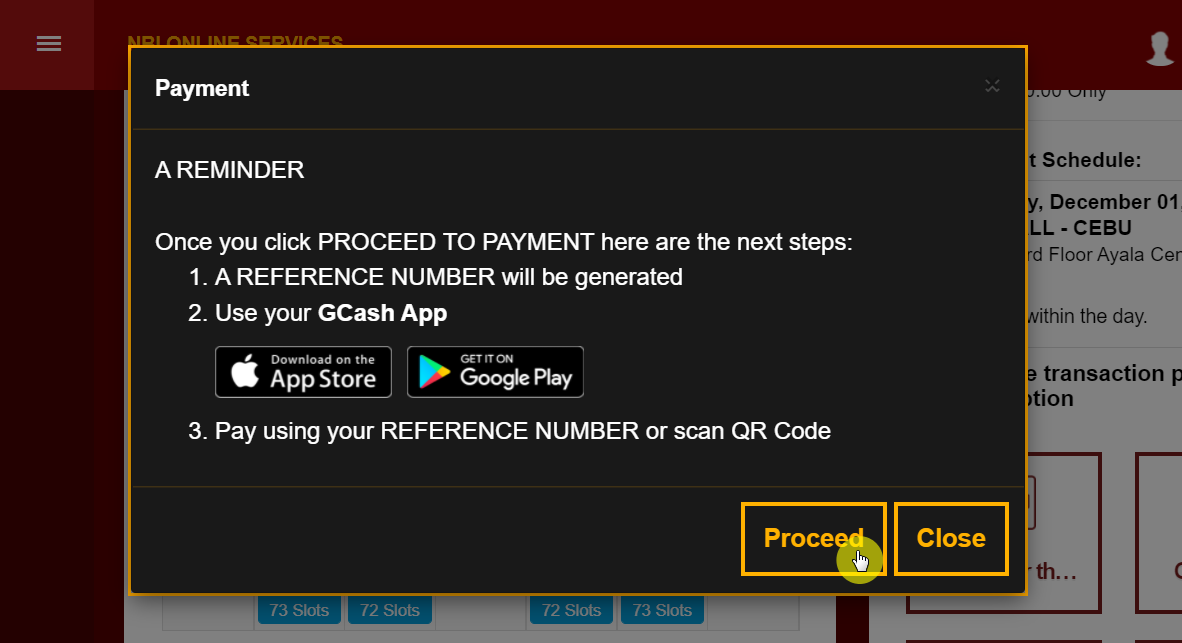
Once you have chosen the preferred payment option, another pop-up will come up. This will provide you with the details to proceed with the payment. You will get different details here depending on the method you chose.
For example, the image below shows what happens if you select the GCash option. But regardless of what option you go with, click on the "Proceed" button to go on to the next step.
11. Pay your clearance dues
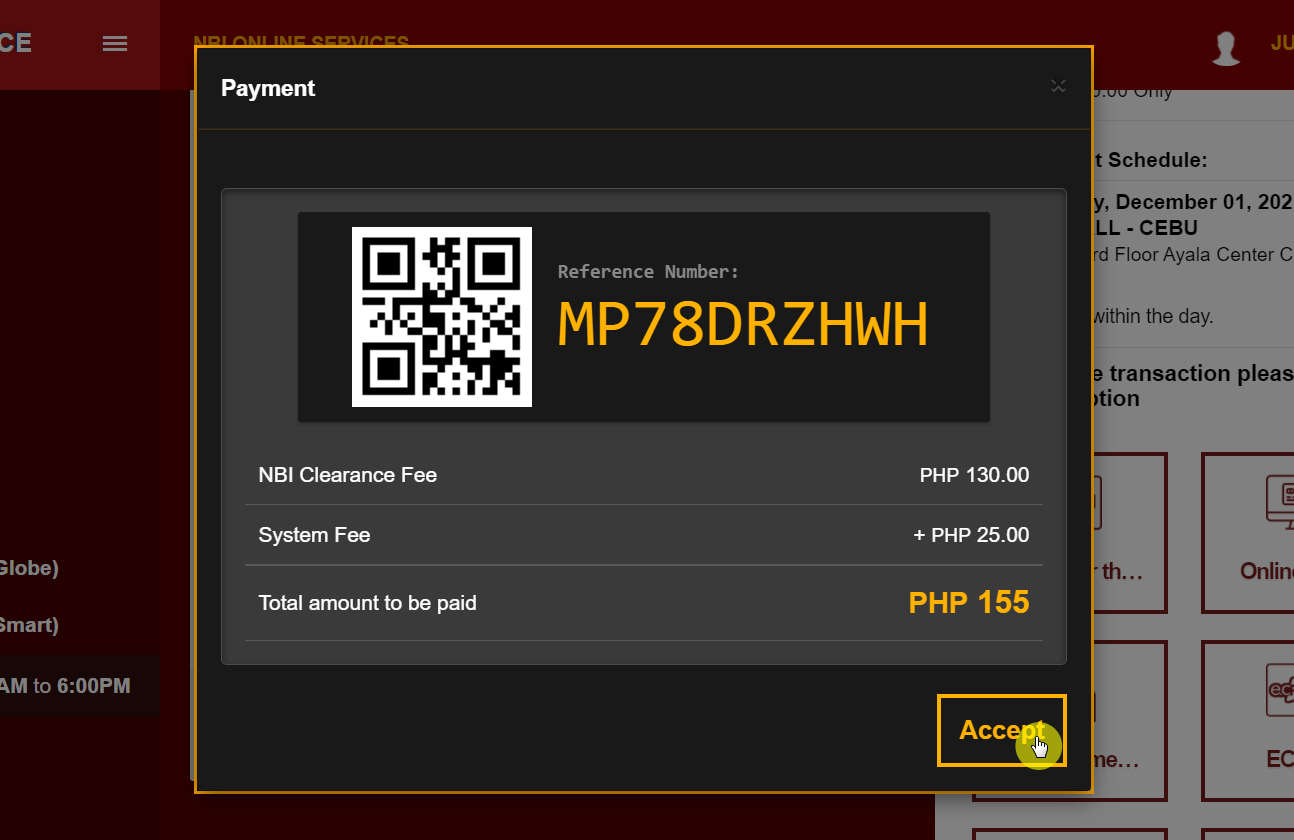
After you pay your fee, your transaction will be shown to you. This will cost you around ₱130 for the clearance and an additional ₱25 as the transaction fee.
To continue, click on the "Proceed to Payment" option, which will either open another pop-up with your reference number or take you to the online bank portal. In the former case, you must note the reference number as it is very significant.
The system will then show you the reference number along with the total fee you need to pay:
The reference number will allow you to enter the NBI clearance center in the future and will also be used to pay your clearance fee. You will receive a confirmation email after your payment has been made.
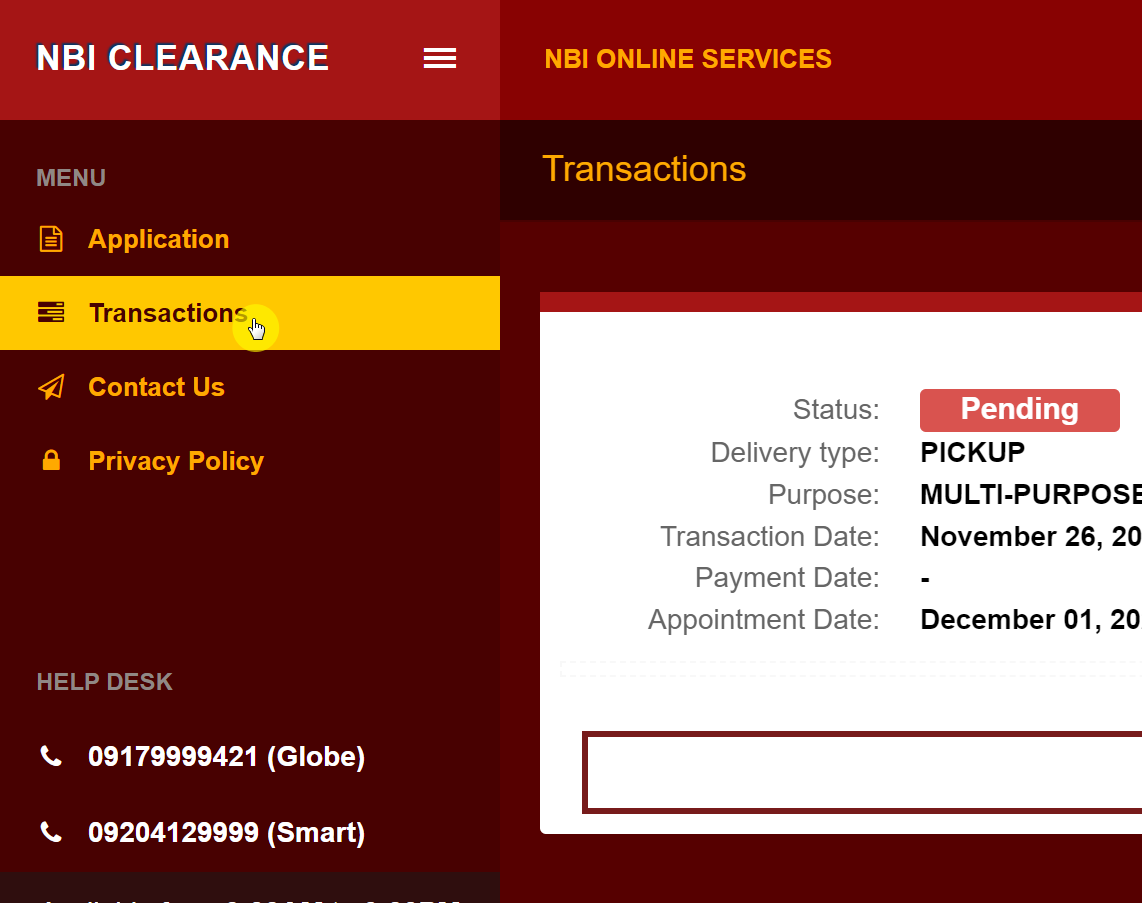
To check the application status, you can click the "Transactions" option and see if the fee has been paid or is still pending.
On your appointment day, you will need the reference number or application form along with your ID cards to complete your clearance successfully.
12. Go to the NBI center
The next step is to head over to the NBI branch you chose earlier at the time and day you indicated. Your biometrics and photograph will be taken there. Remember, you must keep your documents with you to enter the center and initiate this procedure.
If your records are clear, you will receive your clearance immediately. There are instances when people experience a hit in their application process. This indicates the detection of criminal records.
They may not necessarily be yours. It could be someone with the same name as you, who may be the proprietor of these records. For these hits, the clearance may take a few days to process.
Important points to remember when applying for an NBI clearance online:
- NBI will only entertain your clearance request if you have made a prior valid online appointment.
- Physical appearance at the NBI clearance center is mandatory to further process your application in all cases except for foreign applications.
- There is no age limit for the NBI clearance application for any Filipino.
- President Rodrigo Duterte approved the First Time Job Seekers Assistance Act in April of 2019. This act made it easier for fresh graduates, especially first-time job seekers, to obtain their NBI clearance free of cost.
- The updated NBI has been declared a multi-purpose one. This eliminates the concept of the green NBI clearance, which was used for foreign traveling and employment purposes. The new one is universally valid for all local and foreign purposes.
- Some shady individuals might approach you near the NBI clearance center, offering to get your work done faster in exchange for money. They usually offer to provide "priority numbers" by saying they have connections inside the NBI.
However, there is no such thing as priority numbers, and it's all just a scam to attain money from you. In such cases, remember to never entertain their offer and report them to respective authorities.
What they are doing is a punishable act under the Republic Act No. 9485 or the Anti-Red Tape Act of 2007.
Frequently asked questions about applying for an NBI clearance online
Here are answers to some questions you might be asking:
How long does the entire NBI clearance process take?
Thanks to the online system, the NBI clearance doesn't take very long anymore. The maximum time it will take is between 30 to 45 minutes. First, they will check your requirements, and after verification, you will proceed to the next step.
In the next step, your biometrics will be done. You will do your digital signature and your photo will be taken. In most cases, your clearance will be given immediately.
However, if your namesake has shady records, there might be a delay, and the situation will be considered a “hit”. In this case, the process can take anywhere from 5 to 15 days, so you will have to be a little patient.
How much does it cost to get an NBI clearance online?
Your NBI clearance will cost you ₱130. In addition, depending on your method of payment, you might be charged an extra transaction fee. For example, for e-payment services, you will be charged an extra ₱25, which puts the total cost to ₱155.
How long is the NBI clearance valid?
The NBI clearance validity is up to 12 months from the date it's issued. The short duration of validity is to keep your records updated. If you get involved in illegal activities during this duration, it can get noted easily once you get a renewal.
How can I renew my NBI clearance online?
For a quick and hassle-free renewal of your NBI clearance, you should opt for "Quick renewal." The process is online, and you will receive your clearance in the span of a few days.
The best part about this method is that you don't have to go to any NBI clearance center to obtain your renewed clearance.
In another case, you can also make an online appointment. Then, you will have to visit the mentioned NBI clearance center, where your biometrics will be done. Later, your digital signatures and photos will also be taken.
This option suits people who may have dealt with technical issues with the "quick renewal" method. It is also appropriate if you want to edit, change, remove, or add certain personal information.
Do I need a Barangay clearance to get an NBI clearance?
You only need the Barangay certificate if you are a first-time job applicant attempting to get your clearance for free. This is under the "First Time Jobseekers Assistance Act”.
The document verifies you have been in your residence for at least six months. It also proves you're a first-time job applicant.
In addition to the Barangay certification, an applicant also has to get an Oath of Undertaking. This oath requires the presence of the Barangay captain or an authorized officer at the time it is conducted.
Can you still get an NBI clearance if you have a pending case?
If your case is still pending, you are eligible for an NBI clearance. If a case is under scrutiny by the fiscal's office and has yet to reach the courts, an NBI clearance can be achieved easily.
According to the NBI policy, a case is only considered once it has entered the court's records. So, if the status of your case is not present in the clearance, it is probably still being looked at by the fiscal's office. Furthermore, the decision of its dismissal lies in their hands.
Can I reschedule my NBI clearance appointment? What if I wasn't able to make it to the first schedule?
Sadly, it isn't possible to change the date and time of your appointment once you have paid the fee. However, if the payment hasn't been made yet, it is possible to schedule another appointment.
All you need to do is apply with the date and time of your choice and ignore the entry and reference number issued before this.
What is the difference between an NBI clearance and a police clearance?
The basic purpose of both types of clearances is the same. They verify a person's criminal records. However, the NBI clearance is much more vast and informative than a police clearance.
The police clearance is limited and covers only a city, whereas an NBI clearance covers all the person's records from any city in the Philippines.
This means if you have been charged with robbery in Cebu, the police clearance in Manila won't record it. However, the NBI clearance will have these records and will track your activity more successfully.
The police clearance is also unable to take note of civil cases, which the NBI easily does.
Apply for an NBI clearance today
This concludes all the steps involved in obtaining your online NBI clearance, which is important if you plan on starting an online business.
Make sure you apply in the right category and are punctual with your deadlines as well as appointments. In addition, take all your valid and required documents with you on your appointment to avoid any hassle in the process.
If you haven’t started your online business yet, you might want to make sure of z.com’s web hosting plans starting at ₱69 per month only. This plan already includes a free .com domain and 50 email accounts, which you can use to apply for an NBI clearance online.
PROMO
FREE Web Hosting
for Your Website
Learn More