8 Quick Solutions to Remove the “this site can’t be reached” Error!
As mentioned earlier, while the causes might be uncertain, the following solutions can help you address and resolve the issue:
1. Restart Your Router
The first thing that you can try out is restarting your router. Many times, the connection does not pull through because there is a glitch in the router. Simply restarting it would bring the connection back to you.
Simply click on the power button and hold it until it is turned off. Repeat the process to turn it on. However, some routers have the easy press-to-turn-off feature. Make sure to check what configuration your model carries. In addition, usually, the power button is at the back of the router but it may be at a different placement depending on the model of your router.
Once you have turned the power switch off, you can also remove the cord to make the process more efficient. Leave it like that for a minute before replacing the cord back into the socket. Turn the power button on to see if the error is gone.
2. Disable Antivirus Programs and Windows Firewall
Sometimes, the antivirus programs and the built-in firewall are the main culprits behind the connection error. This may happen as a misunderstanding or a deliberate action because these programs are responsible for blocking threatening sites and actions.
If you want to see if this is the problem, disable them to see if the error is gone. Depending on the antivirus you use, the settings would be different to deactivate it. Similarly, the built-in firewall in your system would depend on what operating system you are using. Here are the steps to deactivate the Windows Firewall.
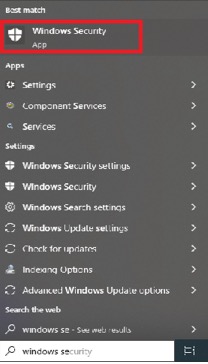
1. Search for Windows Security from the Start menu and click on it.
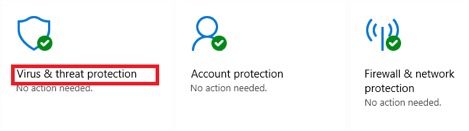
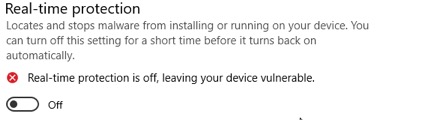
2. Choose Virus & threat protection.
- Press the Real-time protection button under the Manage Settings tab to turn it off.
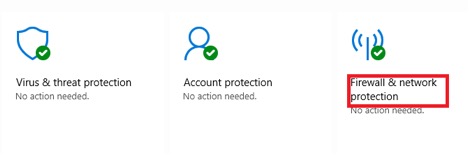
- Now, look for the Firewall & network protection by going back.
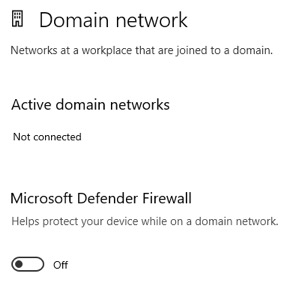
- Go to Domain network and toggle the Microsoft Defender Firewall button.
- Reload the website to check the visibility of the error.
If the website loads without any issue, then the Firewall must have been blocking it. However, you cannot leave your defense system disabled. Instead, you can turn the Firewall off for that specific site and let it keep running in the background for every other site. Here is how to do that.
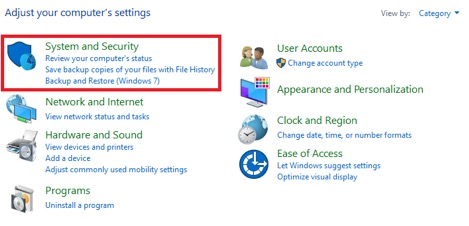
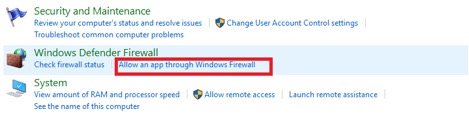
- Go to the Control Panel and search for System and Security.
- Locate the Windows Defender Firewall tab.
- Now, select the Allow an app through Windows Firewall option.
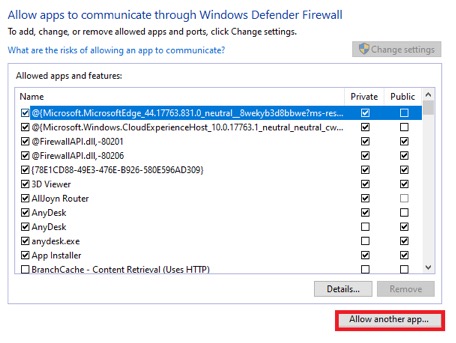
- Tap on the Change Settings button.
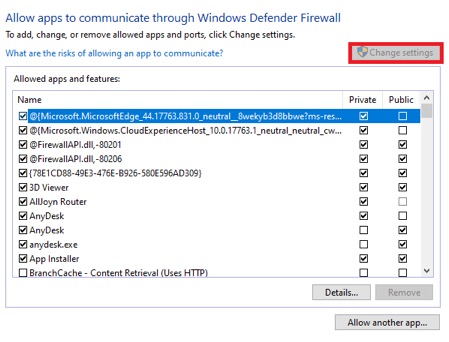
- Alter the settings as per your liking. If you do not see the DNS client there, click on Allow another app…
3. Make Use of Window’s Internet Connections Troubleshooter
If you have Windows, you can make use of the built-in troubleshooter to find the cause behind the error. When you run it, you may find other potential issues within your system too. Here is how to do it.
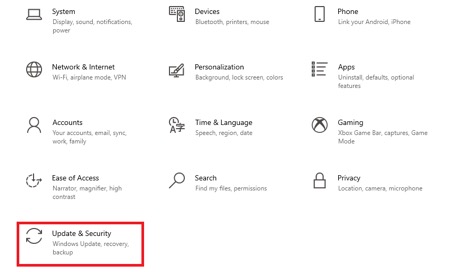
- Open Settings from the Start Menu.
- Go to Update & Security.
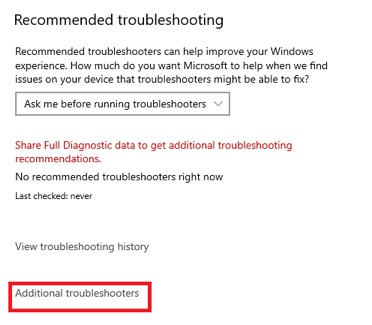
- Tap on Troubleshoot.

- Then, tap on Additional troubleshooters.
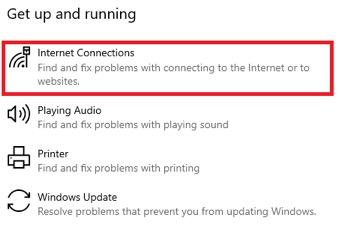
- Choose Internet Connections.
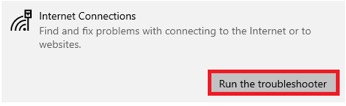
- Press Run the Troubleshooter.
4. Clear the Browser Cookies and Cache
Another cause behind the error could be the outdated cache and cookies. They can lead to a bunch of different errors in your system. They may be an aid towards personalizing your experience on the internet but could also become corrupt and cause problems. The best way to steer clear of errors is by regularly removing the cache and cookies on your browser.
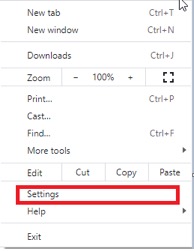
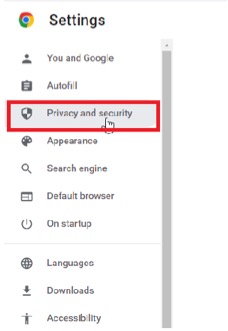
1. Open Google Chrome and click on the three dots in the upper right corner.

2. Go to Settings.
3. Now head to Privacy and security.
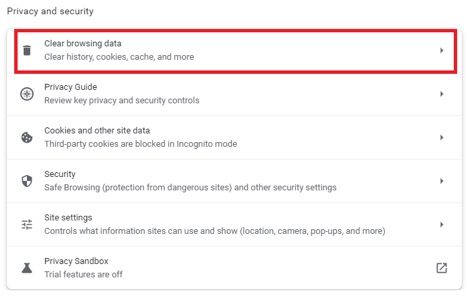
4. Click on Clear browsing data.
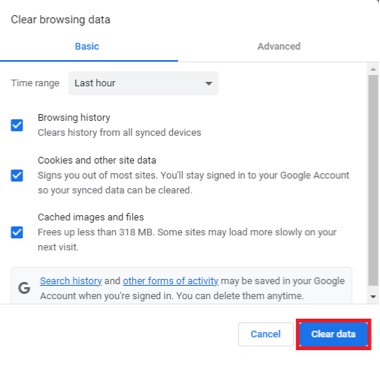
- In the pop-up window, check all the boxes. You can select the time duration of the cache you want to delete to only delete a specific website’s saved version.

- Confirm by clicking on Clear data.
5. Change Your DNS Server to Public DNS
When you get the internet from an Internet Service Provider, they assign a certain DNS server to you. However, you can change it and use an alternate DNS server to make your connections for you. A public DNS server is available, thanks to Google which we will be replacing with the current server in the steps below.
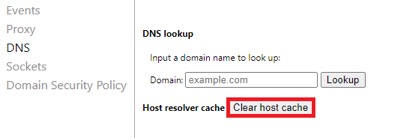
- Go to Google Chrome and type in chrome://net-internals/#dns on the address bar.
![]()
![]()
- Click on Clear Host Cache. That’s it!
- Search for Network & Internet or locate it from the Control Panel.

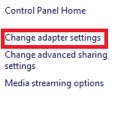
- Head to the Network and Sharing Center.

- On your left, you will find the Change adapter settings. Click on it.
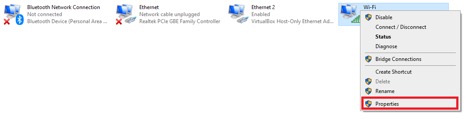
- Skim through the network options to find your network. Right-click on it to find and press on Properties.
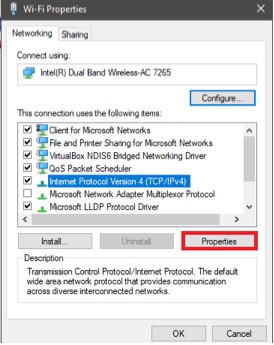
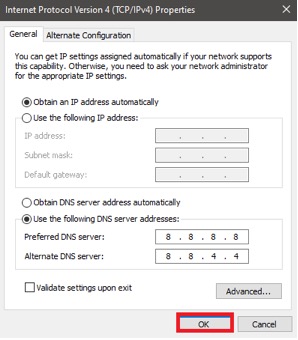
- From the list, select Internet Protocol Version 4 (TCP/IPv4) and go to Properties.
- You will find a number of options. Choose “Use the following DNS server addresses.”
- Type “8.8.8.8” in the Preferred DNS server block and “8.8.4.4” in the Alternate DNS server block. You can also leave the Alternate DNS server area blank.
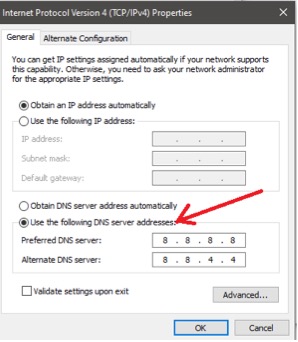
- Hit OK to save the changes.
6. Flush the DNS Cache
Just like browser cache, DNS cache can also be a problem for the users. It helps in limiting the time that the server takes to fetch the DNS records. However, if they become outdated and corrupt, the cache can be the reason why your site is not connection.
Moreover, if a domain has shifted to a new host name, there is a high chance that these old cache in your DNS may lead to an error with connecting to the new site. Follow these steps to flush the DNS cache from your system.
1. Go to the Start Menu and search for the command prompt.
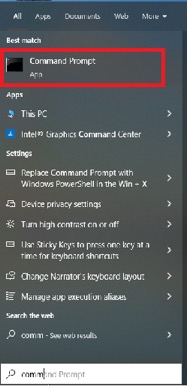
2. Open Command Prompt.
3. Once it opens, type the syntax: ipconfig /flushdns.
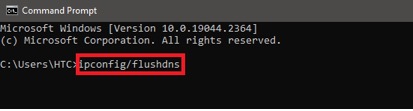
4. Press the Enter key.
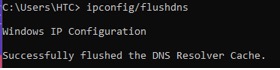
5. A message will pop up saying, Successfully flushed the DNS Resolver Cache.
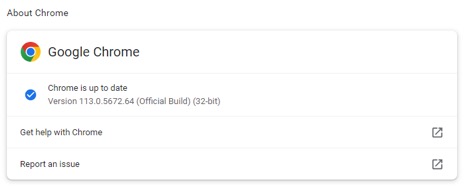
7. Update Chrome
Sometimes, an old version of the browser could be the culprit behind the errors. If you update your browser, you will get a bug-free version that is free of errors like being unable to connect the site to you.
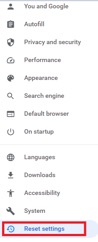
8. Reset Chrome
You can also factory reset the Chrome settings on your system. This is the last resort as it will delete all existing data from your browser. From your saved card details, history, and login information to personalized feeds on various platforms, all will be deleted. So, if you are following through with these steps, make sure that all other methods have not helped you.
- Go to Settings on Google Chrome.
- Scroll down to see Reset Settings.
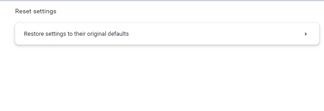
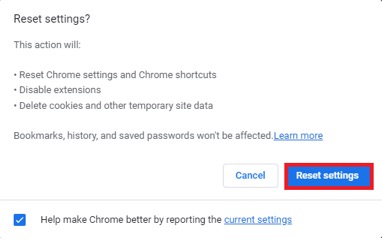
- Tap on Restore settings to their original defaults.
- Select Reset Settings.
Conclusion
In conclusion, the exact cause of the "this site can't be reached" error may not be easily pinpointed. Primary factors could include unstable internet connections or conflicts arising from security programs. Nonetheless, trying out the suggested quick fixes can potentially resolve the issue and help you regain access to the desired site.

PROMO
FREE Web Hosting
for Your Website