DNS_Probe_Started Error and How to Fix it With 8 Quick Solutions
While browsing the web, you may encounter issues such as the DNS_Probe_Started Error, which is a result of a network problem. Nonetheless, this error can be easily managed.
In this blog post, you will learn about the problems you may face with the DNS_Probe_Started error, the reasons behind it, and solutions to help you mitigate it.
We will focus primarily on Google Chrome as our browser, but don't let that confuse you. By adapting the steps mentioned here, you can find a solution for other operating systems as well. So, let's dive right in!
What is the DNS_Probe_Started Error?
DNS or the Domain Name System takes a hostname or a website address that is translated into an IP address from the contact book of the DNS. This way, it acts as a medium between you and the server, translating where needed for the comprehension of both parties.
The DNS_Probe_Started error is a type of DNS-related error that indicates a problem with the DNS probe on your computer. A DNS probe is responsible for the quality assurance check on the hostname. Moreover, it determines the ability and the speed to fetch the translation of a hostname into a workable IP address.
If the probe is compromised for any reason, you may see this error appear on your browser. This error mostly runs on Google Chrome, but you may find it on Microsoft Edge and other browsers too.
Reasons For the DNS_Probe_Started Error to Occur
There are a number of reasons why this error may surface on your screen. Sometimes, the source of the error is as minimal as an outdated cache in your browser or the problem may be with a poorly configured DNS server.
8 Easy and Quick Solutions
There might be different causes for this error and even unknown, but its solutions are clear. Skim through the list to find the solution for the DNS error on your end.
1. Change Your DNS Directory
On your computer, there is a designated DNS server that helps locate the relevant IP addresses. You can change this server to any popular DNS server to make faster and safer connections. Google Public DNS is one of the most popular Domain Name Systems that can help you achieve this.
There are two versions of IP addresses: IPv4 and IPv6. The former is the older version, also known as IP version 4, while the latter is the newer version, also known as IP version 6. Although there are many differences between the two, IPv6 offers more variations in hostnames, thereby creating a larger directory of IP addresses.
Google Public DNS supports both versions of IP addresses. It even allows you to pick one of them as your preferred choice if you are inclined towards one more than the other. Here's how you can change your DNS server.
- Search for Network & Internet or locate it from the Control Panel.
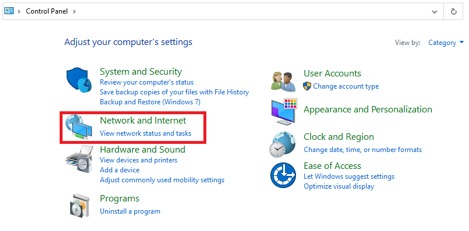
- Head to the Network and Sharing Center.

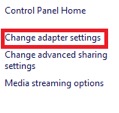
- On your left, you will find the Change adapter settings. Click on it.
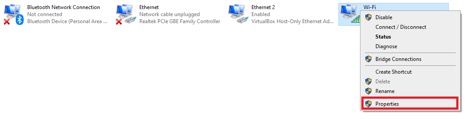
- Skim through the network options to find your network. Right-click on it to find and press on Properties.
- From the list, select Internet Protocol Version 4 (TCP/IPv4) and go to Properties.
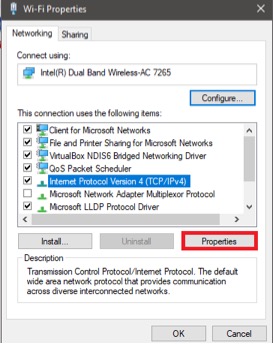
- You will find a number of options. Choose “Use the following DNS server addresses.”
- Type “8.8.8.8” in the Preferred DNS server block and “8.8.4.4” in the Alternate DNS server block. You can also leave the Alternate DNS server area blank.
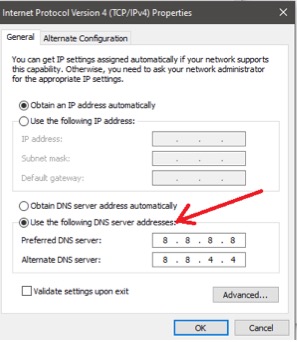
- Hit OK to save the changes.

2. Flush the DNS Cache
Just like a browser cache, there is a DNS cache that may interrupt a proper network run. You can eliminate this happening by removing the DNS cache from your system and fixing the probe error.
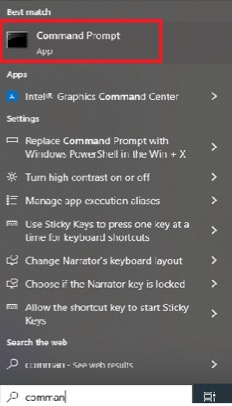
- Search for Command Prompt in the Start menu.
- Write the following code,
![]()
![]()
- After removing the DNS cache, type this to renew your IP address.
![]()
![]()
- Lastly, you must register the new DNS settings with your ISP. To do this, write
![]()
![]()
- Close and refresh by writing Exit.
![]()
![]()
3. Get Rid of the Browser Cache
Cookies and cache can lead to a number of errors if they are not removed. Similarly, you may also encounter the DNS_Probe_Started error if the cache in your system has become outdated. One way to avoid this and many such errors is by removing them.
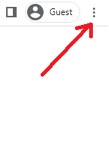
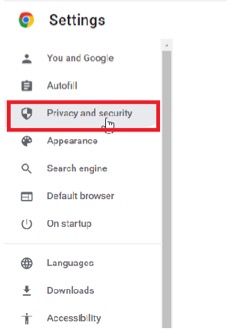
- On Google Chrome, click on the three dots on the right side of the screen.
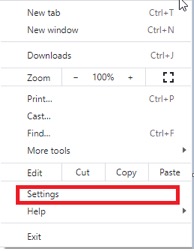
- Go to Settings.
- Head to Privacy and security.
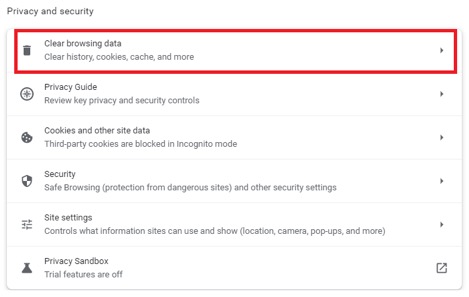
- Tap on Clear browsing data.
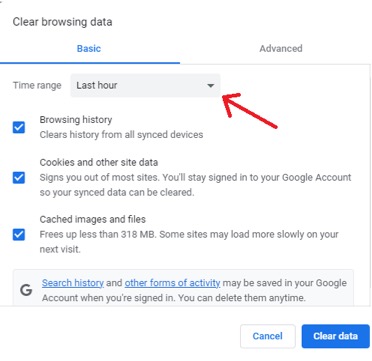
- In the pop-up window, check all the boxes.
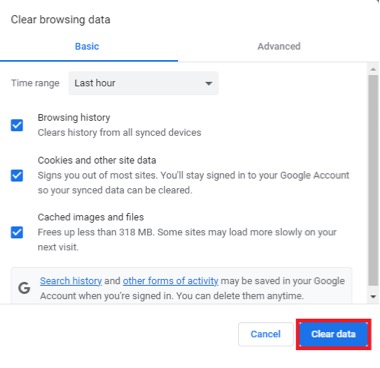
- Confirm by clicking on Clear data.
4. Update the Network Drivers
An important part of keeping your system running smoothly is handling all updates. If there is anything outdated or old, the system may experience a lag or an error like the DNS_Probe_Started error.
Similarly, if you do not keep your network drivers updated, the system won’t be able to encounter any bugs. In general, you will be missing out on a bunch of bug fixes and improvements for various features. Your best bet is to uninstall and reinstall the drivers from the Device Manager.
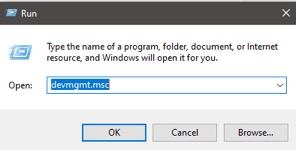
- Search for the Run app from the Start menu.
- Type “devmgmt.msc” and hit OK.
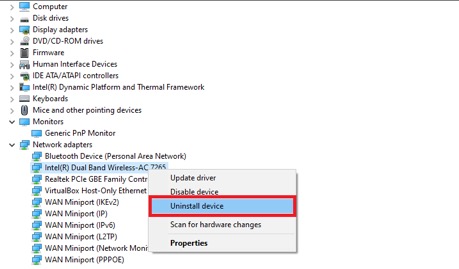
- Press the Network adapters to open the tab. Find and right-click on your adapter.
- Select Uninstall device.
- Close the window and restart your computer.
- Follow the first two steps again.
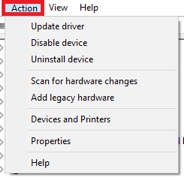
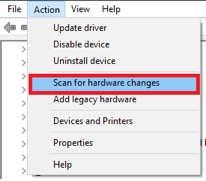
- Now, click on Network Adapter and press the Action option from the top bar.
- Go to Scan for hardware changes.
- Reload the website to see if the error is gone.
5. Take Help from the Troubleshooter
The Internet Connections Troubleshooter is a great tool to help you locate and resolve issues that you may not be aware of. Additionally, it can help detect issues that you might not be able to identify on your own. This tool is especially helpful if you are not very tech-savvy because it is easy to use and doesn't require a lot of technical knowledge to operate.
- Go to Settings on your computer and head to Update & Security.
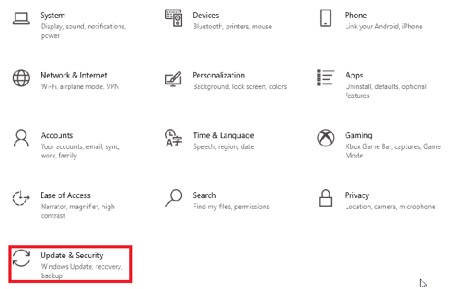
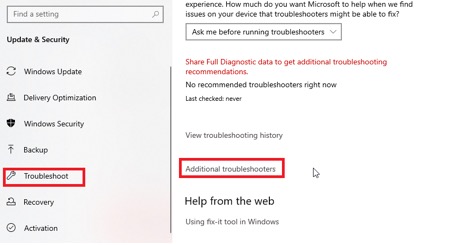
- Now, go to Troubleshoot. Scroll down to find Additional troubleshooters.
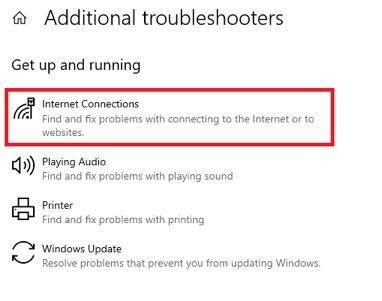
- Find and select Internet Connections.
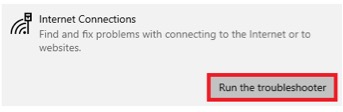
- Press the Run the troubleshooter button.
- Choose the issue you want to fix and the Troubleshooter will guide you with each problem.
6. Disable the Antivirus Program & the Firewall
Antivirus and Firewalls solve many issues in the background but could lead to other errors at the front. The DNS_Probe_Started error is one such error that the Antivirus may be creating indirectly.
You may encounter it because the program must have found the website shady and may have blocked it. This is all manageable though. You can temporarily disable the Antivirus program & the Firewall to see if this is the reason behind the error.
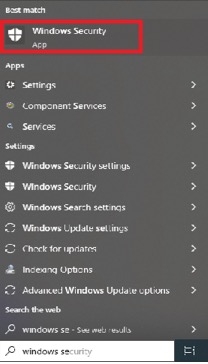
- Search for Windows Security from the Start menu and click on it.
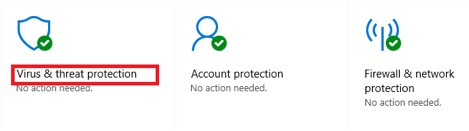
- Choose Virus & threat protection.
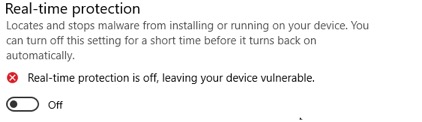
- Press the Real-time protection button under the Manage Settings tab to turn it off.
- Now, look for the Firewall & network protection by going back.
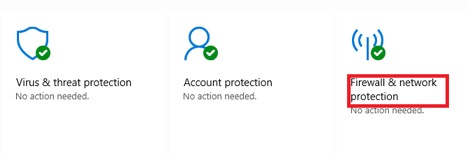
- Go to Domain network and toggle the Microsoft Defender Firewall button.
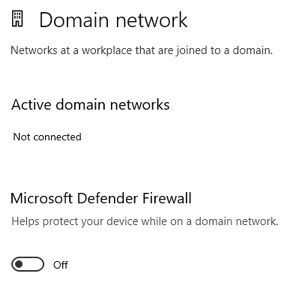
- Reload the website to see if the error is still there.
If the website loads without any error, then the Firewall must have been the primary issue. You do not have to keep the firewall disabled or turn it off whenever you need to access that particular site. Instead, you can adjust the settings to your liking such that the firewall is only disabled when you use that site.
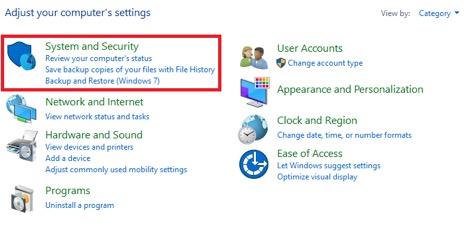
- Go to the Control Panel and search for System and Security.
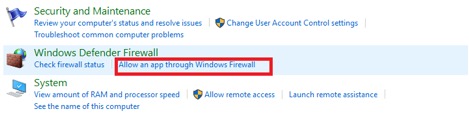
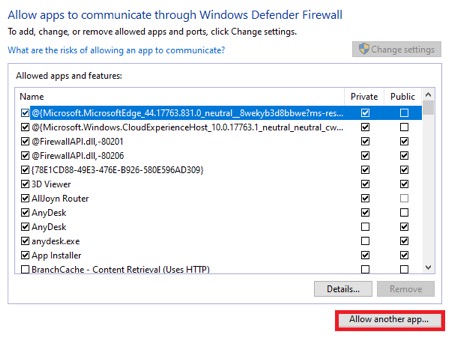
- Locate the Windows Defender Firewall tab.
- Now, select the Allow an app through Windows Firewall option.
- Tap on the Change Settings button.
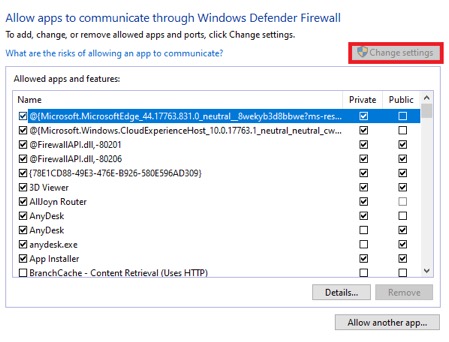
- Alter the settings as per your liking. However, if the respective DNS client is not there, you can always add it to adjust the settings. This can be done by clicking on Allow another app…
7. Try a Different Browser
The DNS_Probe error could also be a result of an outdated browser. To check if your browser is the issue, try loading the same site on a different browser. If you regularly use Chrome as your default browser, use Microsoft Edge or Mozilla Firefox to see if the error is still there.
If the probe error is not visible on other browsers, try updating your existing browser. It may help in the mitigation of the error.
8. Reset Your Connection
Another way to remove the DNS_Probe_Started error is to reset the connection between the DNS server and your computer. The simplest way to do that is by restarting your router.
You can do this by turning off your router and removing all the plugs. Reinsert the plugs and start the router to see if the error is still there.
Conclusion
To sum up, the DNS_Probe_Started error is a common type of DNS error. You may encounter it due to a bunch of reasons but the most common is the wrong DNS settings on your computer. To remove this error, you can try out a few quick solutions even if you are not tech-savvy. These solutions will save you time and get you the easiest fix within minutes.
FAQs
What is a DNS Probe?
A DNS Probe is basically a tool that helps determine the strength between the hostname and its relevant IP address. It is responsible for determining how fast the server can fetch an IP address.
What Exactly Does the DNS Probe Error Mean?
It means that the probe is unable to start and cannot determine the performance of the DNS server. It can happen due to a number of reasons but the most common is the misconfigured DNS server or old DNS & browser cache.

PROMO
FREE Web Hosting
for Your Website