Featured Blog Posts
May 15, 2020
16 min Read
Getting Started With WordPress: the Definitive Guide for Website Owners for 2020
 Having trouble setting up your website with Wordpress? Fret not, we have come up with a comprehensive user guide on how to set up your website without paying a hefty fee for a designer or coder. Let's leap right in.
What Is WordPress?
 WordPress is an open-source content management system (CMS) that allows anyone with a computer and an internet connection to set up a website within a few minutes. The best feature of WordPress is that you don't need any programming skills to set up your website. Also, as the source code of the content management system is open for anyone to use or modify, there are plenty of plugins, themes, and other add-ons available for website owners to empower their sites with more functionality. If you wish to set up a personal blog, an ecommerce storefront for your new drop shipping project, or a business website for your agency, you will very likely find your desired solution in WordPress regardless of your goals.
Why Is WordPress So Popular?
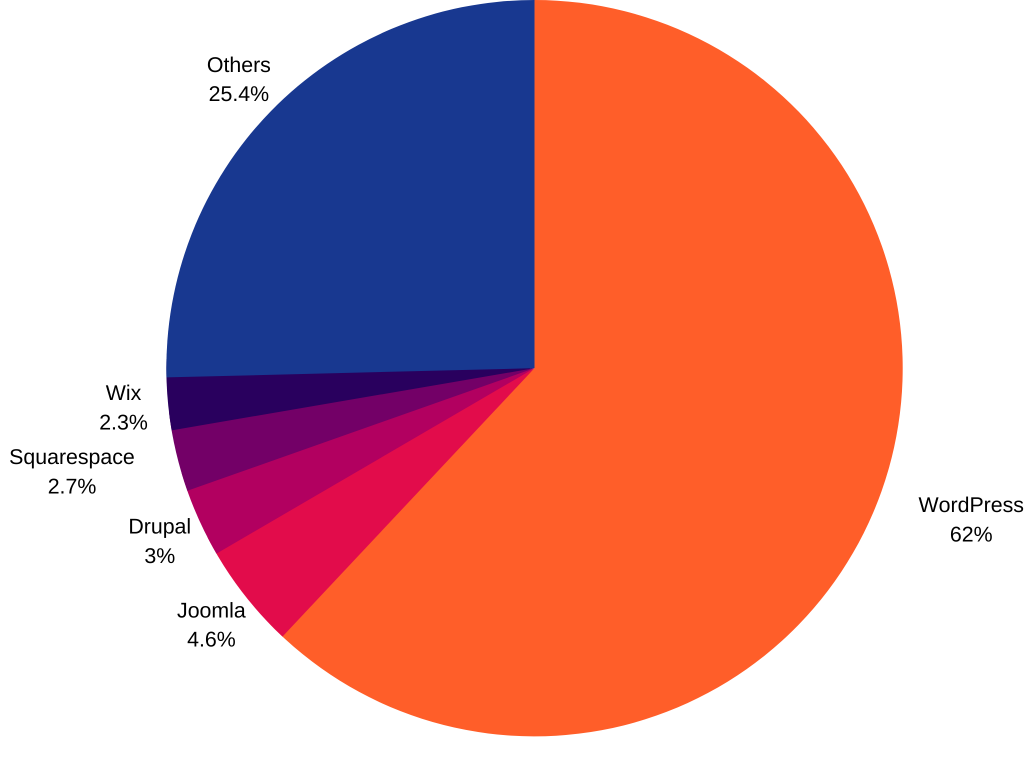 Image Caption: CMS market share According to Kinsta, WordPress is by far the most popular website platform. Based on the organization's data, 35% of all websites use WordPress while the software has a market share of 62% among content management systems. Kinsta's data shows that WordPress has massively outpaced its competitors as the second most popular CMS software, Joomla, only has a market share of 4.6% among content management systems. With such a great market share, you may wonder why WordPress is so popular among website owners. The first reason is that WordPress is a free software. To install it on your website, you only need a web hosting service and a domain name to get started. You don't need to pay anything for using the software. Secondly, as WordPress is an open-source software, developers can easily create their own plugins, themes, and other add-ons for the CMS. As a result, there are thousands of free and premium themes that you can choose from to give your website a professional look. Add-ons like plugins are essential parts of your WordPress journey. These apps empower your website with more features, allowing you to customize your site to suit the needs of your visitors. Hence, this allows Wordpress to meet most of the users' requirements without the need for any coding skills.
 How to Install WordPress: the Ultimate Step-by-Step Guide
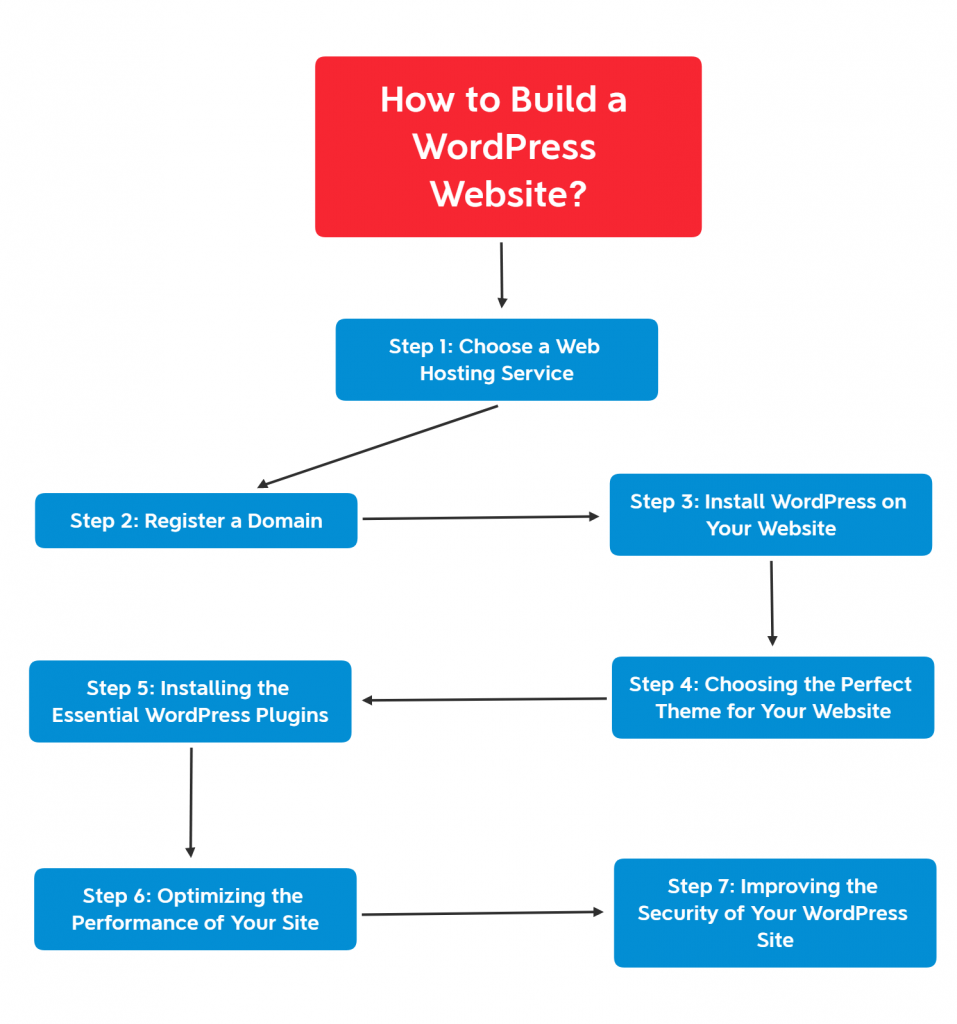
Now that you know the essentials about the CMS software, it's time to get started with WordPress. In this section, you will find a comprehensive tutorial that guides you through the exact steps you need to take to set up and manage your first WordPress website. Let's dive in!Step 1: Choose a Web Hosting Service
 The first step to building your WordPress website is choosing an excellent web hosting service. A web hosting solution is an essential part of building your website as it houses all your site's data on its servers. By offering the necessary technology and tools to operate your website, the hosting service allows people to find, visit, and access your site on the web. Web hosting service providers usually offer multiple packages you can choose from to operate your site. One of the most popular solutions is shared hosting, where you use the same server with other websites at a cost-efficient price. On the flip side, shared hosting has some limitations, such as slower performance as well as a maximum limit of monthly visitors (usually around 10,000-30,000 per month). With that said, unless you expect very high traffic for your website in the first months, shared hosting is one of the best ways to start a WordPress site. Even if your traffic grows exponentially in a short period, most service providers will allow you to switch to a more expensive hosting package (e.g., dedicated hosting) to handle your increasing user base. If you want to learn more about shared hosting and the different types of web hosting solutions, we highly recommend reading this article on the topic [Link to shared hosting article].
Step 2: Register a Domain
After choosing your preferred web hosting solution, the next step is to register a domain name for your site. After you have chosen your domain name, it's time to set it up with your hosting service provider. The first thing you should do is to check its availability, which you can do on your web host's platform. In case your domain name is available, you can proceed with registering it. Domain names are usually registered for a minimum of one year, and you should renew them before expiry to continue using them. When you register your domain name, most web hosting service providers will offer you some additional features in exchange for a bit higher price. One of them is WHOIS protection, a domain privacy service where the registrar replaces your personal data with its own. As your personal data is valuable, we recommend setting up WHOIS to avoid spam, phishing attacks, or other tactics cybercriminals use to exploit your personal information. With Z.com, you don't have to pay additional fees for WHOIS protection, as it is already included in your domain package. We won't charge you for ICANN fees either for domain registrations, renewals, or transfers. After you are finished with registering your domain, your web hosting service provider will activate your website for you, which usually takes a few minutes.
Step 3: Install WordPress on Your Website
Now that you have your web hosting package and domain name ready, it's time to install WordPress on your website.Step 3.1: WordPress Installation
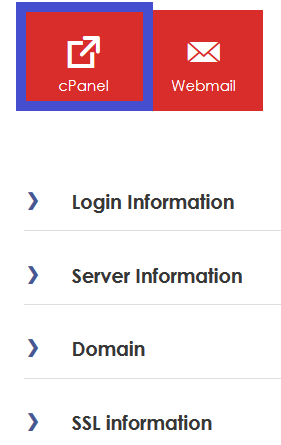 The first step to install WordPress on your website is to log in to your hosting account and then head to the section where your server is listed. After the initial setup, you will be able to login to your cPanel.
 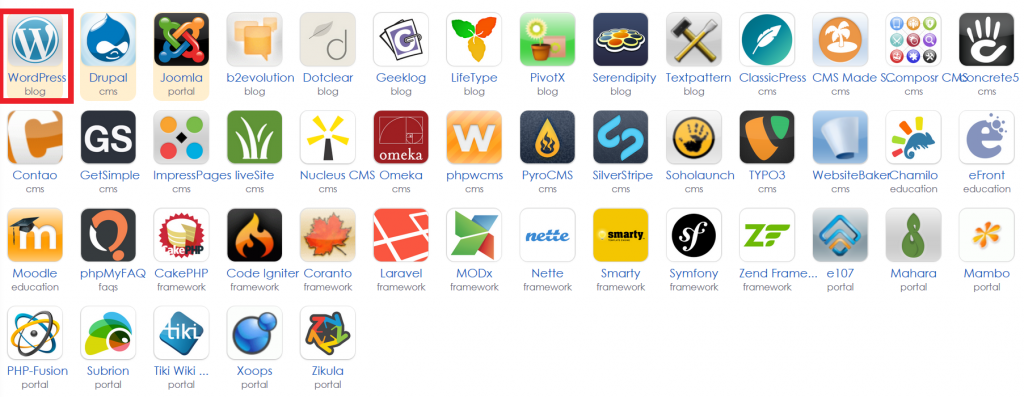 When you are inside your cPanel, scroll down to the “Web Applications” section and click “View More” next to “Featured Applications.” You can find WordPress in the “Apps for Content Management” section. Click on its icon to enter the setup page.
  On the setup page, click the “Install this application” button. After clicking it, the host will start installing the CMS on your domain, which shouldn't take longer than a few minutes.
Step 3.2: Initial WordPress Setup
When the host has finished with the installation, it's time to log into WordPress via your website's admin panel.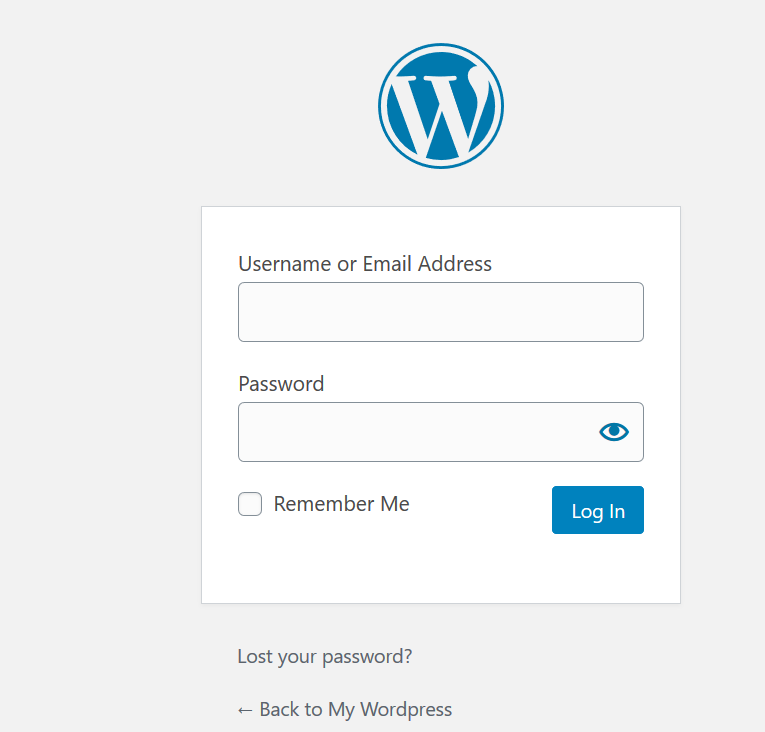 Fill out the form with your credentials to log in to your WordPress admin panel.Either your hosting service has provided the login details for you – which you should have received by email by now – or they are the same as the one you use for the web hosting platform.
 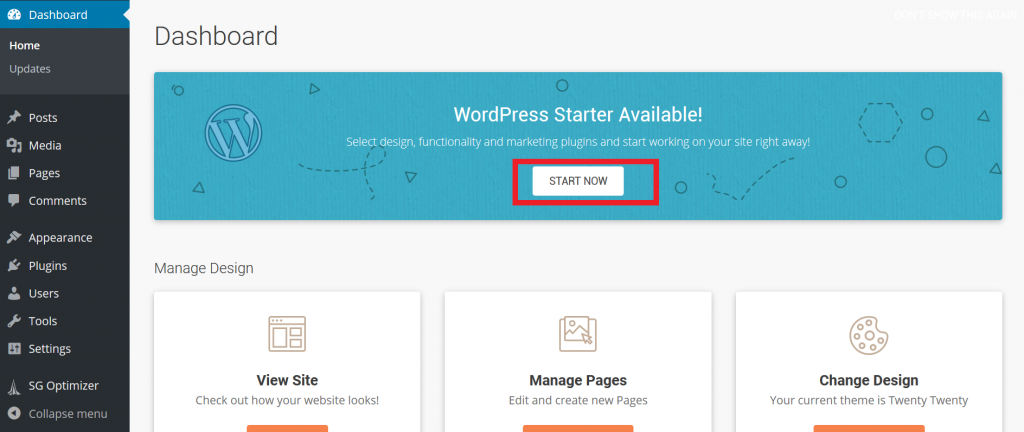 After logging in, we recommend going through the WordPress Starter setup you can find on the top of your dashboard. Click "Start Now" to begin the process.
  On the first screen, WordPress will ask you to choose a theme for your website. The CMS offers several basic themes for free you can use to get started with WordPress. For now, choose one that you like. You can always change your WordPress theme later, and we will explore this topic more deeply in the next section.
  The second step of your WordPress Starter setup is to select the plugins you want to install. From what the CMS offers in this setup, we recommend installing JetPack as it provides a wide range of features to website owners. However, as with WordPress themes, we will look more thoroughly into plugins later in this article.
 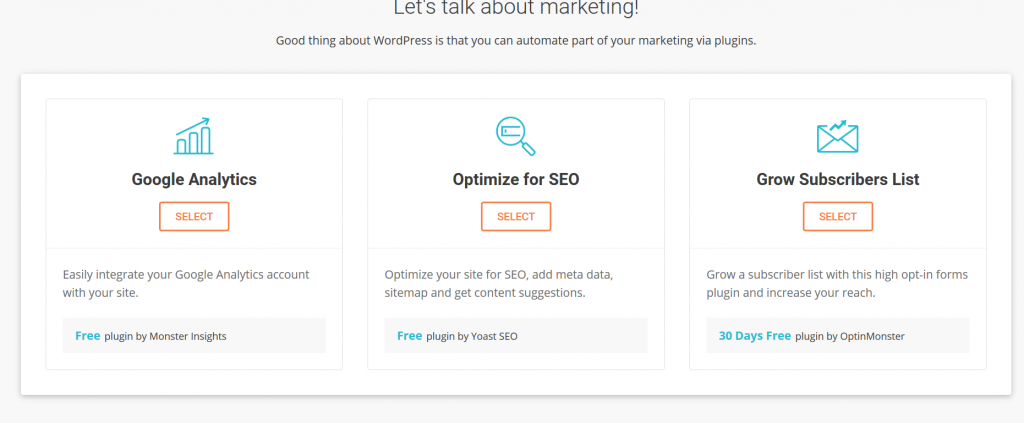 On the next screen, WordPress will give you the option to install some basic marketing plugins, which we will also cover in the next sections of the guide. When you are ready with the Starter setup, the last thing to do to get your WordPress website up and running is to update the software.
 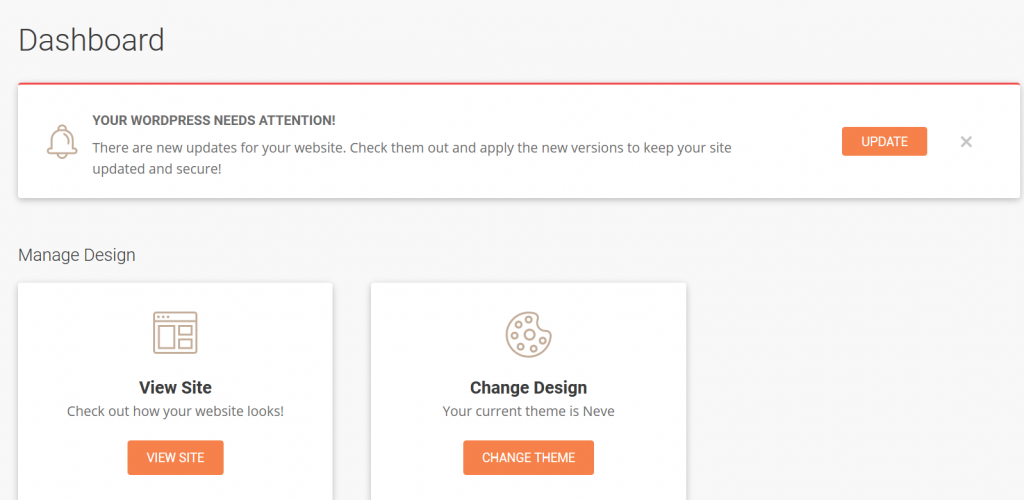 To do that, click the "Update" button on the dashboard to install the latest version of WordPress. After reaching this point, you have successfully installed WordPress on your website. Congratulations! However, your work does not end here. You need to choose a theme that best suits your needs and install the essential WordPress plugins to empower your site with more features. It's also crucial to optimize the speed of your website and improve its security. But don't worry, we will cover all these in the upcoming sections.
Step 4: Choosing the Perfect Theme for Your Website
Previously, you have chosen a basic theme for your WordPress website. This basic option should work great when you are starting out, but you should consider selecting a more professional theme that best suits your needs. Fortunately, you can select from thousands of WordPress themes. However, due to WordPress being highly customizable, not all themes cater to the same audience. For example, a WordPress theme that focuses on written content features could perfectly suit the needs of a personal blog or a news website. Still, it may be the wrong option for an ecommerce store that doesn't publish any articles or blog posts. Instead, that store may consider using WooCommerce, one of the most popular ecommerce platforms on WordPress. Therefore, it's crucial to choose wisely, especially when you are considering using a paid WordPress theme. Pro tip: Don't be afraid to select a premium WordPress theme for your website. Unless you need only a handful of features, we recommend purchasing a paid theme to get the most out of your WordPress site.Step 4.1: Things You Should Consider When Choosing a WordPress Theme
To help you in your decision, we have gathered the three most important factors you should consider when selecting between different themes for WordPress. Simplicity A great number of WordPress themes – even some of the most popular ones – are offering numerous features, such as complex layouts, tons of colors, and flashy animations, to suit the needs of all website owners. While it may seem like a good idea at first to choose a theme like that, it's better to strive for simplicity and usability. Themes with complex layouts often operate at slower speeds while offering a confusing user-experience to visitors. Pro tip: Know the features you want to have on your website beforehand and choose your WordPress theme accordingly to avoid issues with bloated themes. Responsiveness Nowadays, making a mobile-friendly website is not a luxury anymore but a mandatory requirement. According to Statista, mobile devices accounted for 52.6% of the total website traffic in the last quarter of 2019. By representing over half of the traffic, website owners can't ignore smartphone users anymore. Furthermore, if you want to score top results in Google Search, you have to optimize your website for mobile devices. Therefore, choosing a responsive WordPress theme is crucial for attracting mobile traffic to your website. Pro tip: Most WordPress themes are designed to be responsive by default. With that said, we recommend testing the demo page of your preferred theme with Google's Mobile-Friendly Test tool to make sure that the theme is properly optimized for smartphone devices. Plugin Support As mentioned earlier, plugins are crucial for WordPress sites as they provide additional features and functions to your website. Unfortunately, some WordPress themes are not compatible with a part of the plugins. Therefore, it's important to choose a theme for your WordPress website that supports all the popular plugins to avoid any plugin-related issues. Pro tip: Don't worry if the developer of the theme does not specify any information on plugin support. In such a case, send him a message to get things clear and avoid any issues with plugins.Step 4.2: Installing Your WordPress Theme
After you have chosen your WordPress theme (and made the purchase for premium themes), it's time to install it.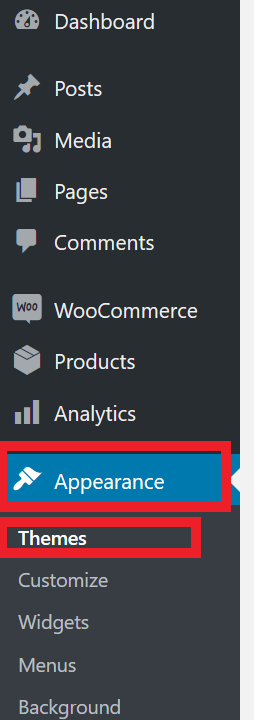 The easiest way to get your new WordPress theme ready is by clicking "Themes" inside the "Appearance" menu on the left side of the page.
  On the top of the page, you will see a button with "Add New" on it. Click it, then use the search bar on the top right side of the page to find your new WordPress theme.
  After you have found it, click "Install" and then "Activate" to get your WordPress theme ready. In some cases, you won't be able to find the WordPress theme you have just purchased from its creator. For such themes, you have to click the "Upload Theme" button instead of using the search bar to find your WordPress theme.
  Download the .zip file from the creator's website (or the store where you have purchased your theme). Use that file to upload and install your theme. If you have done everything right, you will see a message prompting that your theme was installed successfully. Click the "Activate" button below the message to get started with your new WordPress theme.
Step 5: Installing the Essential WordPress Plugins
Now that you have your theme ready, it's time to install some WordPress plugins to empower your website with useful features. However, you should be careful when installing plugins on your WordPress site. Having too many on your website could slow its speed, which decreases the overall user experience. Therefore, it's important to install only the essential WordPress plugins to take advantage of the additional features they provide while maximizing the performance of your site.Step 5.1: the Top 5 WordPress Plugins
We have listed some of the best WordPress plugins below:- Yoast SEO: Yoast SEO is simply the best Search Engine Optimization plugin out there for WordPress. Use it to get better rankings in Google, engage your visitors, and attract more people on your site.
- JetPack: JetPack is WordPress.com's comprehensive plugin that supercharges your website with a multitude of functions that ranges from improved customization to useful marketing features.
- Contact Form 7: It's crucial to provide a platform for your visitors so they can contact you with their questions. Contact Form 7 is a free plugin that allows website owners to create and manage highly customizable contact forms for WordPress.
- Monsterinsights: Even when you only have a handful of visitors on your site, gathering data on them is essential. Monsterinsights is a great plugin that provides you just that in the form of an integrated Google Analytics Dashboard.
- Google XML Sitemaps: Indexing your website helps search engines in discovering it. Google XML Sitemaps generates sitemaps and submits updated information about your website to major search engines.
Step 5.2: WordPress Plugin Setup
When you have finished choosing the plugins you need for your website, it's time to install them. You can do so by heading to the "Plugins" menu inside your WordPress dashboard. When you are there, click "Add New.”
 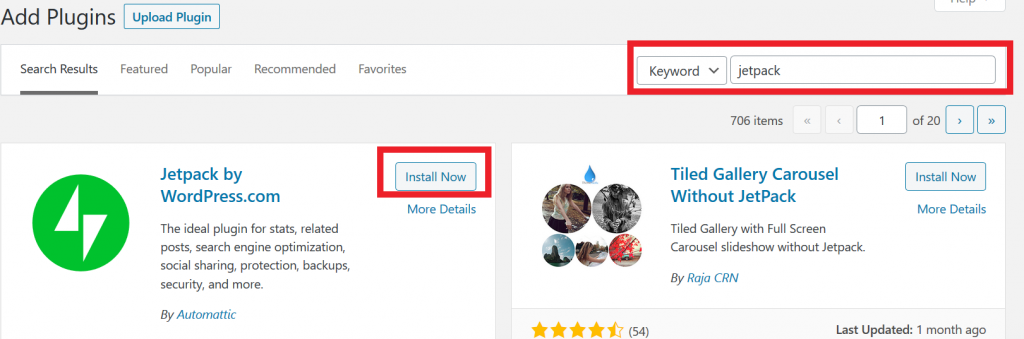 Type the name of your chosen plugin in the search bar at the top right side of the page and click the blue "Install Now" button. WordPress will need a few seconds to install it. And, like with themes, you need to click "Activate" to get the plugin live after installation.
  In case you can't find the plugin you need, then you have to download it from an external source and add it manually to your WordPress site. To do that, click "Upload Plugin" inside the "Add Plugins" menu, then choose the .zip file that contains the plugin you want to install and upload it to WordPress. After a successful installation, you need to activate it, just like you did during the normal installation process.
Step 6: Optimizing the Performance of Your Site
People don't like to wait. Therefore, you shouldn't test their patience with a slow website. A few seconds is enough – while your page is loading – for a significant percentage of your visitors to leave your site. Furthermore, if your website is slow, your conversion rates will suffer, you will have fewer sales, and Google will likely penalize you for long page load times. In summary, a slow website will lose you money. To avoid that from happening, you will need to optimize the performance of your WordPress site. Source: Google Page Speed Insights The first step to optimizing your page speed is to run a test via a tool, such as Google Page Speed Insights. After screening your site, the tool will provide you data on how it performs on both desktop and mobile devices. Follow the steps outlined on the page to optimize the performance of your site. Some of the common website speed issues include:
- Unoptimized images: One of the gravest mistakes new site owners make is uploading images without optimizing their size. As a result, their pages will take longer to load. To keep your site speedy, we recommend compressing all your pictures to find a good balance between image quality and size.
- Too many site extras: Extras, such as plugins, provide additional features to WordPress websites. However, having too many of them will make your site bloated, decreasing its performance. Be sure to keep only the essential ones and eliminate the others to achieve an optimal page speed.
- Data-heavy code: Some developers fail to optimize their CSS and JavaScript codes, which often results in slower website performance. To avoid such problems, you should always strive to use a high-performing WordPress theme where developers have eliminated all the unnecessary code.
Step 7: Improving the Security of Your WordPress Site
 While WordPress offers decent security to website owners, it's important to make sure that your site remains safe on the internet.
  One of the first things you should do is to keep your WordPress software updated. Checking the "Updates" menu and installing new software versions (for both the CMS and its plugins) will help you in preventing vulnerability issues. You can also update your WordPress plugins in the “Plugins” menu by ticking the box next to them and selecting “Update” from bulk actions then clicking “Apply.” It's also crucial to use a safe username and password combination to log in to both your WordPress and web hosting dashboard. The best way to ensure that your login credentials are secure is to use a password manager to generate and manage your passwords. To avoid losing any website data, it's essential to backup your WordPress site's data regularly. We recommend using a plugin to do that automatically. Pro tip: You can also consider installing safety-focused plugins, such as Wordfence, to improve the security of your WordPress site with additional security features, such as an endpoint firewall and a malware scanner. Again, you can find more information on security plugins in this article [Link to WP plugins article].
WordPress: a Powerful Tool to Build Excellent Websites
 In this article, you have learned all the essentials you need to build a WordPress website from scratch. However, your job shouldn't end here as you need to fill your website with content and market your site to attract new visitors. And believe us, that's the hardest part of the job. While you are working on that, it's essential to be efficient with your time. Therefore, if you haven't done yet, we recommend choosing a decent web hosting service that takes care of operating your site so you can focus on doing other tasks. We are providing a promotion at the moment. Click here to grab our cheap web hosting plan in the Philippines today!
PROMO
FREE Web Hosting
for Your Website
Learn More