How to Fix the Uploaded File Exceeds The Upload_Max_Filesize Directive In PHP.Ini. WordPress – 5 Easy Ways!
Are you here because you have encountered the maximum filesize error too? Many readers have been bothered by this issue, but don’t worry, they left with the problem resolved.
The maximum filesize error is a WordPress error that occurs because of the limited PHP memory. Almost every hosting provider sets up this memory limit upon initiation and it is stored on the web server. When you upload a file on WordPress that is larger than the set limit, it causes this error.
However, there is an easy fix. In fact, you will find not just one, but five effective methods in this blog to get rid of this error for good!
What is the Reason Behind the WordPress Maximum Filesize Error?
First and foremost, the maximum filesize error is not caused by incorrect settings on WordPress. Instead, it is an error in the php.ini file which contains the upload_max_filesize directive. If the upload_max_filesize limit is exceeded, then this error message is shown on the screen. This limit is usually set up by the hosting provider.
Most providers set a limit of merely 2MBs or 4MBs, which causes the error when you attempt to upload a file larger than this limit. The server recognizes the designated limit and throws the error.
How to Fix the Maximum Upload Size in PHP.ini?
A simple way to avoid this error is by increasing the file size limit. This can be done through various different techniques. Here, you will find 5 different methods.
1. Contact Your Hosting Provider
Your first instinct should be to contact your hosting provider. This will help eliminate any potential errors on your end and avoid complicating the error further. Plus, it is the easiest fix available, and it only takes a few minutes for the provider to get the job done.
However, your provider might ask you for the desired limit before increasing it. So, make sure that you know what changes you need and convey them to the hosting provider to get a better idea of what you want. They might even advise you on a better choice.
2. Edit the .htaccess File from CentOS Web Panel
This is the easiest way to increase the PHP memory limit. In these steps, we will be setting the memory limit to 256 MB. However, you can set it to any desired limit as per your requirements. The only thing you should be careful about is whether the hosting provider allows the desired limit for your system. So, it is best if you contact them before you make the changes.
- Go to the Web Panel and find File Manager.
- Locate the .htaccess file and press the edit option through right-click.
- Scroll down to the bottom of the screen and add,
php_value upload_max_filesize 256M
- Save the changes.
3. Edit the wp-config.php File from the Web Panel
Similar to the way that you tweaked the .htaccess file from the web panel, there is another file that can help you adjust the memory limit to your liking. It is the wp-config.php file that is part of the WordPress directory.
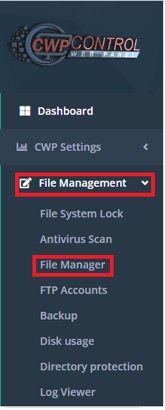
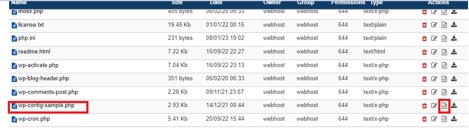
- Go to the Web Panel and locate File Manager.
- Find public-html and open it.
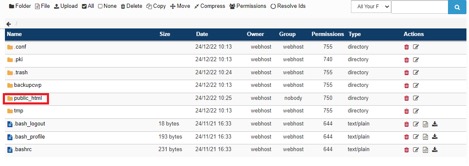
- Locate wp-configsample file and edit it.
- Edit the file and locate the line, “That’s all, stop editing! Happy publishing”
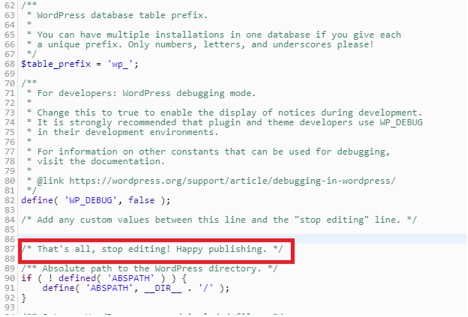
- Just before this line, add this,
![]()
![]()
- Hit the save button to add the changes to the system.
4. Update PHP.ini
This file already exists in the system as a default. It contains the configuration settings for all applications that require PHP to run. Inside this file, you can find all the relevant information that manages the size of uploads, file timeouts, and resource limits. This is why an error related to memory size can be traced back to this file.
However, it may not always be easy to locate this file on your system as its location is related to the web server installed by your hosting provider. Hence, you need to contact your hosting provider to locate and get permission to edit this file on your computer.
Once you have located the file, you can increase the memory limit as per your needs and then save those changes to remove the error.
For the CentOS Web Panel, you will find an editor to do the job.

5. Make Adjustments to PHP Configurations on Web Panel
You can also make edits in the PHP configuration through a Web Panel. Here is what you need to do:
- Log in to the Web Panel.
- Go to Advanced and then to PHP Configuration.
- Head to PHP Options.
- Find the upload_max_file and add the desired limit.
Conclusion
To sum it up, the upload_max_filesize directive is one of the most common errors that is not related to WordPress settings but pops up there. You can easily eliminate it yourself using the four effective solutions mentioned in the blog or contact your hosting provider for a better fix. All in all, you will have an increased memory limit within no time.
FAQs
What is the Best Limit for the PHP.ini File?
It depends upon your needs. Sometimes, the users may feel comfortable with 128MB while others prefer setting the file size up to 256 MB which is more than enough for most people.
Is it Better to Ask the Hosting Provider to Increase the PHP Memory Limit?
If you are not in a hurry, then you can contact the hosting provider. They will help you assess the situation and offer you the best option. However, the solutions mentioned are ways that have helped many customers with a self-fix. So, you can opt for the fix that is easier for you.

PROMO
FREE Web Hosting
for Your Website